Getting a train together, Diesel and Steam!

What is your latest project?
User avatar
Steven.T
Fireman
Fireman
Posts: 410
Joined: Sun Mar 13, 2011 5:56 pm
Location: Stockton

Post by Steven.T » Fri Apr 29, 2011 9:04 pm

After a brief trip to meet Brian (AKA MDLR) to collect some track, a few lengths were laid in the garden, some trucks rolled down it a few times and it was then put away :lol:
However a few pieces had some of the sleepers replaced, I haven't got any photos of these but they look almost new.
Anyway, a few photos to keep you all interested :lol:

Image

Image

This one shows a bit of the rebuilt track:
Image

And the whole rake of trucks + loco, this is all the stock I have at the moment;
Image

Hopefully I'll be ordering the radio system soon, so I will have full control over the loco rather than it just running away :roll: :lol:
Thats all for now.
Cheers,
Ste :)

User avatar
Steven.T
Fireman
Fireman
Posts: 410
Joined: Sun Mar 13, 2011 5:56 pm
Location: Stockton

Post by Steven.T » Sun May 08, 2011 9:26 pm

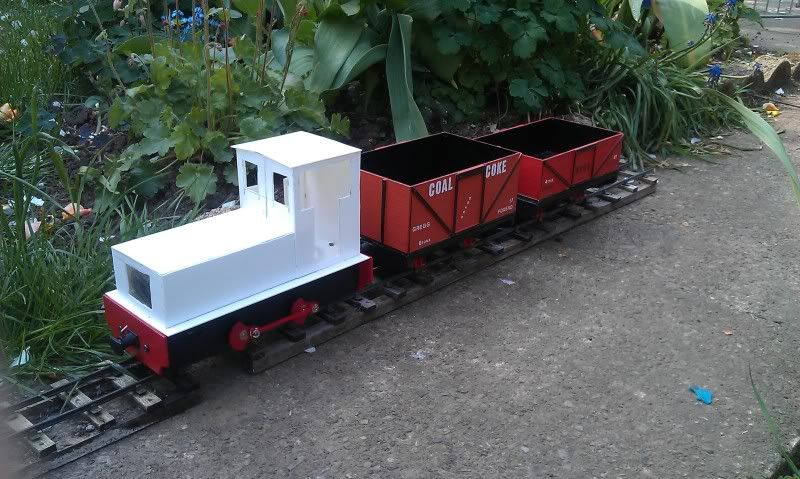
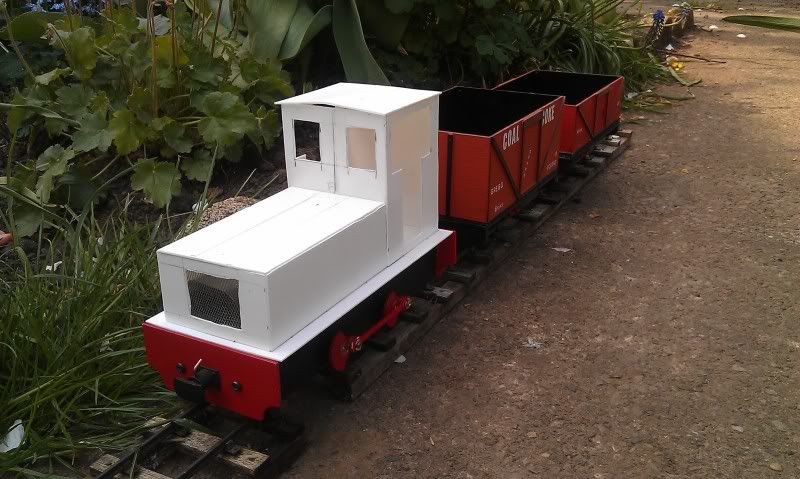
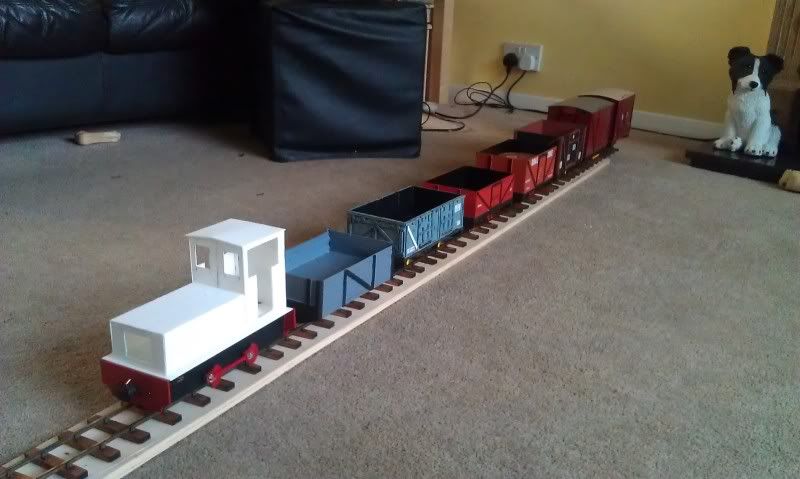
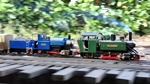
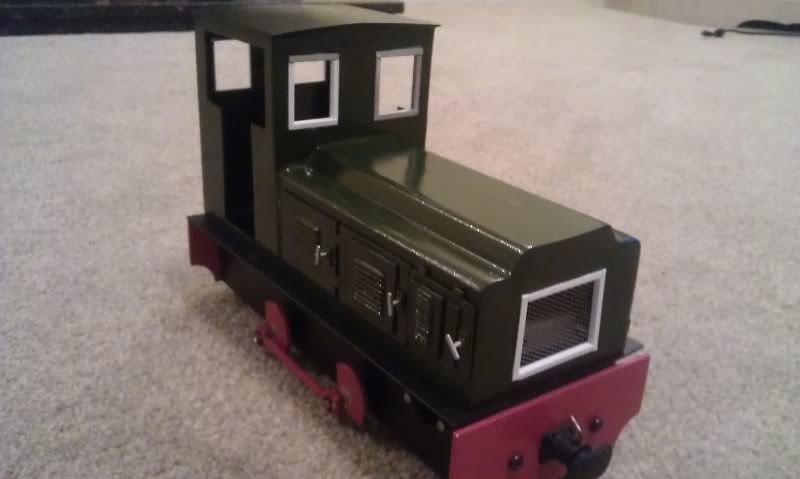
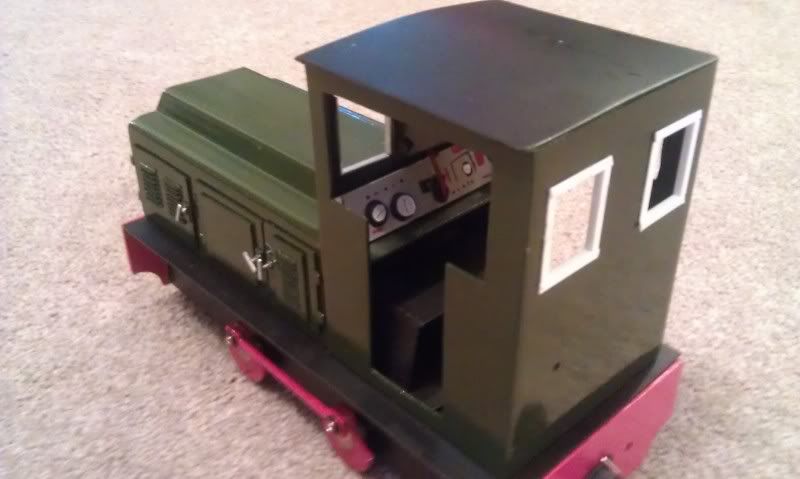
The loco had it's first run under radio control today, unfortunatley it wasn't the 2.4ghz set I've ordered, this hasn't arrived yet, so I used a 40mhz set instead, and to be honest, I've been pretty impressed with it's running :D
The traction has improved because of the weight of the battery and radio gear, so it now hauls the full rake of trucks with ease.
It also ran for 3 hours flat, only stopping when I went to grab some lunch, which took 5 minutes :lol:
And the squeaky noise has stopped, its amazing what a bit of oil can do :wink:
Heres a little video of it running, if you look closely enough you will also see Williamfj's stock running, and his little loco having a piggy-back in his truck :lol:

<object width="425" height="349"><param name="movie" value="http://www.youtube.com/v/jh9vWSywZwU?fs ... ram><param name="allowFullScreen" value="true"></param><param name="allowscriptaccess" value="always"></param><embed src="http://www.youtube.com/v/jh9vWSywZwU?fs=1&hl=en_US" type="application/x-shockwave-flash" width="425" height="349" allowscriptaccess="always" allowfullscreen="true"></embed></object>

Thats all for now,
Ste :)

mhlr
Retired Director
Retired Director
Posts: 4336
Joined: Sun Oct 21, 2007 8:16 pm
Location: Shropshire, England

Post by mhlr » Sun May 08, 2011 11:05 pm

Nice work mate! Bet that battery pack adds some nice weight to it. Will look great once its all painted up and detailed :P
Image

User avatar
Sir Clothem Cap
Driver
Driver
Posts: 1707
Joined: Sun Sep 26, 2010 8:45 pm
Location: Hampshire
Contact:

Post by Sir Clothem Cap » Mon May 09, 2011 8:18 am

That runs well, I would suggest that the driver could do with a rear view when you come to Detailing it.
Last edited by Sir Clothem Cap on Mon May 09, 2011 4:05 pm, edited 1 time in total.

User avatar
Steven.T
Fireman
Fireman
Posts: 410
Joined: Sun Mar 13, 2011 5:56 pm
Location: Stockton

Post by Steven.T » Mon May 09, 2011 3:53 pm

Thanks for the comments guys, it does run well, better than I had expected :)
Bryan, I will be adding rear windows, I'm just trying to devise a way of keeping them in line with the front ones!
I'm looking for a way to keep the body on the baseplate, I'm thinking some magnetic strips strategically placed in each corner should do the trick.
Cheers.
Ste :)

bessytractor
Trainee Driver
Trainee Driver
Posts: 677
Joined: Wed Nov 14, 2007 2:34 pm

Post by bessytractor » Mon May 09, 2011 3:58 pm

cracking bit of kit that, looks like an excellent runner, well done!
proudly flying in the face of convention

User avatar
Steven.T
Fireman
Fireman
Posts: 410
Joined: Sun Mar 13, 2011 5:56 pm
Location: Stockton

Post by Steven.T » Mon May 09, 2011 8:01 pm

Sir Clothem Cap:53251 wrote:That runs well, I would suggest that the driver could do with a rear view when you come to Detailing it.
Ask and you shall receive! The windows are now cut, just need a bit of rubbing down now :)

Image

Image

Image

Cheers,
Ste ;)

User avatar
Mrs F Controller
Fireman
Fireman
Posts: 433
Joined: Sat Mar 05, 2011 11:19 pm
Location: Essex, England
Contact:

Post by Mrs F Controller » Mon May 09, 2011 11:26 pm

Nice one! That's really come one. By the time you've dressed it up a bit and it's had a nice paint job it'll be lovely! Like your coffee stirrer wagon, my kind of modelling that is!!

User avatar
Sir Clothem Cap
Driver
Driver
Posts: 1707
Joined: Sun Sep 26, 2010 8:45 pm
Location: Hampshire
Contact:

Post by Sir Clothem Cap » Tue May 10, 2011 8:19 am

Thats far better Well done it will look great once it's painted.

User avatar
Steven.T
Fireman
Fireman
Posts: 410
Joined: Sun Mar 13, 2011 5:56 pm
Location: Stockton

Post by Steven.T » Thu May 26, 2011 6:40 pm

Some basic detailing has been scrambled together for the model recently, A mock Control panel has been made and two pressure gauges, throttles etc from Cambrian Models have been used. Also Horns, and a brake stand from Cambrian models have been assembled, I have also bought some handrail knobs and the bar, some 90 degree plastic section to go around the windows and grill, Oh, and some little LED Lights I plan to install as headlights :)
So, the control panel; the photo is a little blurry, it looks better physically, honest :lol:
Image

Image

And a new bonnet top has been bashed together, I'm a bit undecided, but it takes away the box-look of the loco, the horns are also seen at the top;
Image
Thats all for now,
Cheers,
Ste

Narrow Minded
Driver
Driver
Posts: 4650
Joined: Wed Dec 30, 2009 2:27 pm
Location: Forgotten Realms
Contact:

Post by Narrow Minded » Thu May 26, 2011 9:46 pm

I'd agree that the new bonnet top does work to break up the "boxy" look. :D
How about some thin plasticard access doors & wire handles for the sides? ;)
Image

User avatar
Steven.T
Fireman
Fireman
Posts: 410
Joined: Sun Mar 13, 2011 5:56 pm
Location: Stockton

Post by Steven.T » Thu May 26, 2011 9:54 pm

Narrow Minded:54107 wrote:I'd agree that the new bonnet top does work to break up the "boxy" look.  :D  
How about some thin plasticard access doors & wire handles for the sides? ;)
Thanks for the comments :)
I've got some louvres also from Cambrian but these aren't massive so I will be making some little access doors, and I also got some coach door handles so may use them on the panels :) I'm also considering making like a half-door for the cab, to stop the currently non existing driver falling out!
Cheers,
Ste :)

User avatar
Steven.T
Fireman
Fireman
Posts: 410
Joined: Sun Mar 13, 2011 5:56 pm
Location: Stockton

Post by Steven.T » Sat May 28, 2011 9:41 pm

Some Access panels and louvres were knocked up today for both sides, each is only held to the body with BlueTac at the moment. I've also added some little hinges and handles, just for good measure ;)

The left side;
Image

The right side, the eagle eyed out there may notice that the hinges are at the top on one of the panels, this is because I stuck the louvres on the wrong way round, and this was the only way I could fit it in :lol: ;
Image


Also, some rivets (yes, I am sad aren't I :roll: ) have been added to my coffee stirrer wagon;

Image

With any luck I should have a coat of primer on the Loco's body soon, to get it ready for it's main coat!
Cheers,
Ste :)

User avatar
Steven.T
Fireman
Fireman
Posts: 410
Joined: Sun Mar 13, 2011 5:56 pm
Location: Stockton

Post by Steven.T » Sun May 29, 2011 8:36 pm

And now in a coat of primer, awaiting a light rub-down to bring up any bad areas. As my Plasti-card cutting skills leave nothing do be desired a bit of filler is going to be needed in places, especially on the new bonnet top to hide the join :lol:
And as you can see an access panel has been cut in the top, so I can get access to inside the bonnet top, where a little LED is going to be housed :)

Image

User avatar
Steven.T
Fireman
Fireman
Posts: 410
Joined: Sun Mar 13, 2011 5:56 pm
Location: Stockton

Now in Green!

Post by Steven.T » Mon May 30, 2011 8:36 pm

And the loco is now in "BR Loco green", which funnily enough bears a similar resemblance to GWR Cow Pat Green...

Without Flash;
Image

With Flash;
Image

Image

Image

Cheers,
Ste

User avatar
williamfj
Trainee Driver
Trainee Driver
Posts: 605
Joined: Sat Nov 20, 2010 9:20 pm
Location: York

Post by williamfj » Mon May 30, 2011 9:39 pm

Looking good! 8)

User avatar
LMS-Jools
Driver
Driver
Posts: 1325
Joined: Thu Sep 25, 2008 9:24 pm
Location: Northwest UK

Post by LMS-Jools » Mon May 30, 2011 9:49 pm

Lookin Great :D 8)

User avatar
taliesin001
Driver
Driver
Posts: 1594
Joined: Mon Feb 08, 2010 8:04 pm
Location: Hampton Hargate, Peterborough

Post by taliesin001 » Mon May 30, 2011 9:55 pm

agreed, looks very nice and the colour suits it well

User avatar
Steven.T
Fireman
Fireman
Posts: 410
Joined: Sun Mar 13, 2011 5:56 pm
Location: Stockton

Post by Steven.T » Mon May 30, 2011 10:12 pm

Thanks for the positive comments guys, hopefully I will get the access panels and the other details on over the coming week :D

User avatar
Steven.T
Fireman
Fireman
Posts: 410
Joined: Sun Mar 13, 2011 5:56 pm
Location: Stockton

Post by Steven.T » Fri Jun 03, 2011 9:59 pm

After a few more coats of cow pat green (i'll stop now... :lol:) the panels were again added, edging around the windows and grill in place and the grills mesh put back. Also a few pieces have had a coat of Humbrol Metal Cote.

The pictures aren't the best but if I used the flash the green looks too light:

Image

Image

Image

Image

Image

I've still got the edging to paint in a grey-ish colour, and the Horns, handrails and cab-half-doors to add. I may be a real saddo and stick some rivets on in places! :shock: :lol:
Thats all for now,
Cheers,
Ste :)

Post Reply

Who is online

Users browsing this forum: No registered users and 0 guests