

Norinoo Jct. Railway

If operating is your thing, it does allow a lot of moves. Once you get the loco at the right end, one leg of the "Loop" can be a siding, either temporary or not.
And here's me suggesting you build more points( Switches) something I would shy away from ha! ha!, but full credit to your switch building mate.
P.S. don't know about the name. Don't want you detracting from your nice railway
And here's me suggesting you build more points( Switches) something I would shy away from ha! ha!, but full credit to your switch building mate.
P.S. don't know about the name. Don't want you detracting from your nice railway


Installed the switch this evening. Unfortunately the primer I bought to use on the short section between the end of the previous track install and the switch is more of a "red oxide" color than the darker brown previously used. Other than that, I'm happy with how things are progressing. Next up is to build a switch for the siding going towards the pond and the switch to complete the run around.


I've actually noticed less pressure is required on this switch to move it compared to the two other switches. They will all be manually operated. Keep in mind that I'm using code 250 aluminum rail. Can't say how brass or nickel silver rail in this code or larger would behave.LNR:116832 wrote:Dwayne, you're sure getting stuck into it.
Does the lack of a hinge in the point blades require much extra pressure on the change lever, which would be manual I presume?
I foresee converting the other two switches to this type as well at a later date.
I'm considering making the switch going to the Mags siding a wye... just for giggles.


-
Dannypenguin
- Trainee Driver

- Posts: 632
- Joined: Tue Feb 26, 2013 9:57 am
- Location: Forest of Dean, UK
- Contact:
I'm liking the fact you're building the points yourself, they look nice and well built 
Dan
Visit the PFLR website - http://poultonfarmlightrailway.webs.com/
Dean Forest Railway Society website - http://dfrsociety.org/
Visit the PFLR website - http://poultonfarmlightrailway.webs.com/
Dean Forest Railway Society website - http://dfrsociety.org/


Thank you Rik.
The first switch (a stub switch) I built was approached with trepidation. Once I got going and completed it, I was wondering why more folk don't build their own. It's very easy in our larger scales where the size of our equipment is forgiving of the small mistakes that may occur in the build process. Keep the track in gauge as it's assembled and everything comes together just fine.
The solid point style has become the version I prefer as they are easier to build with fewer parts. If I can do it anyone can.
-
Soar Valley Light

- Driver

- Posts: 1454
- Joined: Sun Dec 08, 2013 5:18 pm
- Location: North West Leicestershire
Dwayne,
Beautiful work, the quality of construction speaks for itself. It looks like you build them up on top of a template drawn out for the specific turnout but how do you set the radii?This is definitely the best way of fitting your railway where you want it, rather than fitting what you want around the limitations of standard 'off the shelf' alternatives. Well done!
Folks in General,
The correct British description of a track layout intended to get the loco from one end of the train to the other, using two turnouts and a parallel road, is a run ROUND loop. It allows the loco to run round from one end the train to the other. Running AROUND is an activity generally confined to over excited dogs and small children! Sincere apologies for being a pedant, I just can't help myself!
"Smith! Why do you only come to work four days a week?
"'cause I can't manage on three gaffer!"
"'cause I can't manage on three gaffer!"
Thank you. I just wing it without using a template. I gradually bend the rail to fit the space until I get it close to where I want it. From that point it's just a matter of bending the additional components of the switch to match up to the first piece of rail that was bent. Trial and error more or less. Here's a photo of my railbender...

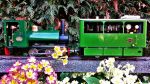
So today I installed the final switch for the run around siding down near Mags. Since the siding going off towards the small pond has been designated at Mags Siding, I decided to name the run around as Keylock Loop. With a bit of daylight remaining I plunked the Davenport down on the rails, hooked up the three tanker cars (sans the tanks) and ran the train around a bit. The climb up to Norinoo Junction from Mags was a piece of cake. I haven't determined the grade, but it climbs about eight inches in 18 feet.


Next on the agenda is to install two switches at Hope to get that planned run around in operation. I also need to determine where I want to have a siding for the engine shop located.
At the rate your moving ahead, I expected a shot of a loco and trucks any time now. Looks really good Dwayne, I'm sure you will have a lot of fun just pushing wagons around the Mags area.
I am envious of your soil type, how does it go when it gets wet? Looks like it might stay where you put it, unlike mine.
I am envious of your soil type, how does it go when it gets wet? Looks like it might stay where you put it, unlike mine.
One of the reasons I'm pushing to get the track down is to get it in place before the plants get growing in earnest. The soil where I am located consists of about a foot of sandy loam atop clay. It drains fairly quickly even during some of the heaviest downpours. Once the ground cover gets established the soil stays put.LNR:117014 wrote:At the rate your moving ahead, I expected a shot of a loco and trucks any time now. Looks really good Dwayne, I'm sure you will have a lot of fun just pushing wagons around the Mags area.
I am envious of your soil type, how does it go when it gets wet? Looks like it might stay where you put it, unlike mine.
This portion of my yard was landscaped for the express purpose of the layout and still needs to fill in. Ground covers are Periwinkle and Creeping Charlie. Both do well in shade as my backyard is heavily shaded by several pecan trees, silver maples, laural oak and post oak. This being year two for the ground covers, they should start growing steadily this year.
Who is online
Users browsing this forum: No registered users and 2 guests