A place for discussing battery-electric locomotives, whether they're diesel, steam or even electric outline
-
jez kirkwood
- Trainee Fireman

- Posts: 121
- Joined: Sat Nov 19, 2011 9:39 pm
- Location: forest of dean
Post
by jez kirkwood » Thu Mar 06, 2014 8:54 pm
Fowler never built any diesels in 15" gauge but they did build various designs in 2' gauge....
I'm planning a 'might have been' 15" estate railway loco based on this

The model will be built around an Accuaraft Baguley chassis which will be converted to battery power. Unlike all my other locos I 'm going to leave this one gauge adjustable (just in case I ever get invited to play at a broad gauge line!!). I've already turned the 'chimney' and it's base as these will form the speed control handle. I'm hoping this will be a relatively quick build, there's at least a chance it might be done for Waterfield Hall's next outing (York MRS at Easter)........
-
jez kirkwood
- Trainee Fireman
- Posts: 121
- Joined: Sat Nov 19, 2011 9:39 pm
- Location: forest of dean
Post
by jez kirkwood » Thu Mar 06, 2014 9:29 pm
Here are some pics of the chimney, they are both turned from old plumbing fittings, the stack itself is one piece and the base three pieces. As you can see the base is drilled ready for the speed control pot. The stack will have a length of brass rod soldered across the middle which locate in the slot on the shaft of the speed control pot. the flange on the base is shaped to fit the curved top of the bonnet and was attached with a large solder fillet all round which was then shaped back with a round file.


-
Big Jim
- Moderator

- Posts: 2694
- Joined: Sat Jul 06, 2013 5:28 pm
- Location: Near Llanelli
Post
by Big Jim » Fri Mar 07, 2014 8:28 pm
Good luck with the build.
I do like these locos. I don't suppose there is any real reason why Fowler didn't make any 15'' gauge I/c locos apart from not being asked to.
Go for it and keep the pics coming.
If at first you don't succeed, use a bigger hammer!
-
TTHLRMatt
- Fireman

- Posts: 321
- Joined: Wed Oct 26, 2011 10:20 am
- Location: South Shields
Post
by TTHLRMatt » Fri Mar 07, 2014 11:40 pm
This has tempted me over the edge. I have been toying with 1/12th for a while due to the fact I am a fireman at the SFR and own a loco in 15 inch. Think I may have to get on and build some kits!
-
laalratty
- Retired Director

- Posts: 3887
- Joined: Wed Jan 16, 2008 5:35 pm
- Location: Morecambe
Post
by laalratty » Sat Mar 08, 2014 8:30 pm
I'll be interested to see what this comes out like. There are a few rod drive 0-6-0 diesels out there in 15 inch, none look like that but I suppose had things been different they could have done
"What the hell is that?"
"It's a model icebreaker sir."
"It's a bit big isn't it?"
"It's a full scale model sir....."
-
TTHLRMatt
- Fireman
- Posts: 321
- Joined: Wed Oct 26, 2011 10:20 am
- Location: South Shields
Post
by TTHLRMatt » Sat Mar 08, 2014 8:47 pm
Maybe not regaugeable to 15 inch, but at the same railway my loco is housed out (my loco can go from 9.5 inch to 15), we are building (eventually) a passenger diesel which is going to be a fowler like the picture. We have a cab mock up for it and the cranks.
-
Dr. Bond of the DVLR
- Retired Director
- Posts: 4485
- Joined: Tue Jun 09, 2009 9:43 pm
- Location: Suffolk
-
Contact:
Post
by Dr. Bond of the DVLR » Tue Apr 01, 2014 3:47 pm
Really brilliant, sturdy looking stuff. Looks well put together!

The railway which people forgot
(to build)
-
TTHLRMatt
- Fireman
- Posts: 321
- Joined: Wed Oct 26, 2011 10:20 am
- Location: South Shields
Post
by TTHLRMatt » Tue Apr 01, 2014 8:55 pm
Jez, here is the cab mock up for our Fowler type diesel!


-
jez kirkwood
- Trainee Fireman
- Posts: 121
- Joined: Sat Nov 19, 2011 9:39 pm
- Location: forest of dean
Post
by jez kirkwood » Wed Apr 02, 2014 11:37 pm
Very nice Matt, what gauge is this going to be?
Well I spent an enjoyable few hours yesterday building up the radiator components, beautiful etches from Allen Law as usual. Tonight I finally figured out where to hide the forward/reverse switch, I turned a brass filler cap for the rad and soldered this to a length of brass rod which operates the switch. The switch will be hidden under the gearbox cover - which is next on the build list. The first pic shows the how the switch mechanism fits, the second pic shows the completed rad unit.


-
TTHLRMatt
- Fireman
- Posts: 321
- Joined: Wed Oct 26, 2011 10:20 am
- Location: South Shields
Post
by TTHLRMatt » Thu Apr 03, 2014 5:16 pm
It is primarily for 9 1/2 inch gauge but will be regaugeable to 10 1/4!
-
laalratty
- Retired Director
- Posts: 3887
- Joined: Wed Jan 16, 2008 5:35 pm
- Location: Morecambe
Post
by laalratty » Thu Apr 03, 2014 8:43 pm
That radiator is a work of art, very nice etch
"What the hell is that?"
"It's a model icebreaker sir."
"It's a bit big isn't it?"
"It's a full scale model sir....."
-
Peter Butler
- Driver

- Posts: 5266
- Joined: Sun Sep 09, 2012 10:33 pm
- Location: West Wales
Post
by Peter Butler » Mon Apr 07, 2014 11:39 pm
That's a classy piece of work there!
I do like your layout from the pictures I've seen. Well detailed and superbly finished. Should go down well at York.
-
Dannypenguin
- Trainee Driver

- Posts: 632
- Joined: Tue Feb 26, 2013 9:57 am
- Location: Forest of Dean, UK
-
Contact:
Post
by Dannypenguin » Tue Apr 08, 2014 8:05 am
Love the loco Jez

-
Big Jim
- Moderator
- Posts: 2694
- Joined: Sat Jul 06, 2013 5:28 pm
- Location: Near Llanelli
Post
by Big Jim » Thu Apr 10, 2014 12:17 am
That is a cracking job you have done there. You have really captured the prototype.
What livery will it be in?
If at first you don't succeed, use a bigger hammer!
-
jez kirkwood
- Trainee Fireman
- Posts: 121
- Joined: Sat Nov 19, 2011 9:39 pm
- Location: forest of dean
Post
by jez kirkwood » Sun Apr 13, 2014 10:12 pm
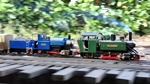
A quick phone vid of the loco running round the garden tonight, I still need to finish the cab interior and install the driver, fit the name and works plates and do some weathering.... But she runs, the vid shows her running at full speed on the 7.2v battery pack - taking nearly 4 mins to do a circuit of the garden. Looking forward to running on Waterfield Hall at York show this weekend..
http://youtu.be/WWJ6gH8AKeQ
-
williamfj
- Trainee Driver
- Posts: 605
- Joined: Sat Nov 20, 2010 9:20 pm
- Location: York
Post
by williamfj » Wed Apr 16, 2014 7:43 am
Very nice, I'm looking forward to going to the York show for the first time in years!

Who is online
Users browsing this forum: No registered users and 2 guests