A Bridge Not Far Enough (yet)

What is your latest project?
Post Reply
User avatar
RylstonLight
Trainee Fireman
Trainee Fireman
Posts: 209
Joined: Fri Oct 26, 2012 3:10 pm
Location: Pontefract West Yorkshire

A Bridge Not Far Enough (yet)

Post by RylstonLight » Sun Oct 06, 2013 9:15 pm

'Twas a sunny Indian Summer type-of Sunday afternoon; and it just begged for an afternoon outside.

I bought a girder bridege off Cain Howley at the last National Garden Railway Show; perversly I decided to make my own abutments rather than buying CHS's excellent bridge piers.

So I decided to carve two abutments from aerated concrete blocks this afternoon.

Image


And then voila:

Image


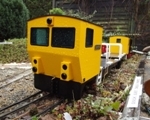
I palced it temporarily over the front path to see if the unfinished bridge fits the abutements:


Image


And with some smoke and mirrors:

Image


Later I did some more detailed carving of the walls to suggest coping stones, but the light was failing and not conducive to photography.

When I next get time I'll have to face with exterior filler and scribe stone courses. The bridge itself still needs final filling before painting and I might try to fake rivets. I did consider real rivets but drilling 780 holes in stainless didn't appeal.

If real-life doesn't re-assert itself to prevent I will try to update you on developments.
Andy S. at the Rylston Light Railway

User avatar
steamie1
Trainee Driver
Trainee Driver
Posts: 685
Joined: Tue Nov 13, 2012 11:04 pm

Post by steamie1 » Sun Oct 06, 2013 9:24 pm

Great stuff!

User avatar
Peter Butler
Driver
Driver
Posts: 5258
Joined: Sun Sep 09, 2012 10:33 pm
Location: West Wales

Post by Peter Butler » Sun Oct 06, 2013 9:35 pm

Most impressive.... I am looking forward to seeing further updates on this.

Big Al
Fireman
Fireman
Posts: 496
Joined: Wed Apr 04, 2012 3:43 pm
Location: Romford,Essex.

Post by Big Al » Sun Oct 06, 2013 10:37 pm

Looking good hope to see more of your progress on this project.
Allen Hopper - early retirement can't beat it !

gringodon
Cleaner
Cleaner
Posts: 30
Joined: Wed Aug 07, 2013 5:52 pm
Location: Round Lake, IL. USA
Contact:

Post by gringodon » Mon Oct 07, 2013 1:19 am

Very nice, please keep us updated.
Don Head
www.gringodon.com
May Garden Railroading be a lifelong passion.
and once again, I cut it twice and it's still too short

User avatar
Keith S
Driver
Driver
Posts: 1627
Joined: Thu Feb 24, 2011 11:44 pm
Location: Canada

Post by Keith S » Mon Oct 07, 2013 5:56 am

I don't think I've ever heard of "aerated concrete". It sounds handy.

User avatar
RylstonLight
Trainee Fireman
Trainee Fireman
Posts: 209
Joined: Fri Oct 26, 2012 3:10 pm
Location: Pontefract West Yorkshire

Post by RylstonLight » Mon Oct 07, 2013 9:06 am

Aerated concrete is known by different trade names around the world:
http://en.wikipedia.org/wiki/Autoclaved ... d_concrete

It carves easily and cuts with a simple wood saw (just don't use for wood afterwards) although I use a saw designed for cutting plaster board. It is very easy to chain drill, and most shapes can be produced if you think through the order.

It wasn't my idea, I discovered it on the internet in 1999, and produced my first bridge and building then. The bridge is still sound today. I painted mine with masonary paints to give more weather protection than they need in Aus. In fact some projects I have coated in exterior plaster and scribed that when "green"; this gives a more suitable surface to represent brick.

The originator I think was Greg Hunter:

http://www.members.optusnet.com.au/satr/hebel.htm
Andy S. at the Rylston Light Railway

jim@NAL
Driver
Driver
Posts: 1115
Joined: Sun Sep 23, 2012 11:01 am
Location: haverhill suffok

Post by jim@NAL » Mon Oct 07, 2013 9:02 pm

now I love that it looks fantastic well done

User avatar
RylstonLight
Trainee Fireman
Trainee Fireman
Posts: 209
Joined: Fri Oct 26, 2012 3:10 pm
Location: Pontefract West Yorkshire

Post by RylstonLight » Tue Oct 08, 2013 7:59 am

I did say that failing light prevented me photographing the abutment after carving the relief onto it. Here it is - next step is to coat with exterior grade polyfiller and then scribe when "green".


Image


If you are wondering how durable this technique is then here is an underbridge built in 1999. It is still in place today although the line that runs over is long since redundant. The bridge itslf is now overgrown with a shrub and difficult to photograph. The scribing was direct to the aerated concrete and then masonary paint applied.


Image


I made a number of errors. First I carved a broad shallow channal on the top of the block to form a low balustrade either side to which I drilled and fixed GRS turntable stantions. I was aiming for Tal y LLyn viaduct effect. This was one of my early attempts at 16mm and I still had "my eye in" for standard gauge and so I scribed the stonework far too small, and the balustade was far too narrow.

This resulted in the only failure with the stantions levering through leaving the bridge with a moth-eaten balustrade. The bridge has survived structurally intact and can bear my weight without any post-production care at all.

The "air-bubbled" surface is filled in with the masonary paint and doesn't give a bad appearance for dressed stone. However it is not as convincing for brick.

Brick is best simulated with a polyfiller coating such as this chimney on the pickle factory. This has has two seasons in the elements (awaiting a ressurected RLR)


Image
Andy S. at the Rylston Light Railway

User avatar
RylstonLight
Trainee Fireman
Trainee Fireman
Posts: 209
Joined: Fri Oct 26, 2012 3:10 pm
Location: Pontefract West Yorkshire

Post by RylstonLight » Mon Oct 14, 2013 5:45 pm

Last week I left with the upper block carved with the balustrade; during the week the lower block was carved to form a buttress. It was then coated with exterior filler; and the dressed stone coarses scribed on.

The whole was then coated in masonary paint and then weathered with craft acrylics. Moulded patress plates were then fitted.

The whole was taken outside (everyone should be married to a women that allows you to create an abutment in the sitting room!) and posed for a photo in the failing light.

Still have to sort out the opposite abutment and finish the bridge itself . . .


Image
Andy S. at the Rylston Light Railway

Big Al
Fireman
Fireman
Posts: 496
Joined: Wed Apr 04, 2012 3:43 pm
Location: Romford,Essex.

Post by Big Al » Mon Oct 14, 2013 5:56 pm

Looking very good so far.
Allen Hopper - early retirement can't beat it !

User avatar
Tom
Fireman
Fireman
Posts: 431
Joined: Sun Apr 25, 2010 3:54 pm
Location: Kent

Post by Tom » Mon Oct 14, 2013 6:22 pm

Lovely!
Cheers Tom

jim@NAL
Driver
Driver
Posts: 1115
Joined: Sun Sep 23, 2012 11:01 am
Location: haverhill suffok

Post by jim@NAL » Mon Oct 14, 2013 7:23 pm

wow wow wow I love it very good looks brill

User avatar
Peter Butler
Driver
Driver
Posts: 5258
Joined: Sun Sep 09, 2012 10:33 pm
Location: West Wales

Post by Peter Butler » Mon Oct 14, 2013 9:53 pm

That's a very clever idea and a brilliant result.

invicta280
Trainee Driver
Trainee Driver
Posts: 669
Joined: Wed Sep 21, 2011 9:24 pm
Location: kent england

Post by invicta280 » Mon Oct 14, 2013 10:33 pm

The rust streaks add that extra touch. Looks great.

Post Reply

Who is online

Users browsing this forum: No registered users and 3 guests