Goods Wagon from Busted Bricks

Announcements on new models and reviews should be posted here
Post Reply
User avatar
Busted Bricks
Trainee Driver
Trainee Driver
Posts: 750
Joined: Sat Jan 22, 2011 9:16 pm
Location: Denmark
Contact:

Goods Wagon from Busted Bricks

Post by Busted Bricks » Wed Feb 20, 2013 9:41 pm

Dear All,

I have just added a new kit to the shop. It is a modestly priced goods wagon, available in both 32mm and 45mm gauge. You can download the assembly instructions from the product page. It uses the same chassis as our flat bed wagon.

There is an intro offer running until end of March 2013: Buy two wagon kits and receive a free roof assembly jig.

Michael

http://www.bustedbricks.com/goods-wagon ... -169-p.asp

Image

User avatar
williamfj
Trainee Driver
Trainee Driver
Posts: 605
Joined: Sat Nov 20, 2010 9:20 pm
Location: York

Post by williamfj » Wed Feb 20, 2013 10:49 pm

Looks very good, I might have to buy a couple at some point. 8)

User avatar
MDLR
Driver
Driver
Posts: 4027
Joined: Thu Jan 15, 2009 10:38 pm
Location: Near Ripley, Derbyshire, UK
Contact:

Post by MDLR » Thu Feb 21, 2013 9:26 pm

Ordered one last night...................
Brian L Dominic
Managing Director
Flagg Fluorspar Co
www.mdlr.co.uk/ff.html

User avatar
MDLR
Driver
Driver
Posts: 4027
Joined: Thu Jan 15, 2009 10:38 pm
Location: Near Ripley, Derbyshire, UK
Contact:

Post by MDLR » Sun Feb 24, 2013 1:40 am

MDLR:80468 wrote:Ordered one last night...................
........... which arrived in the post yesterday. Got built, too (apart from the door hinges and latch on one side - that's today's job, together with painting).

I LIKE the way the axlebox bearings are held in place - there's no need for glue to get ANYWHERE near them! There are one or two places where a fraction more could do with being taken out of the lasered tabs / slots - I had to assemble the underframe with gentle taps from a small hammer, and don't even mention the buffers - I had to take a file to the holes in the buffer beam!

The roof (something I always have problems with) went on like a dream - the lasered "planks" made it bend quite nicely, there are a good number of cross-ribs to glue it to and a couple of large elastic bands helsd all in place.

Photos later today...................

Image

The only additions (standard for all MDLR builds) are the lamp brackets and document clip.


Image

View of the underside - the axle bearings sit behind the "ears" and are held in place by the 3-ply axlebox covers which are glued to the solebars: an elegant solution to the "problems" of axle alignment and glue in the bearings - no glue ever gets NEAR the bearings!

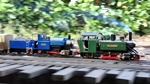
Good news - it's Flagg Fluorspar compliant! (ie it goes round the corners and goes through the arch!)
Brian L Dominic
Managing Director
Flagg Fluorspar Co
www.mdlr.co.uk/ff.html

User avatar
Busted Bricks
Trainee Driver
Trainee Driver
Posts: 750
Joined: Sat Jan 22, 2011 9:16 pm
Location: Denmark
Contact:

Post by Busted Bricks » Sun Feb 24, 2013 1:28 pm

Looks good Brian. Was it very humid where you assembled the kit or did you apply the glue and then wait a while before assembling the parts? Humidity makes MDF swell a bit. I assembled the kit used for the instructions from the same batch and had no problems with the parts fit. I don't put glue into any of the slots or onto the tabs normally (perhaps worht mentioning in the instructions?)

Michael

bazzer42
Driver
Driver
Posts: 1215
Joined: Sun Nov 25, 2012 1:37 pm
Location: Forest of Dean

Post by bazzer42 » Sun Feb 24, 2013 1:58 pm

16mm Today sent me to the website, I was planning on scratchbuilding some box vans but these make a great base to add some strapping and possibly tweaking the doors to open. I' ll be ordering a couple before the offer ends. Two quid is two quid!
Thanks for the review Brian. Do you know the axle diameter? Wondered about some flatties as a chassis for some open bodies.
Bazzer42

User avatar
Busted Bricks
Trainee Driver
Trainee Driver
Posts: 750
Joined: Sat Jan 22, 2011 9:16 pm
Location: Denmark
Contact:

Post by Busted Bricks » Sun Feb 24, 2013 2:36 pm

The axle diameter is 3mm. The doors are cut out already, only tabs where the simulated hinges/latch are located keep them in place. The tabs can be easily cut with a knife. I mainly designed it this way so there would still be a visible gap once the van is painted.

bazzer42
Driver
Driver
Posts: 1215
Joined: Sun Nov 25, 2012 1:37 pm
Location: Forest of Dean

Post by bazzer42 » Sun Feb 24, 2013 2:58 pm

Thanks Michael. I've got some bachmann wheelsets that need using up so those bronze bearings look a good buy. It will be nice to try a laser cut kit. I rushed in and bought a couple of kits with my Lady Anne and they look like they will need some serious fettling.
Bazzer42

User avatar
Busted Bricks
Trainee Driver
Trainee Driver
Posts: 750
Joined: Sat Jan 22, 2011 9:16 pm
Location: Denmark
Contact:

Post by Busted Bricks » Sun Feb 24, 2013 3:14 pm

You need a wider frame rail spacing for the Bachman wheels but as I have supplied chassis in the past to suit Bachman wheels I already have the cut files available.

User avatar
MDLR
Driver
Driver
Posts: 4027
Joined: Thu Jan 15, 2009 10:38 pm
Location: Near Ripley, Derbyshire, UK
Contact:

Post by MDLR » Sun Feb 24, 2013 5:09 pm

I'll mention that it would be easy to cut the doors out, fit dolls house hinges and make a catch, to make the doors open.................
Brian L Dominic
Managing Director
Flagg Fluorspar Co
www.mdlr.co.uk/ff.html

User avatar
Spule 4
Trainee Driver
Trainee Driver
Posts: 574
Joined: Fri Dec 28, 2007 9:32 pm
Location: Tennessee, USA

Post by Spule 4 » Sun Mar 03, 2013 3:06 pm

I really like the looks of the van, will consider it when I need another covered goods wagon.

Question, is there a chance of a small brake/gaurds van in the future? The IP basic one just does not look right to me and many of the others are too big compared to small IP/Mamod type stock.

Thanks!
Garrett

"Some say that Mamods have problems.  Whatever. I view them as opportunities for improvement."

User avatar
williamfj
Trainee Driver
Trainee Driver
Posts: 605
Joined: Sat Nov 20, 2010 9:20 pm
Location: York

Post by williamfj » Mon Mar 18, 2013 3:21 pm

I finally finished my pair on Saturday, and I found them to be very well thought out kits, with the chassis being particularly impressive. The only things I've added are lamp irons and vacuum pipes.

Image

User avatar
Busted Bricks
Trainee Driver
Trainee Driver
Posts: 750
Joined: Sat Jan 22, 2011 9:16 pm
Location: Denmark
Contact:

Post by Busted Bricks » Mon Mar 18, 2013 5:25 pm

They look really good! Thanks for sharing the picture. Do you mind if I post the picture on my blog? I have a category reserved for customers models. http://blog.bustedbricks.com

User avatar
Chris Cairns
Driver
Driver
Posts: 2366
Joined: Mon Oct 29, 2007 7:25 pm
Location: Glasgow, Scotland

Post by Chris Cairns » Mon Mar 18, 2013 6:27 pm

William those vans look great.

I like the way the way the planks have been highlighted. How did you paint or stain them?

Chris Cairns.

User avatar
williamfj
Trainee Driver
Trainee Driver
Posts: 605
Joined: Sat Nov 20, 2010 9:20 pm
Location: York

Post by williamfj » Mon Mar 18, 2013 7:38 pm

Thanks for liking the picture guys, it's a shame there was no sun though!

Busted Bricks: Feel free to use the picture and good luck with the business, I doubt that they'll be the last things I buy from you.

Chris: I brush painted them with Humbrol Acrylic and to keep the planking effect I ran a small flat head screwdriver down the gaps, it's not advanced but it works!

User avatar
Busted Bricks
Trainee Driver
Trainee Driver
Posts: 750
Joined: Sat Jan 22, 2011 9:16 pm
Location: Denmark
Contact:

Post by Busted Bricks » Mon Mar 18, 2013 9:41 pm

Spule 4:80798 wrote:
Question, is there a chance of a small brake/gaurds van in the future?  
Can you point me in the direction of a real one for inspiration? Always happy to expand the range but judging by the low sales most people prefer something less basic. However that market is already pretty full off offerings so I'll stay with basic kits.

spooner
Fireman
Fireman
Posts: 358
Joined: Sat May 01, 2010 12:21 pm
Location: Woodston,Peterborough

Post by spooner » Mon Mar 18, 2013 10:26 pm

Checkout the Glyn Vally Tramway example.
Ian
WLR

Post Reply

Who is online

Users browsing this forum: No registered users and 9 guests