Edrig + Tender
Edrig + Tender
Today I was thinking what I should do with the wheels and axle boxes (Mr.Bond had kindly given me) and decided I am going to build a tender for my edrig (Yet again inspired by Mr.Bonds regner loco + tender). The loco will be unmodified since they have an acess hole in the back sheet (as you all know). Hopefully progess will hppen soon (maths homeowrk keeps getting in the way).

-
taliesin001

- Driver

- Posts: 1594
- Joined: Mon Feb 08, 2010 8:04 pm
- Location: Hampton Hargate, Peterborough
http://www.summerlands-chuffer.co.uk/#/ ... 4535231705
How about something like this?, chris bird's tendered edrig, although he has altered the bodywork you wouldn't have to do this.
How about something like this?, chris bird's tendered edrig, although he has altered the bodywork you wouldn't have to do this.
-
Dr. Bond of the DVLR

- Retired Director

- Posts: 4485
- Joined: Tue Jun 09, 2009 9:43 pm
- Location: Suffolk
- Contact:
Haha jolly good- you'll have to name it after me 
My vincent tender is simply a flat bed with three sides of metal sheet bent arround it, two tool boses and some coal! Keep it simple for a first try deffo and if you want to make something more complex do after having a go first!
Sounds a brilliant project!
My vincent tender is simply a flat bed with three sides of metal sheet bent arround it, two tool boses and some coal! Keep it simple for a first try deffo and if you want to make something more complex do after having a go first!
Sounds a brilliant project!

The railway which people forgot
(to build)
-
taliesin001
- Driver
- Posts: 1594
- Joined: Mon Feb 08, 2010 8:04 pm
- Location: Hampton Hargate, Peterborough
tis would perhaps be something simpler, festiniogs england locomotive tenders, origional or rebuilt.
http://www.frheritage.org.uk/wiki/Princess
Or Covertcoats tender..
http://upload.wikimedia.org/wikipedia/c ... ercoat.jpg
http://www.frheritage.org.uk/wiki/Princess
Or Covertcoats tender..
http://upload.wikimedia.org/wikipedia/c ... ercoat.jpg
-
Dr. Bond of the DVLR
- Retired Director
- Posts: 4485
- Joined: Tue Jun 09, 2009 9:43 pm
- Location: Suffolk
- Contact:
It would look much better from metal, you can by small sheets from the hobby or craft shop which is expensive for the size you get but still quicker than ordering some great sheet from a Model engineering supplier and quite convenient.
Thin brass can be cut with scissors and can be bent to shape really easily. Rivets are easily punched into it and my 3 sided sheet was just glued on with epoxy resin! The two toolboxes help to hold the sheet inplace by providing a larger glueing surface area. I do like covertcoat's tender. I once had a lovely day helping to sand the rails between the loco and tender with the fall plate up on covertcoat!
Thin brass can be cut with scissors and can be bent to shape really easily. Rivets are easily punched into it and my 3 sided sheet was just glued on with epoxy resin! The two toolboxes help to hold the sheet inplace by providing a larger glueing surface area. I do like covertcoat's tender. I once had a lovely day helping to sand the rails between the loco and tender with the fall plate up on covertcoat!
The railway which people forgot
(to build)
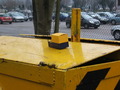
Thnaks for the idea Mr.Bond. I can get brass form my localish model shop (can only get there t weekends really) so might buy some brass then. I still going to build the wooden one (using cambrin rivets) and use that for now. Then buy some brass and try a metal one and if it works well use that and put the other one as a grounded rusty thing 
-
taliesin001
- Driver
- Posts: 1594
- Joined: Mon Feb 08, 2010 8:04 pm
- Location: Hampton Hargate, Peterborough
-
Endless, Nameless

- Driver
- Posts: 1156
- Joined: Mon Sep 29, 2008 6:56 pm
- Location: Plymouth
Take the backsheet off- it's 4 bolts which are the right size for the nut spinner that should have come with it. It'll look better in my opinion. Stick the bolts back in so you don't lose 'em- the middle pair also hold the rear bufferbeam on.
Matt
"The Ancient Greeks called it Pandora's box- but what they actually meant was Baldrick's Trousers"
"The Ancient Greeks called it Pandora's box- but what they actually meant was Baldrick's Trousers"
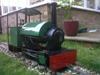
I have now uploaded a picture to my website. Follow this link and go to the bottom of the page:
http://parkwoodanddamemsrailway.webs.com/projects.htm
Detailing still to do (straping, boilts ect...)
Any comments welcome!
http://parkwoodanddamemsrailway.webs.com/projects.htm
Detailing still to do (straping, boilts ect...)
Any comments welcome!
-
Dr. Bond of the DVLR
- Retired Director
- Posts: 4485
- Joined: Tue Jun 09, 2009 9:43 pm
- Location: Suffolk
- Contact:
-
Dr. Bond of the DVLR
- Retired Director
- Posts: 4485
- Joined: Tue Jun 09, 2009 9:43 pm
- Location: Suffolk
- Contact:
Who is online
Users browsing this forum: No registered users and 1 guest