
I think that type of platform was more common than you think - the up platform at Berkswell between Birmingham and Coventry was like that until well into the early noughties.Seb_N&BLR wrote: ↑Mon Oct 25, 2021 11:40 am I’ve posted one of these photos elsewhere, but thought I’d join the fun here as well
I recently visited a friend in Gloucestershire and got talking about the many small halts that existed between Gloucester and Chalford up in the Stroud Valley, where the local auto train seemed to stop at every crossing and lamppost. Talk then turned to the Tetbury branch where in the late 1950s BR introduced the Waggon & Maschinenbau railbuses as an economy drive and opened a number of small halts built out of sleepers, basic in the extreme! I thought one of these platforms would be ideal for the garden and it wouldn’t look out of place when most passenger trains didn’t stop…
C4880C97-E079-488E-9B2D-4CA5EF755555.jpeg
A3ADA4EF-5914-48E4-9577-5BBD20C1F044.jpeg
The timber is various grades of stripwood painted with wood treatment and glued to a carbon board base; which I then buried in the ballast. The name board is just plasticard with a wood backing, and lettered using a white paint pen from Hobbycraft.
I may add a lamp but in some ways it works better without! Just need a railbus now…
So, what have you been up to with your railway?
Re: So, what have you been up to with your railway?
Phil
Sporadic Garden Railer who's inconsistencies know no bounds
My Line - https://gardenrails.org/forum/viewtopic ... 41&t=11077
Sporadic Garden Railer who's inconsistencies know no bounds
My Line - https://gardenrails.org/forum/viewtopic ... 41&t=11077
-
Old Man Aaron

- Trainee Driver

- Posts: 824
- Joined: Wed Oct 19, 2016 11:08 am
- Location: Sunshine Coast QLD, Australia
Re: So, what have you been up to with your railway?
Aye, a very rustic feel to it, will look even better as it weathers and the weeds set in. That hand(sign)writing is impressively tidy, nice work.  EDIT: I think it works best without the lamp, too.
Something I've been working on (though in the last 6 months I've only since primed it) has been this foamboard and styrene traffic office, modelled on the long-since demolished example at South Johnstone sugar mill. As sugar cane spoils quickly once cut, mills need a consistent flow of cane supplied 24 hours a day. Before computers and two-way radio, this was handled by the traffic office, communicating with loco crews by telephone and word-of-mouth.
Locomotives coming off shed would pull up at the traffic office, to receive the running sheet for that crew's shift. This told them how many empty trucks were to be taken from the yard at the mill, how many trucks had to be dropped off at the farms, where and when, etc. Same again for the return trip with loaded trucks. The building will stand on "concrete" (square styrene tube) stumps at about footplate height, and will include a basic interior and lighting.
Idea is to build a stockpile of small structures like this, to save time building the next garden line..
- IMG_8577.JPG (171.27 KiB) Viewed 5234 times
Regards,
Aaron - Scum Class Works
Aaron - Scum Class Works
-
Peter Butler

- Driver

- Posts: 5266
- Joined: Sun Sep 09, 2012 10:33 pm
- Location: West Wales
Re: So, what have you been up to with your railway?
Super job Aaron, really neat and tidy, a 'must have' for your cane line.
The best things in life are free.... so why am I doing this?


Re: So, what have you been up to with your railway?
Looks great!
I've been trying to figure out if you've indented the foam board to create the weatherboarding or used strips of styrene? Either way, it looks very effective.
Rik
I've been trying to figure out if you've indented the foam board to create the weatherboarding or used strips of styrene? Either way, it looks very effective.
Rik

Re: So, what have you been up to with your railway?
Aye, a good question Rik. If I didn't know Aaron's skills I'd have sworn it was a commercial moulding/extrusion of some sort!
Philip
-
Old Man Aaron
- Trainee Driver
- Posts: 824
- Joined: Wed Oct 19, 2016 11:08 am
- Location: Sunshine Coast QLD, Australia
Re: So, what have you been up to with your railway?
Thanks fellas, was quite taken by the prototype. Currently too tidy for a sugar mill!
The only commercial bits so far are the Jackson's Miniatures windows and doors.
Aye, the walls are indented. The boards were marked out in pencil, then the surface of the foamboard pierced with a blade, (taking care not to cut fully through) which provides a sharp, defined edge to the bottom of each board. Cutting the lines does however give the walls a tendency to bow inward, so they need extra bracing to keep them straight.
The wall and a straight-edge is then clamped to the bench, and a wide screwdriver used to emboss the foamboard. This particular stuff from Bunnings is very hard, and is quite slow and painful to emboss. So each wall takes me a few days to complete, but it gives a far-superior result to just scribing lines with the screwdriver.
- Merged_document.jpg (588.28 KiB) Viewed 5194 times
Regards,
Aaron - Scum Class Works
Aaron - Scum Class Works
Re: So, what have you been up to with your railway?
That’s very good, I really like the ‘lapped’ effect of the weatherboard walls. Top work Sir! 

Re: So, what have you been up to with your railway?
Not so much about what I've been up to, more a case of what I haven't been doing i.e. not doing proper maintenance. Over the weekend I removed all the buildings from my railway for their winter storage in the summer house and I was quite surprised at the deterioration that has happened this year. These buildings are all resin, built from kits supplied by two of the well-known manufacturers that frequent the major shows (I'm deliberately not mentioning any names) and have been outside for the summer for around seven or eight years. Generally each year there would be a few minor repairs to carry out, for example a chimney to reattach or maybe paint touching up here and there. This year however I'm going to have to do some serious repair work and virtually every building will need repainting. All my structures were assembled using exterior grade construction adhesive and in the main this has been very successful but this year a number of the joints have failed, the painting was done with masonry paint tester pots and again suddenly the paint has either faded or flaked off.
Now if this had happened on a gradual basis I could understand it but why suddenly this year? Has anyone else here experienced anything like this? I'm talking of a total of twelve or thirteen different buildings from small lineside huts to large engine shed sizes none of which are ever in direct sunlight. Interestingly none of my resin figures which are outside for the same periods have suffered with any deterioration.
Now if this had happened on a gradual basis I could understand it but why suddenly this year? Has anyone else here experienced anything like this? I'm talking of a total of twelve or thirteen different buildings from small lineside huts to large engine shed sizes none of which are ever in direct sunlight. Interestingly none of my resin figures which are outside for the same periods have suffered with any deterioration.
Phil
Re: So, what have you been up to with your railway?
I've not yet brought my resin buildings inside - in fact they usually stay outside the whole year round. Just checked my blog and the last time I repainted them was in the spring of 2014, so I think they're probably in need a bit of sprucing up again.
https://riksrailway.blogspot.com/2014/0 ... rt-52.html
Not inspected them yet, but they appear to be still intact.
Rik
https://riksrailway.blogspot.com/2014/0 ... rt-52.html
Not inspected them yet, but they appear to be still intact.
Rik

Re: So, what have you been up to with your railway?
Just catching up on this thread - what lovely work! Loving the wooden halt and the superb traffic office. The idea of building up a stock of generic buildings ready for the next railway is very good, should help to keep you motivated...
Re: So, what have you been up to with your railway?
Hello-excellent work going on there. Would you be able to tell me the floor to axle distance using the original wheelsets, as I am cooperating on a possible drop-in motorised axle?BWLR wrote: ↑Sun Oct 03, 2021 4:59 pm As a bit of a diversion I've recently been working on an Occre Soller Tram car kit. I've got a bit of a weak spot for trams like this...
Body and interior are complete and once the roof is done, I shall work on how best to motorise it. Probably going to be spring until,its finished as I will probably move onto some other projects in between!
IMG_1704[1].jpg
-
GAP

- Trainee Driver
- Posts: 692
- Joined: Sun Dec 23, 2012 10:34 pm
- Location: Bundaberg QLD Australia
- Contact:
Re: So, what have you been up to with your railway?
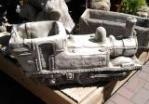
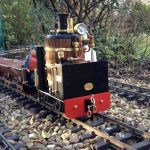
After a nearly 10 years hibernation I fired my "Ruby" live steamer.
There is more to running it than just switching on the battery and running it.
Just like the real thing it requires oiling, firing, water filling and watching to make sure it does not run out of water before the gas runs out. It is supposed to run out of gas first but mine seems to run out of water first.
Good practice for when I go for my steam ticket on the 1:1 locos at the railway in the botanical gardens here, I will need 150 hours in my log book as a fireman/driver and pass an exam to qualify.
Graeme
From the home of the Ringbalin Light Railway
https://ringbalin-light-railway.blogspo ... -page.html
From the home of the Ringbalin Light Railway
https://ringbalin-light-railway.blogspo ... -page.html

Re: So, what have you been up to with your railway?
Somehow, I don't think time on the Ruby, will count?


Re: So, what have you been up to with your railway?
My RH Fowler is also supposed to run out of gas before water, and when I enquired RH informed me on test it did, but after two years the water seems to go first, so much that I no longer trust it for a full run.GAP wrote: ↑Fri Jan 07, 2022 10:19 am After a nearly 10 years hibernation I fired my "Ruby" live steamer.
There is more to running it than just switching on the battery and running it.
Just like the real thing it requires oiling, firing, water filling and watching to make sure it does not run out of water before the gas runs out. It is supposed to run out of gas first but mine seems to run out of water first.
Good practice for when I go for my steam ticket on the 1:1 locos at the railway in the botanical gardens here, I will need 150 hours in my log book as a fireman/driver and pass an exam to qualify.

Re: So, what have you been up to with your railway?
That's actually a really good question, as while I have completed the body & roof I've not yet started on the underframe as I've been considering how best to motorise it myself! Having had a look at it this morning, I find there is a bit of a discrepancy in the kit with regard to axle height. The outside axleboxes (which are dummy ones) don't match height wise with the height of the axles if you fit them as per the instructions. The floor to axle centre is 26mm, while that on the axle boxes is just 21mm which I feel is going to look very odd. There is an extra 3mm spacing piece which I'm tempted to leave out to reduce the distance to 23mm which would look much better, however I'm slightly concerned about lack of clearance, so I'm going to experiment with it before coming up with a motorising plan. Actually I'd be interested to see what you are thinking of!DAVID L wrote: ↑Thu Jan 06, 2022 10:37 amHello-excellent work going on there. Would you be able to tell me the floor to axle distance using the original wheelsets, as I am cooperating on a possible drop-in motorised axle?BWLR wrote: ↑Sun Oct 03, 2021 4:59 pm As a bit of a diversion I've recently been working on an Occre Soller Tram car kit. I've got a bit of a weak spot for trams like this...
Body and interior are complete and once the roof is done, I shall work on how best to motorise it. Probably going to be spring until,its finished as I will probably move onto some other projects in between!
IMG_1704[1].jpg
Cheers
Peter
Bishops Woodland Light Railway - Youtube
-
GAP
- Trainee Driver
- Posts: 692
- Joined: Sun Dec 23, 2012 10:34 pm
- Location: Bundaberg QLD Australia
- Contact:
Re: So, what have you been up to with your railway?
Perhaps I could pass Ruby off as a simulator, aircraft pilots use them so why not me?
Graeme
From the home of the Ringbalin Light Railway
https://ringbalin-light-railway.blogspo ... -page.html
From the home of the Ringbalin Light Railway
https://ringbalin-light-railway.blogspo ... -page.html
Re: So, what have you been up to with your railway?
wheelsBWLR wrote: ↑Sun Jan 09, 2022 2:41 pmThat's actually a really good question, as while I have completed the body & roof I've not yet started on the underframe as I've been considering how best to motorise it myself! Having had a look at it this morning, I find there is a bit of a discrepancy in the kit with regard to axle height. The outside axleboxes (which are dummy ones) don't match height wise with the height of the axles if you fit them as per the instructions. The floor to axle centre is 26mm, while that on the axle boxes is just 21mm which I feel is going to look very odd. There is an extra 3mm spacing piece which I'm tempted to leave out to reduce the distance to 23mm which would look much better, however I'm slightly concerned about lack of clearance, so I'm going to experiment with it before coming up with a motorising plan. Actually I'd be interested to see what you are thinking of!DAVID L wrote: ↑Thu Jan 06, 2022 10:37 amHello-excellent work going on there. Would you be able to tell me the floor to axle distance using the original wheelsets, as I am cooperating on a possible drop-in motorised axle?BWLR wrote: ↑Sun Oct 03, 2021 4:59 pm As a bit of a diversion I've recently been working on an Occre Soller Tram car kit. I've got a bit of a weak spot for trams like this...
Body and interior are complete and once the roof is done, I shall work on how best to motorise it. Probably going to be spring until,its finished as I will probably move onto some other projects in between!
IMG_1704[1].jpg
Cheers
Peter
Hello Peter, I've actually been talking to Tim, who produces Appletree motor/gearbox units. I saw that other people have fitted them to Occre trams by making proper metal or 3D printed sideframes with functioning axleboxes. It looked to me that there might be a way of attaching the gearbox to the floor, so the axles would not make contact with the dummy axleboxes. This interested me because I have an IP railbus with a rough and noisy nylon worm gearbox which bolts to the floor and supports the motor and axles, so the sideframes do not locate the axles as in the standard Ocre setup. Comparing various models, IP, Occre, etc, it seems that he should be able to produce a mount to fit his gearbox so that the axles are 21mm from the floor. If this works it would be easy to drop one or two motors into a tram or railbus with no further running gear mods. I'll let you know if he is able to produce such a mount.
Re: So, what have you been up to with your railway?
I am building the OcCre San Francisco Streetcar, which has bogies, Apple Tree was my first stop, however due to the narrow bogies the Apple Tree will not fit. I also have an IP Railbus, and have looked and ordered the Dean Goods replacement gearbox for the Railbus. Still awaiting to receive the gearbox so cannot comment further.BWLR wrote: ↑Sun Jan 09, 2022 2:41 pmThat's actually a really good question, as while I have completed the body & roof I've not yet started on the underframe as I've been considering how best to motorise it myself! Having had a look at it this morning, I find there is a bit of a discrepancy in the kit with regard to axle height. The outside axleboxes (which are dummy ones) don't match height wise with the height of the axles if you fit them as per the instructions. The floor to axle centre is 26mm, while that on the axle boxes is just 21mm which I feel is going to look very odd. There is an extra 3mm spacing piece which I'm tempted to leave out to reduce the distance to 23mm which would look much better, however I'm slightly concerned about lack of clearance, so I'm going to experiment with it before coming up with a motorising plan. Actually I'd be interested to see what you are thinking of!DAVID L wrote: ↑Thu Jan 06, 2022 10:37 amHello-excellent work going on there. Would you be able to tell me the floor to axle distance using the original wheelsets, as I am cooperating on a possible drop-in motorised axle?BWLR wrote: ↑Sun Oct 03, 2021 4:59 pm As a bit of a diversion I've recently been working on an Occre Soller Tram car kit. I've got a bit of a weak spot for trams like this...
Body and interior are complete and once the roof is done, I shall work on how best to motorise it. Probably going to be spring until,its finished as I will probably move onto some other projects in between!
IMG_1704[1].jpg
Cheers
Peter
Re: So, what have you been up to with your railway?
Hi David, That is interesting as I was thinking about Appletree, so will await developments! By coincidence I also have a IP railbus which needs a better power unit, its a bit noisy but the main issue is that it won't go up one of my gradients without a bit of help. It was one of the first 16mm models I built a few years a go, and has been relegated to being a shelf queen, but I was intending to upgrade it.DAVID L wrote: ↑Mon Jan 10, 2022 5:35 pmwheelsBWLR wrote: ↑Sun Jan 09, 2022 2:41 pmThat's actually a really good question, as while I have completed the body & roof I've not yet started on the underframe as I've been considering how best to motorise it myself! Having had a look at it this morning, I find there is a bit of a discrepancy in the kit with regard to axle height. The outside axleboxes (which are dummy ones) don't match height wise with the height of the axles if you fit them as per the instructions. The floor to axle centre is 26mm, while that on the axle boxes is just 21mm which I feel is going to look very odd. There is an extra 3mm spacing piece which I'm tempted to leave out to reduce the distance to 23mm which would look much better, however I'm slightly concerned about lack of clearance, so I'm going to experiment with it before coming up with a motorising plan. Actually I'd be interested to see what you are thinking of!
Cheers
Peter
Hello Peter, I've actually been talking to Tim, who produces Appletree motor/gearbox units. I saw that other people have fitted them to Occre trams by making proper metal or 3D printed sideframes with functioning axleboxes. It looked to me that there might be a way of attaching the gearbox to the floor, so the axles would not make contact with the dummy axleboxes. This interested me because I have an IP railbus with a rough and noisy nylon worm gearbox which bolts to the floor and supports the motor and axles, so the sideframes do not locate the axles as in the standard Ocre setup. Comparing various models, IP, Occre, etc, it seems that he should be able to produce a mount to fit his gearbox so that the axles are 21mm from the floor. If this works it would be easy to drop one or two motors into a tram or railbus with no further running gear mods. I'll let you know if he is able to produce such a mount.
Bishops Woodland Light Railway - Youtube
-
Fred Mills
- New User

- Posts: 1
- Joined: Mon Dec 02, 2019 2:52 pm
Re: So, what have you been up to with your railway?
Hello out there...
Posting from Eastern Ontario, Canada; we are deep into the Winter season, with low temperatures, sometime dipping into the -20C range. So, there is nothing much happening out-of-doors, needless to say !!
We are however looking optimistically towards the 2022 Spring reopening of the IPP&W Railroad, by doing the maintenance on locomotives and rolling stock, in the workshop, indoors.
Check us out, if you care to on our Ottawa Valley Garden Railroad web page at: www.ovgrs.ca
One of the lads; Mike Hamer, maintains a blog, which keeps us all up-to-date on happenings...the link is on our web page, under "Mike's Blogs.
At the moment; I'm doing upgrades on a small fleet of old MDC Ore Cars; the ones that are from the same moulds as the ones currently being pedaled by Piko. They look and operate much better after being converted to Kadee body mounted 820 couplers. I'm also doing coupler conversions for a few other guys, mostly old Aristocraft freight cars, along with USTrains rolling stock.
I hope everyone is enjoying the idea and optimism of a great 2022 ahead of us...good health and happiness to you all.
Fred Mills send a note if the mood strikes....millsf@sympatico.ca
Who is online
Users browsing this forum: No registered users and 0 guests