That prompts me to share a couple of failures. Well I haven't used them so they are failures - but I have kept them because they are actually recoverable.
Note that it seems best to print roofs on end - ie front or back of the roof on the bed plate.
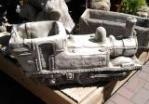
The first is a roof for the Ashbury 4 wheel coach. This was printed in two parts - the join is in the middle of the oil lamp. So just print the front half twice. This was printed at the default speed and temperature. There were numerous cracks in this. So serious that I could actually split it into sections while handling it. I think that the issue is to do with shrinkage as the part cools during printing. The central parts are thicker and perhaps retain the heat better than the thin edges which shrink away from the nozzle. I have glued the sections back together and filled the shrunken bits. I think I could use this one (but I subsequently made two better roofs):
- IMG_0829.jpg (255.1 KiB) Viewed 5037 times
- IMG_0828.jpg (329.8 KiB) Viewed 5037 times
The problem I was having was that at various heights the layers were not bonding properly to each other - and cracks were appearing at the edges - where it is thinnest.
So I think it is worth making roofs this way but it probably won't work first time. It might also be easier using PLA. The ABS I am currently using is renowned for being more difficult.
Now back to the bridge.
I have persuaded the ABS to stay down on the bed at the moment. The first 2 sections of the bridge deck are printed sanded and assembled. Oh and there is no detail to loose here and wood has grain flowing along the plane, so why not? The tops of things are always most in the line of sight:
- IMG_0827.jpg (291.77 KiB) Viewed 5037 times
More next week
Trevor