
The first piece of track laid always inspires more, there's no stopping now. If your screwing track I'm sure you know to allow for expansion, especially with your temps. Those Stainz locos, from what I've read are bulletproof and look good too, looked at them a few times myself.
Grant.
What to do with a tiny, barren wasteland?
-
GAP

- Trainee Driver

- Posts: 692
- Joined: Sun Dec 23, 2012 10:34 pm
- Location: Bundaberg QLD Australia
- Contact:
Re: What to do with a tiny, barren wasteland?
Aaron,Old Man Aaron wrote: ↑Sun May 17, 2020 3:41 am Cheers, fellers. Weirdly, those two weren't fussed by the state of the yard - if I'm honest, I was getting sick of seeing that mess.
17/05/20
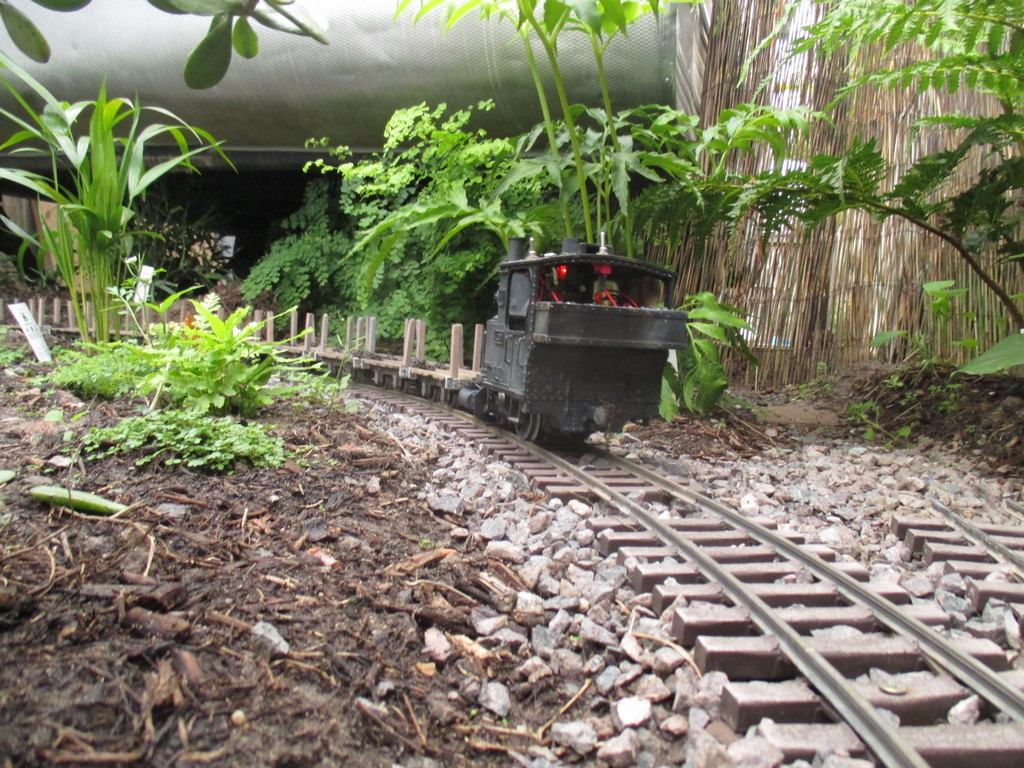
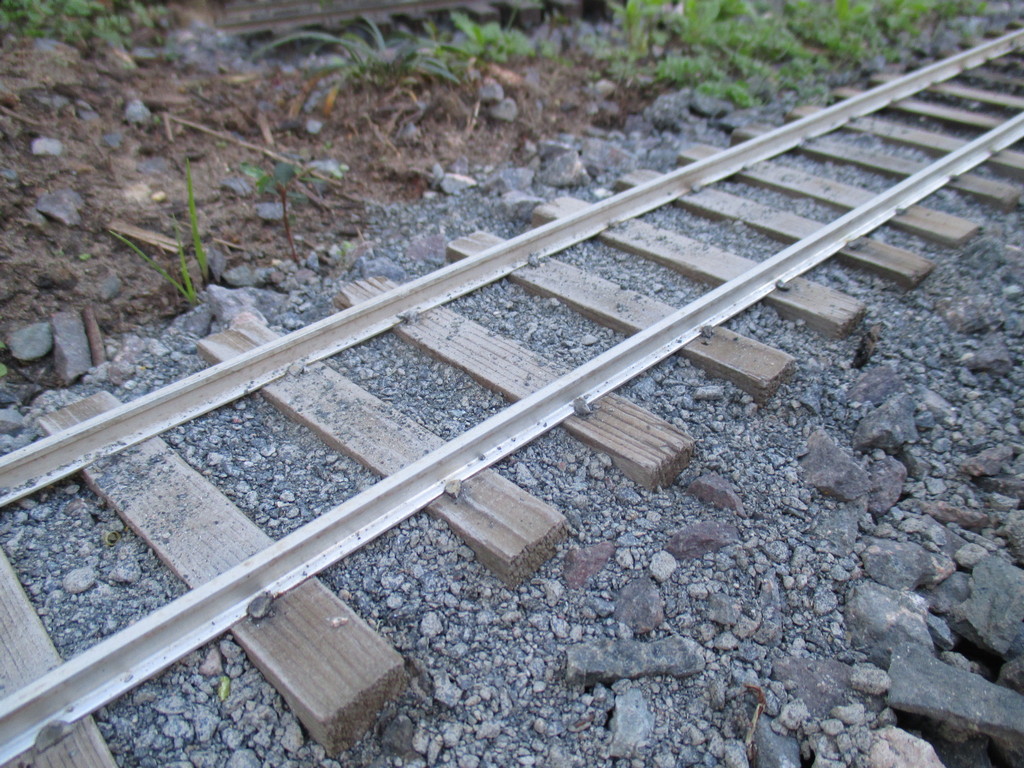
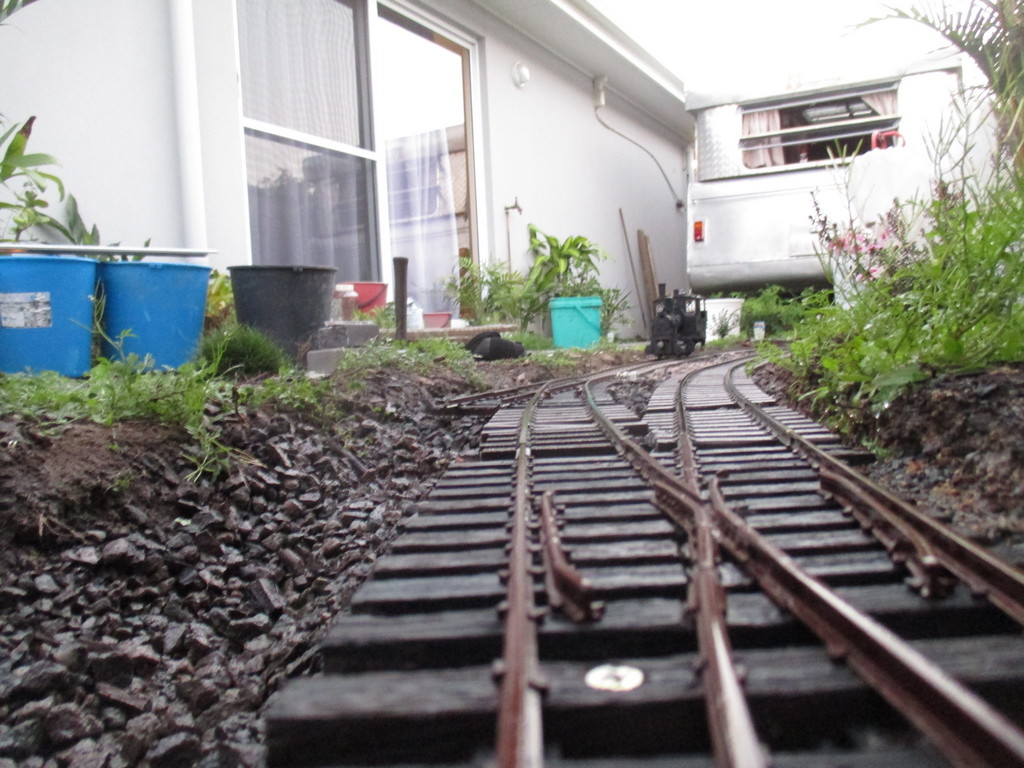
Some more plants delivered, (always need more though) and in trying to use up that pile of gravel (yes, I over-ordered again) I got to starting on the gravel-filled trench roadbed as well.
Mum's a bit of a "tropical enthusiast" and has a number of Dracaena plants, that I've noticed to resemble scale palm trees if kept small. To that end, I've been watering and fertilising them for some months, cultivating the offshoots. I've been doing the same with her Jade plants, which make reasonable miniature "trees".
I left most of these in their pots when I planted them. This will limit their size and make it easier to take them with us when we move out.
I must say, I like where this is going..
IMG_7256.JPG
Several feet away, the new workshop is slowly taking shape.
IMG_7262.JPG
Regards,
Aaron
Let one of the Dracaena plants grow tall and develop a thick trunk, when you cut it down you can strike the top for a new plant and the trunk when dried makes a good log load, it is light and the bark has a lot of character. I have a few that I am going to use on my log train.
Graeme
From the home of the Ringbalin Light Railway
https://ringbalin-light-railway.blogspo ... -page.html
From the home of the Ringbalin Light Railway
https://ringbalin-light-railway.blogspo ... -page.html
-
Old Man Aaron

- Trainee Driver
- Posts: 823
- Joined: Wed Oct 19, 2016 11:08 am
- Location: Sunshine Coast QLD, Australia
Re: What to do with a tiny, barren wasteland?
Now there's an idea. Might plant some offcuts in a spare pot around the back, for that.GAP wrote: ↑Wed Jul 22, 2020 8:05 am Let one of the Dracaena plants grow tall and develop a thick trunk, when you cut it down you can strike the top for a new plant and the trunk when dried makes a good log load, it is light and the bark has a lot of character. I have a few that I am going to use on my log train.
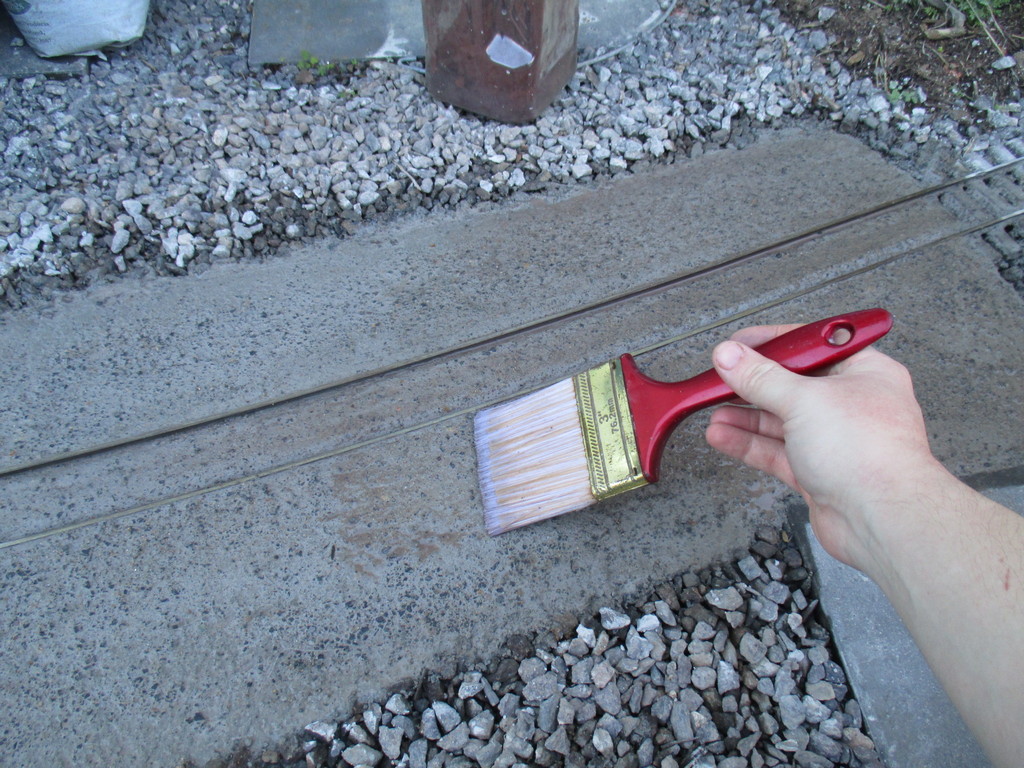
Aye, been eyeballing roughly 1mm gaps in each joint. That's every 2-5ft, which I think might be overkill, but what's the harm?
I've even seen a Stainz run through a pond and apparently keep going. Gross abuse of a loco aside, I'll throw my recommendation of Stainz' in the hat.
Bought a second used one some months back, newer version with the plastic Stephenson's motion. Plan is to rebuild that one as a Burrinjuck-style canefield Krauss. The old black Stainz, will be turned into something vaguely-Indonesian, and put to work as a timber mill loco.
In the meantime, there's all too much work to do. My Baldwin needs an on-rails test run, sorting some recently-surfaced teething issues after it's RH burner retrofit.
A rake of whole-stick cane trucks also requires testing after repairs - Three weeks back, the wind decided that my workshop que somehow wasn't long enough, blowing the rake from the elevated track at Zillmere. In any case, I'll need more track down before anything can be effectively tested.
Managed another five yards, between showers over the last two days. As the "Pommy Summer" set in again this afternoon, I figured a Pommy afternoon tea was appropriate - coffee notwithstanding.
- IMG_7547.JPG (238.73 KiB) Viewed 7129 times
Aaron
Regards,
Aaron - Scum Class Works
Aaron - Scum Class Works
-
Peter Butler

- Driver

- Posts: 5266
- Joined: Sun Sep 09, 2012 10:33 pm
- Location: West Wales
Re: What to do with a tiny, barren wasteland?
They look delicious Aaron, but nowhere near enough cream!
The best things in life are free.... so why am I doing this?
Re: What to do with a tiny, barren wasteland?
My track is all code 250 AMS brass Flextrack in 5ft. lengths and I have 2mm gaps in winter but that closes completely and pushes the odd curve in summer.Old Man Aaron wrote: ↑Fri Jul 24, 2020 11:31 am Aye, been eyeballing roughly 1mm gaps in each joint. That's every 2-5ft, which I think might be overkill, but what's the harm?
I'm with Peter, not enough cream. Mind you not what I need to see at 10-30 at night, now I'm hungry again !!
Grant.

Re: What to do with a tiny, barren wasteland?
Thats Aussies for you mate...Peter Butler wrote: ↑Fri Jul 24, 2020 12:22 pm They look delicious Aaron, but nowhere near enough cream!
ROD
Life is so easy when I run my trains.


https://gardenrails.org/forum/viewtopic ... 41&t=11364
https://www.youtube.com/@fairywoodlightrailway
Life is so easy when I run my trains.


https://gardenrails.org/forum/viewtopic ... 41&t=11364
https://www.youtube.com/@fairywoodlightrailway


Re: What to do with a tiny, barren wasteland?
Great progress on the railway, well done!
Nice to see Stainz in action too, I've got a soft spot for those. Your mention of one running through a pond reminded me of this: https://www.youtube.com/watch?v=TpcvUpymZgA
Cheers,
Andrew.
Nice to see Stainz in action too, I've got a soft spot for those. Your mention of one running through a pond reminded me of this: https://www.youtube.com/watch?v=TpcvUpymZgA
Cheers,
Andrew.
-
GAP
- Trainee Driver
- Posts: 692
- Joined: Sun Dec 23, 2012 10:34 pm
- Location: Bundaberg QLD Australia
- Contact:
Re: What to do with a tiny, barren wasteland?
[/quote]
A rake of whole-stick cane trucks
[/quote]
Aaron can I see pictures of the whole stick cane trucks as I have plans to make some to go behind my Stainz to look like an Australian cane loco.
A rake of whole-stick cane trucks
[/quote]
Aaron can I see pictures of the whole stick cane trucks as I have plans to make some to go behind my Stainz to look like an Australian cane loco.
Graeme
From the home of the Ringbalin Light Railway
https://ringbalin-light-railway.blogspo ... -page.html
From the home of the Ringbalin Light Railway
https://ringbalin-light-railway.blogspo ... -page.html
-
Peter Butler
- Driver
- Posts: 5266
- Joined: Sun Sep 09, 2012 10:33 pm
- Location: West Wales
Re: What to do with a tiny, barren wasteland?
Aaron, I apologise for hijacking this thread but, despite my search, I have failed to find a suitable heading to introduce the following message, which should be under...... Board index < Home cooking < Sweets and cakes
This is my preferred way of enjoying scones with raspberry jam, fresh raspberries and enough fresh whipped cream to make you say... 'STOP!'......
As you can see, I had already eaten the rest!
This is my preferred way of enjoying scones with raspberry jam, fresh raspberries and enough fresh whipped cream to make you say... 'STOP!'......
- IMG_7575.JPG (148.52 KiB) Viewed 7001 times
As you can see, I had already eaten the rest!
The best things in life are free.... so why am I doing this?
-
11thHour
- Trainee Fireman

- Posts: 116
- Joined: Mon Mar 26, 2012 4:00 am
- Location: Wodonga, Vic. Land of Oz
Re: What to do with a tiny, barren wasteland?
A rake of whole-stick cane trucks
[/quote]
Aaron can I see pictures of the whole stick cane trucks as I have plans to make some to go behind my Stainz to look like an Australian cane loco.
[/quote]
https://www.zelmeroz.com/album_model/ng ... estick.pdf
Tim
Re: What to do with a tiny, barren wasteland?
Thats more like it Arron....Peter Butler wrote: ↑Fri Jul 31, 2020 11:12 pm Aaron, I apologise for hijacking this thread but, despite my search, I have failed to find a suitable heading to introduce the following message, which should be under...... Board index < Home cooking < Sweets and cakes
This is my preferred way of enjoying scones with raspberry jam, fresh raspberries and enough fresh whipped cream to make you say... 'STOP!'......
IMG_7575.JPG
As you can see, I had already eaten the rest!
ROD
Life is so easy when I run my trains.
https://gardenrails.org/forum/viewtopic ... 41&t=11364
https://www.youtube.com/@fairywoodlightrailway
Life is so easy when I run my trains.
https://gardenrails.org/forum/viewtopic ... 41&t=11364
https://www.youtube.com/@fairywoodlightrailway
-
Old Man Aaron
- Trainee Driver
- Posts: 823
- Joined: Wed Oct 19, 2016 11:08 am
- Location: Sunshine Coast QLD, Australia
Re: What to do with a tiny, barren wasteland?
Regarding the cream, I must agree; I usually prefer double what I'd used, but had to stretch the cream as it was running out. Not something I often do, and not all brands will mix in properly, but a teaspoon of cream is also very good in coffee.
Peter, now that's the way to go. Thanks for the reminder - I've raspberries sitting forgotten in the fridge, will have to see if they're still edible..
That's very interesting to hear, Grant. Might have to lengthen my gaps, then. At some point, I noted a discussion on another forum having determined that the expansion of brass and aluminium rail to be roughly the same, and that it would expand by roughly 20mm over fifteen meters, between 0°C and 70°C.
Andrew, aye, I was thinking of that video, too. Can't help but feel sorry for that loco and wagons, being treated like that. Tried looking for the video I initially mentioned, to no avail. It involved a roughly 8" deep trough dug into the ground with pond liner, and filled with water. Track laid down the length of it, climbing up out onto the grass at either end.
Tim & Graham, here's the build log I wrote up when I built the rake of cane trucks years ago. https://anzaccreekworkshops.blogspot.co ... build.html
Whilst they run well, and I'm very happy with the finish, (which has since been improved with an airbrush) I feel they sit far too high, owing to my choice of axleboxes. Because the trucks' frames are balsa, I can't remove the existing 'boxes without destroying the frames. Plus, as I'd like a longer rake and other design changes, it's easier to simply start over. I've bought enough Binnie running gear (using Hudson skip axleboxes this time) for thirty trucks, and will re-design the frames - which will this time, be made of oak ripped down from planks, rather than using pre-milled balsa. To recoup some of the build costs, I'm selling the existing rake of ten trucks to a mate.
Would certainly love to see more cane modelling here - I daresay that insofar as variety of gauges, rollingstock, operations, infrastructure and scenery, Queensland's cane tramways are an Australian modelling equivalent of Welsh slate railways.
On to photos, anyway..
27/07/20
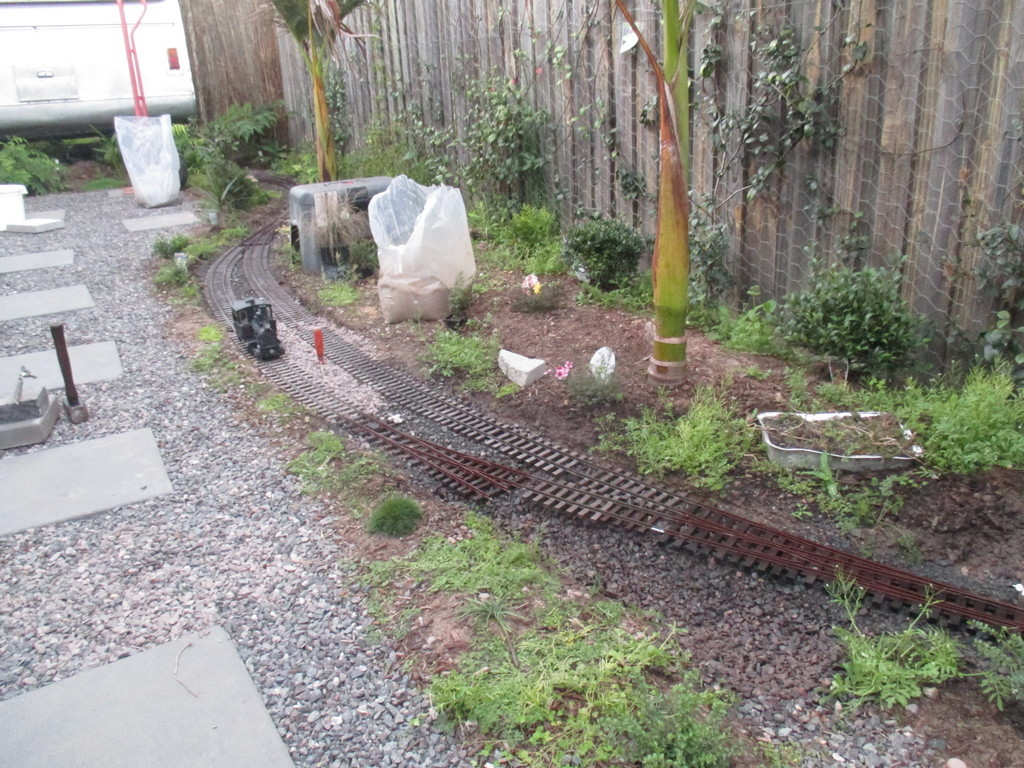
Another few yards are down, allowing for the first train on the tramway. The trucks were thoroughly tested at all speeds, pushed and pulled in both directions, loaded and empty, etc etc. Only problems were from some of the permanently-link-coupled trucks, (because they don't like being pushed) and the odd cane load snagging on weeds, which were subsequently trimmed.
The line to mid-right will be laid as part of Stage Two.
28/07/20
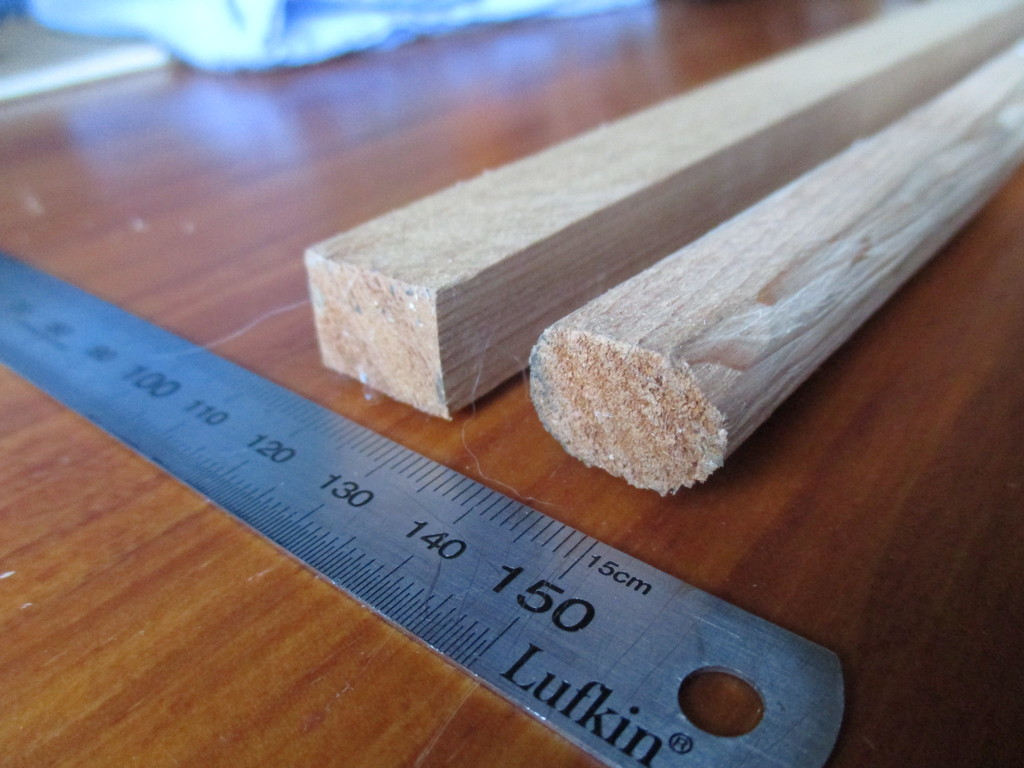
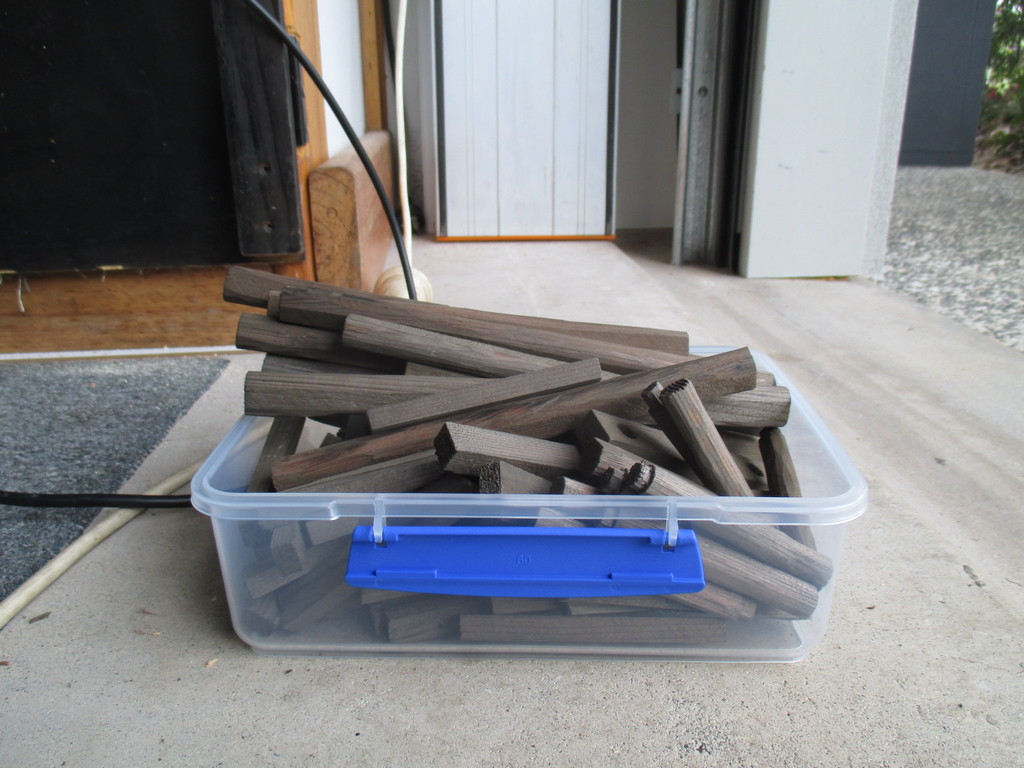
The bridge in the Southeastern corner of the yard will be built from cedar. When I built the handlaid track some years ago, I set aside a bundle of sticks ripped down from cedar planks, for use as point and bridge timbers. The term for of milling both sides of a log, so it doesn't roll away, is unknown to me, so unless anyone knows the correct term for it, I'll just call them "paralleled" logs. A pair of sticks had two sides each, whittled down to look like "paralleled" logs. Whittling's rather enjoyable, though I don't see myself carving anything more than miniature logs..

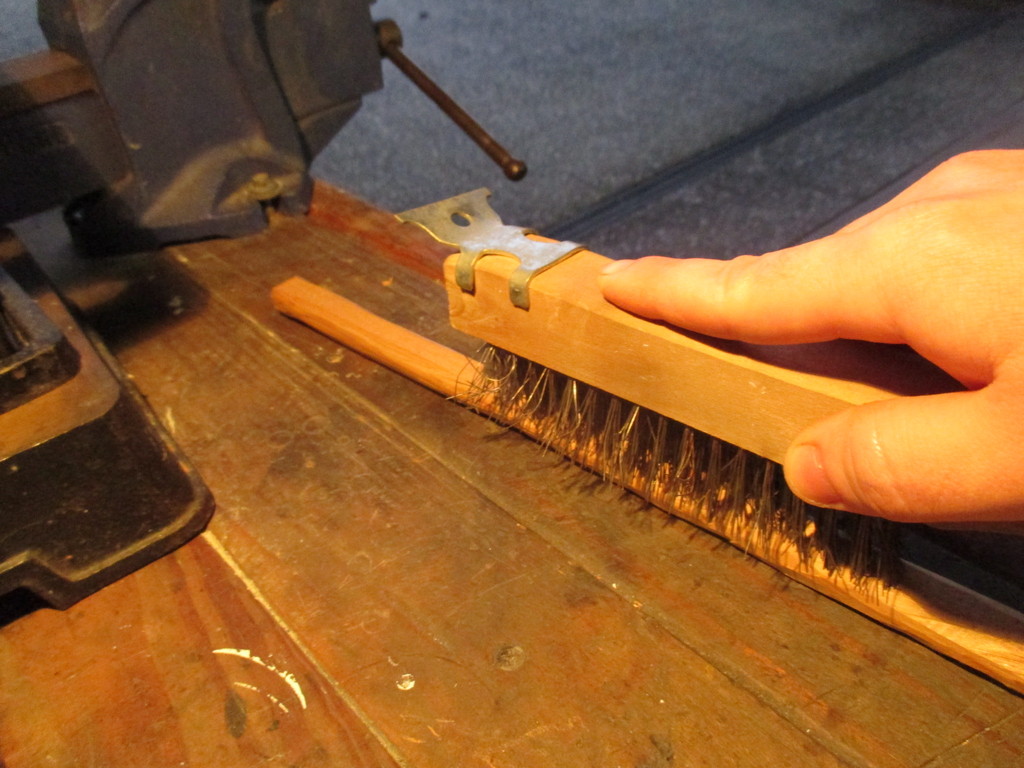
A scale grain effect was added with a wire brush.
30/07/20
One of the gas bottles is about empty, so I switched to the other bottle, and we'll have to order a replacement for the first, soon. In readiness for that, the crossings have all been concreted. In the initial batch of concrete, I used leftover gravel from the pathway, which was unsurprisingly too coarse for use between the rails. That was dumped elsewhere as fill, and a new batch mixed using crusher dust instead. The first crossing turned out very nicely. We'll see how it holds up once cured..
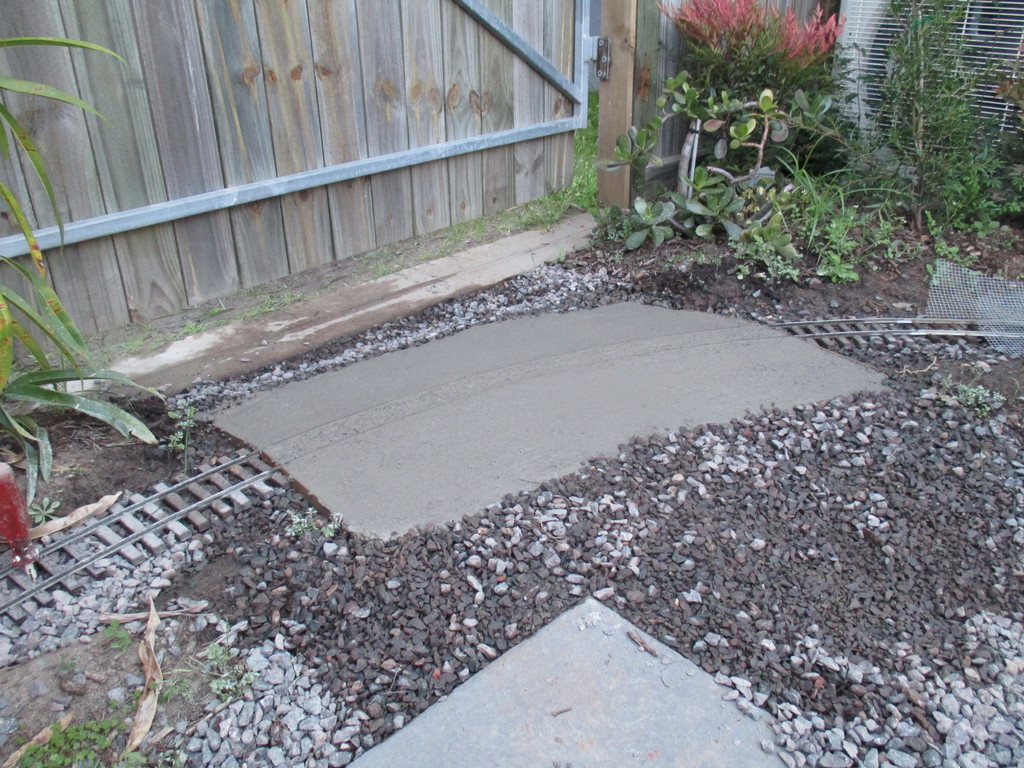
The second was awful. A new batch was mixed each time, and for whatever reason, this was the best surface finish I could manage.
The third came out somewhat better.
31/07/20
Once the crossings had turned "green", flangeways were carved with a screwdriver. The edges of each crossing were straightened, and the surfaces of the second two smoothed, somewhat. During mixing, I'd forgotten to add some brown oxide to tone down the starkness, so I thought I'd try mixing some oxide with water and brushed it over the partially-set concrete. Weather or not that works, remains to be seen.
Just to see how it looks, some crusher dust was spread over a short section. Looks great, but certainly too well-maintained in appearance. Will pack this lot down a bit, paint the rails, then apply the "proper" ballast mix, in time.
01/08/20
The remaining bridge parts have been made, and the stringers cut down to suit the curve where the bridge is to be assembled. Pre-weathering the components with the vinegar and steel wool method. In the past however, I've found that not all types of wood are affected by the treatment. Another pre-treatment deals with this - soak the parts in tea, and allow to fully dry, prior to the vinegar bath. Whilst I have stained cedar with the vinegar method, I don't remember weather it needs the tea or not. Easy enough just to do it anyway. Might throw the parts in vinegar/rust tomorrow.

Regards,
Aaron
Peter, now that's the way to go. Thanks for the reminder - I've raspberries sitting forgotten in the fridge, will have to see if they're still edible..
That's very interesting to hear, Grant. Might have to lengthen my gaps, then. At some point, I noted a discussion on another forum having determined that the expansion of brass and aluminium rail to be roughly the same, and that it would expand by roughly 20mm over fifteen meters, between 0°C and 70°C.
Andrew, aye, I was thinking of that video, too. Can't help but feel sorry for that loco and wagons, being treated like that. Tried looking for the video I initially mentioned, to no avail. It involved a roughly 8" deep trough dug into the ground with pond liner, and filled with water. Track laid down the length of it, climbing up out onto the grass at either end.
Tim & Graham, here's the build log I wrote up when I built the rake of cane trucks years ago. https://anzaccreekworkshops.blogspot.co ... build.html
Whilst they run well, and I'm very happy with the finish, (which has since been improved with an airbrush) I feel they sit far too high, owing to my choice of axleboxes. Because the trucks' frames are balsa, I can't remove the existing 'boxes without destroying the frames. Plus, as I'd like a longer rake and other design changes, it's easier to simply start over. I've bought enough Binnie running gear (using Hudson skip axleboxes this time) for thirty trucks, and will re-design the frames - which will this time, be made of oak ripped down from planks, rather than using pre-milled balsa. To recoup some of the build costs, I'm selling the existing rake of ten trucks to a mate.
Would certainly love to see more cane modelling here - I daresay that insofar as variety of gauges, rollingstock, operations, infrastructure and scenery, Queensland's cane tramways are an Australian modelling equivalent of Welsh slate railways.
On to photos, anyway..
27/07/20
Another few yards are down, allowing for the first train on the tramway. The trucks were thoroughly tested at all speeds, pushed and pulled in both directions, loaded and empty, etc etc. Only problems were from some of the permanently-link-coupled trucks, (because they don't like being pushed) and the odd cane load snagging on weeds, which were subsequently trimmed.
The line to mid-right will be laid as part of Stage Two.
28/07/20
The bridge in the Southeastern corner of the yard will be built from cedar. When I built the handlaid track some years ago, I set aside a bundle of sticks ripped down from cedar planks, for use as point and bridge timbers. The term for of milling both sides of a log, so it doesn't roll away, is unknown to me, so unless anyone knows the correct term for it, I'll just call them "paralleled" logs. A pair of sticks had two sides each, whittled down to look like "paralleled" logs. Whittling's rather enjoyable, though I don't see myself carving anything more than miniature logs..
A scale grain effect was added with a wire brush.
30/07/20
One of the gas bottles is about empty, so I switched to the other bottle, and we'll have to order a replacement for the first, soon. In readiness for that, the crossings have all been concreted. In the initial batch of concrete, I used leftover gravel from the pathway, which was unsurprisingly too coarse for use between the rails. That was dumped elsewhere as fill, and a new batch mixed using crusher dust instead. The first crossing turned out very nicely. We'll see how it holds up once cured..
The second was awful. A new batch was mixed each time, and for whatever reason, this was the best surface finish I could manage.
- IMG_7611.JPG (300.62 KiB) Viewed 4248 times
The third came out somewhat better.
- IMG_7612.JPG (283.97 KiB) Viewed 4248 times
31/07/20
Once the crossings had turned "green", flangeways were carved with a screwdriver. The edges of each crossing were straightened, and the surfaces of the second two smoothed, somewhat. During mixing, I'd forgotten to add some brown oxide to tone down the starkness, so I thought I'd try mixing some oxide with water and brushed it over the partially-set concrete. Weather or not that works, remains to be seen.
Just to see how it looks, some crusher dust was spread over a short section. Looks great, but certainly too well-maintained in appearance. Will pack this lot down a bit, paint the rails, then apply the "proper" ballast mix, in time.
01/08/20
The remaining bridge parts have been made, and the stringers cut down to suit the curve where the bridge is to be assembled. Pre-weathering the components with the vinegar and steel wool method. In the past however, I've found that not all types of wood are affected by the treatment. Another pre-treatment deals with this - soak the parts in tea, and allow to fully dry, prior to the vinegar bath. Whilst I have stained cedar with the vinegar method, I don't remember weather it needs the tea or not. Easy enough just to do it anyway. Might throw the parts in vinegar/rust tomorrow.
Regards,
Aaron
Last edited by Old Man Aaron on Wed Jul 21, 2021 9:32 am, edited 2 times in total.
Regards,
Aaron - Scum Class Works
Aaron - Scum Class Works
Re: What to do with a tiny, barren wasteland?
Another great read Aaron, progressing well. It's always good to be able to run the first train on a completed continuous loop. Did you put any reo in the cement crossings?
Grant.
Grant.
Re: What to do with a tiny, barren wasteland?
Those photos and your description has been well thought out Arron. I enjoyed it immensely. The weathering of your wood is a great idea...
Have you got a photo of them done please. It's purely to see if I can replicate what you have managed to do. The cost of weathering stuff is going up by the day over here, maybe it's because of COVID-19, I don't know...
Have you got a photo of them done please. It's purely to see if I can replicate what you have managed to do. The cost of weathering stuff is going up by the day over here, maybe it's because of COVID-19, I don't know...
ROD
Life is so easy when I run my trains.
https://gardenrails.org/forum/viewtopic ... 41&t=11364
https://www.youtube.com/@fairywoodlightrailway
Life is so easy when I run my trains.
https://gardenrails.org/forum/viewtopic ... 41&t=11364
https://www.youtube.com/@fairywoodlightrailway

Re: What to do with a tiny, barren wasteland?
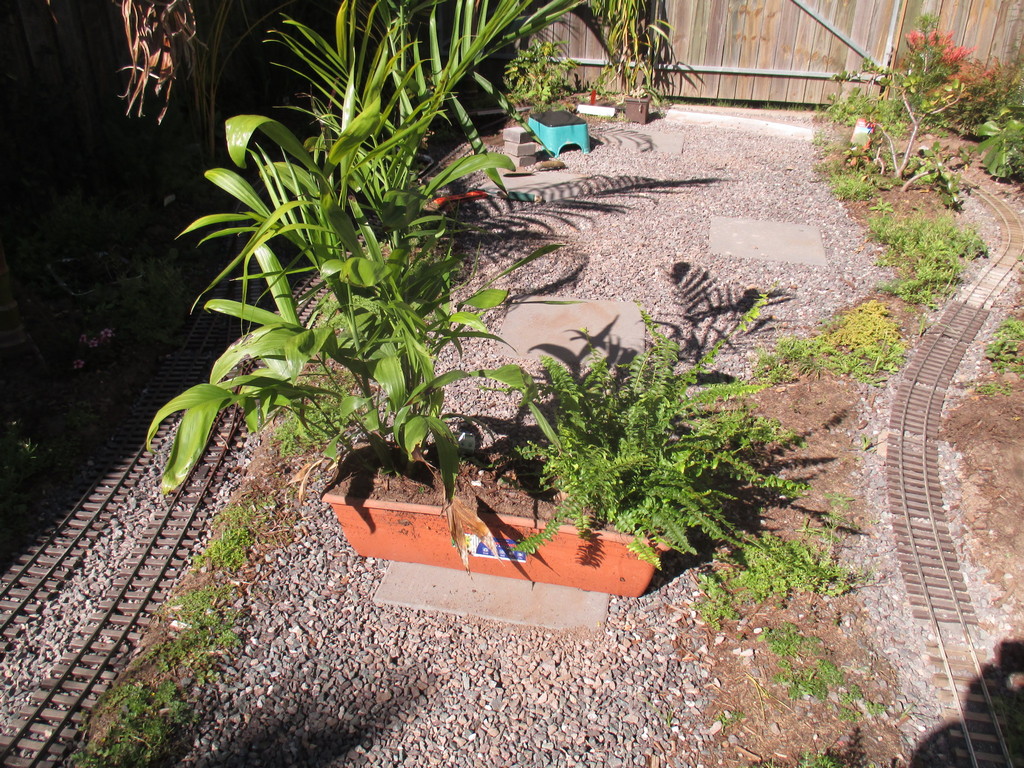
It's looking really well established already. That crusher dust does look in-scale and realistic to my mind.
I have a bashed Stainz on the PLR. As has been said already, they are more or less bullet-proof.
Rik
I have a bashed Stainz on the PLR. As has been said already, they are more or less bullet-proof.
- IMG_2805.JPG (50.77 KiB) Viewed 6174 times
Re: What to do with a tiny, barren wasteland?
Hi Aaron,
Love the "Stainz on the canez" shots, it's all really coming together. I'd been thinking the same thing re Australian cane lines and the Welsh narrow gauge, I had no idea such variety existed - it's a real eye-opener to have so many modelers from "down under" on here, especially as you're all interested in portraying the local scene.
Interesting thoughts re pre-applying tea where the vinegar/wire wool solution won't take, thanks. I've added a tea-bag to the mix where I couldn't get the result dark enough,which seems to work, but not tried applying it beforehand. I've recently been very pleasantly surprised how well MDF seems to take the vinegar solution, much more evenly and effectively than I expected, although it took three applications to get the colour right to my eye. I used MDF sealer over the top, which should protect it but didn't affect the colour or finish.
Anyway, congratulations on such excellent progress!
Andrew.
-
Old Man Aaron
- Trainee Driver
- Posts: 823
- Joined: Wed Oct 19, 2016 11:08 am
- Location: Sunshine Coast QLD, Australia
Re: What to do with a tiny, barren wasteland?
I did cut pieces of "snake-wire" mesh as reinforcing for the gate crossing, but decided after the fact, that it was a bit fine to allow the concrete porridge to properly flow under it. Chicken wire would've been better, but have none on hand. As a pessimist, I figure it'll crack regardless. We'll see how it holds up, can always start over if it fares that poorly.
Nice of you to say, regarding my writing. I do agonise over it - each of these postings takes me at minimum, an hour each, to write. I tend to go into unnecessary detail, then proof-read it and realise how long-winded it is, and end up condensing everything into (relatively) concise paragraphs.
Never thought about staining MDF with this stuff. Will have to try it if I happen to use MDF for something..
04/08/2020
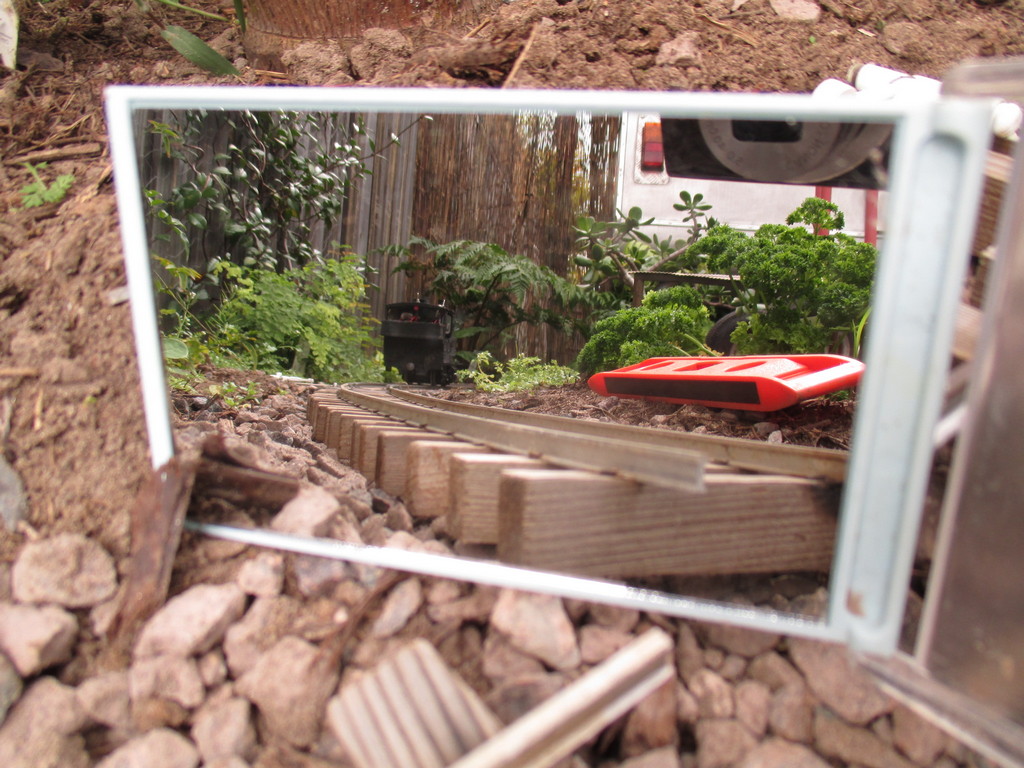
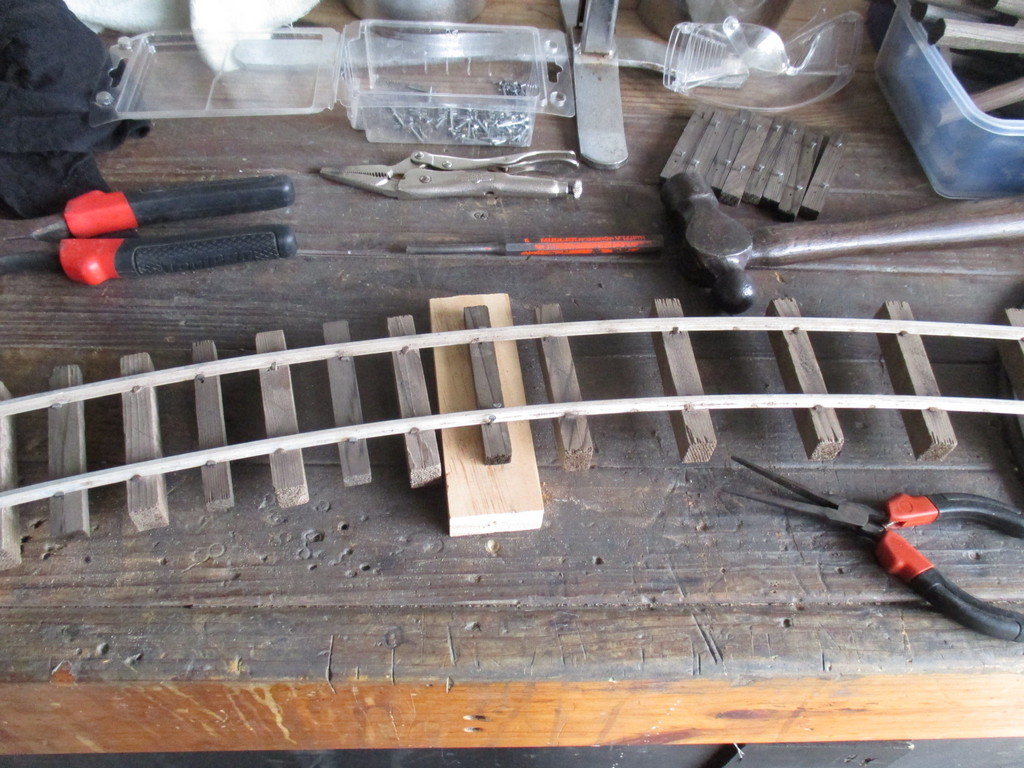
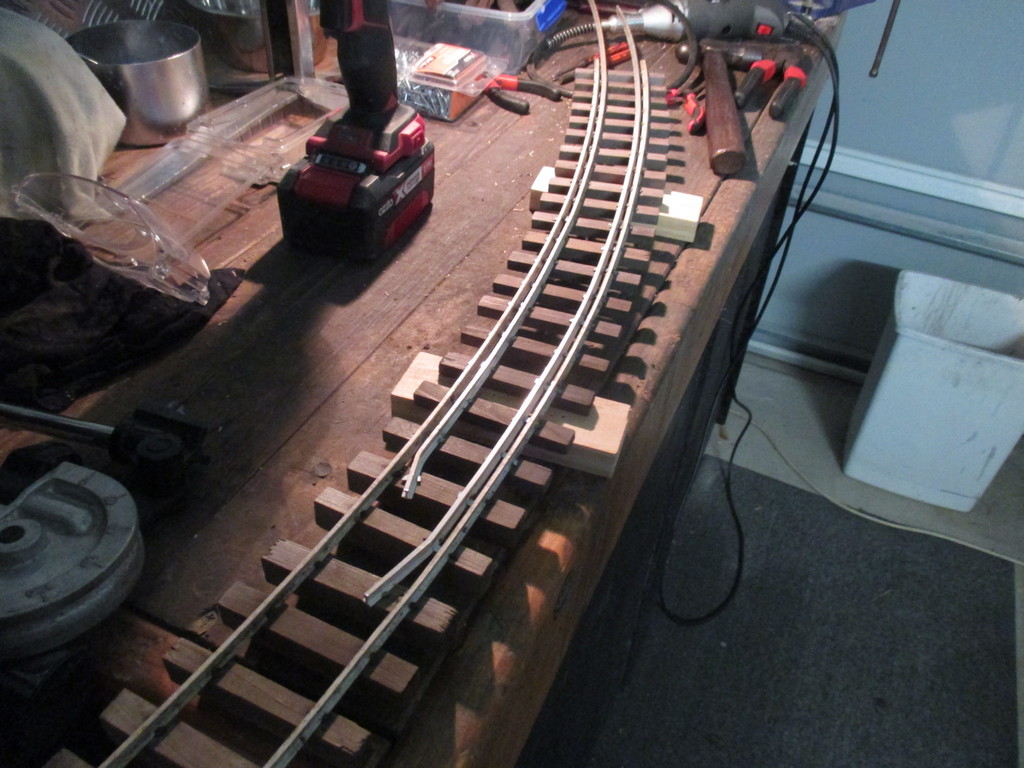
Whilst the bridge parts soak in vinegar, the navvies press on with laying track. I find the job painful and exhausting enough, so a cheap mirror from evilbay is a lifesaver for laying track. A great way to find flaws in the alignment as one goes along, that are often otherwise invisible from the usual viewing angles. I can't recommend it enough.
07/08/20
The bridge parts took far longer to stain than expected. The piles and to a lesser extent, the stringers, were somewhat resistant to the stain.
There's a few virgin-wood-coloured streaks in these components, but they don't look awful and will further fade in time.
When I ripped down cedar boards to make sleepers, I had only an 11" table saw - which was of course too large to safely split the sleepers to a scale-ish depth. So the depth of my sleepers were the full 18mm thickness of the boards I'd used. I can get away with that when ballasting track, but on bridges, I'm replacing the sleepers with spares, that have been split on my new 2" table saw. To maintain the gauge, alternating sleepers had their dogspikes cut away with the dremel. I was surprised at how well the newly distressed and stained sleepers, matched the originals that had been stored outdoors for two years.
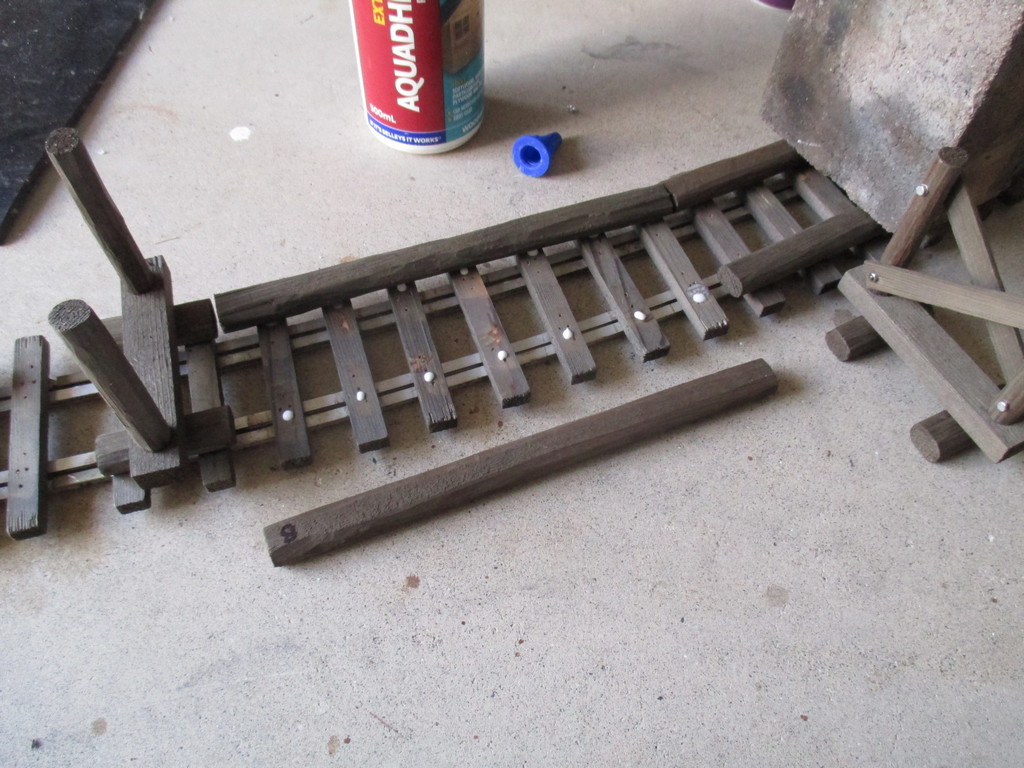
Half of the bridge is re-timbered, and guard rails fitted. I'm leaving the guard rails overhanging this section, as they'll be spiked to the other half of the bridge, to help rigid-ify the two pieces of track. I confess to having forgotten to properly research guard rails on curved bridges, so I'm not sure if the ends are positioned quite properly. Too late now of course, but it looks good enough for me.
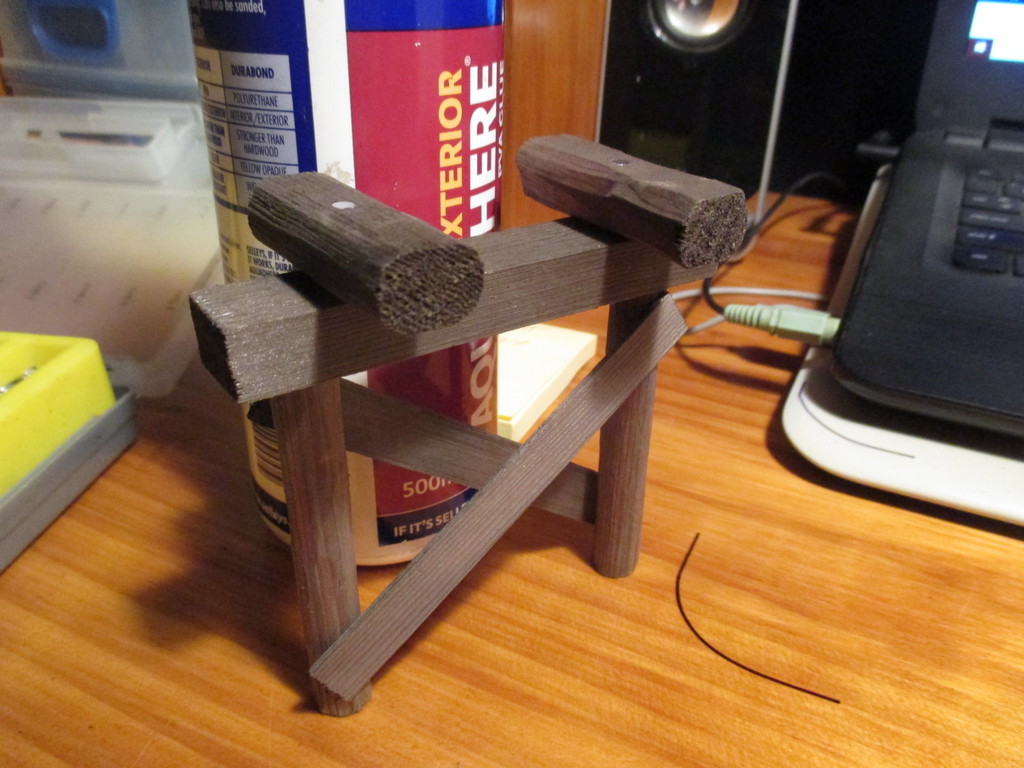
10/08/20
The bents have been assembled, and although I cut sway braces (the diagonal planks) for all four bents, I realised only one was going to be standing high enough over the terrain, to warrant the sways being fitted. After the glue had dried, the spacer blocks on top were drilled through, and panel nails fitted as reinforcement.
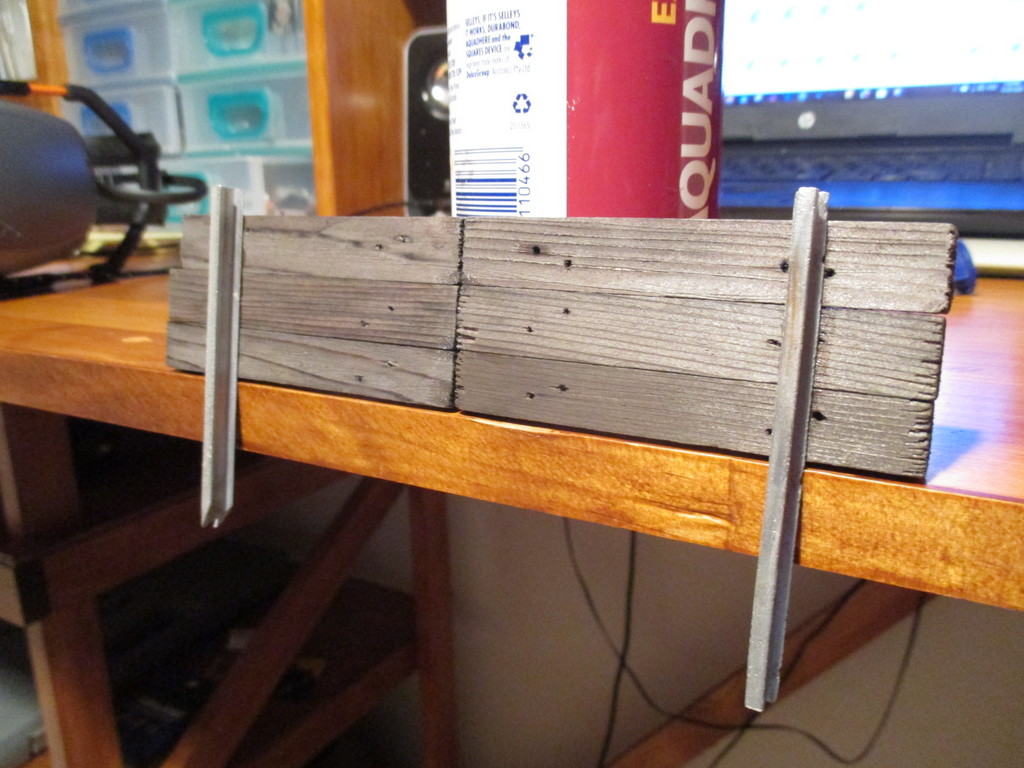
Forgot to consider abutments, but had some spare sleepers. These were epoxied to a piece of aluminium, using the traditional mixing stick/spatula.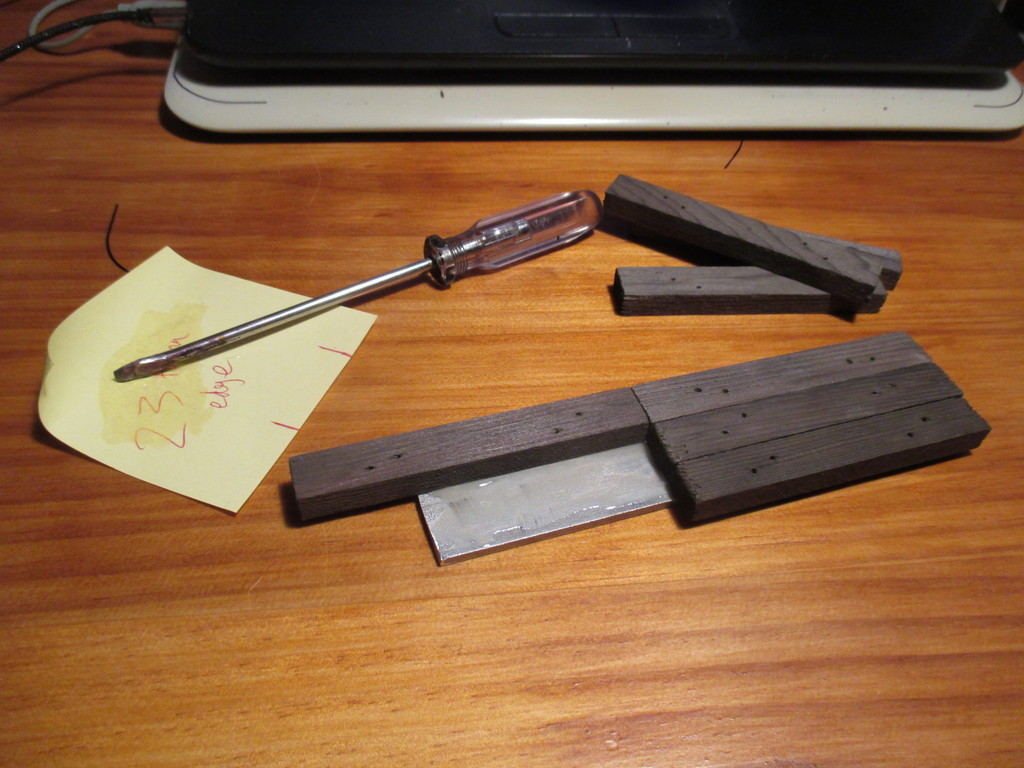
I knew I had a reason to keep that annoying bundle of short rail offcuts.
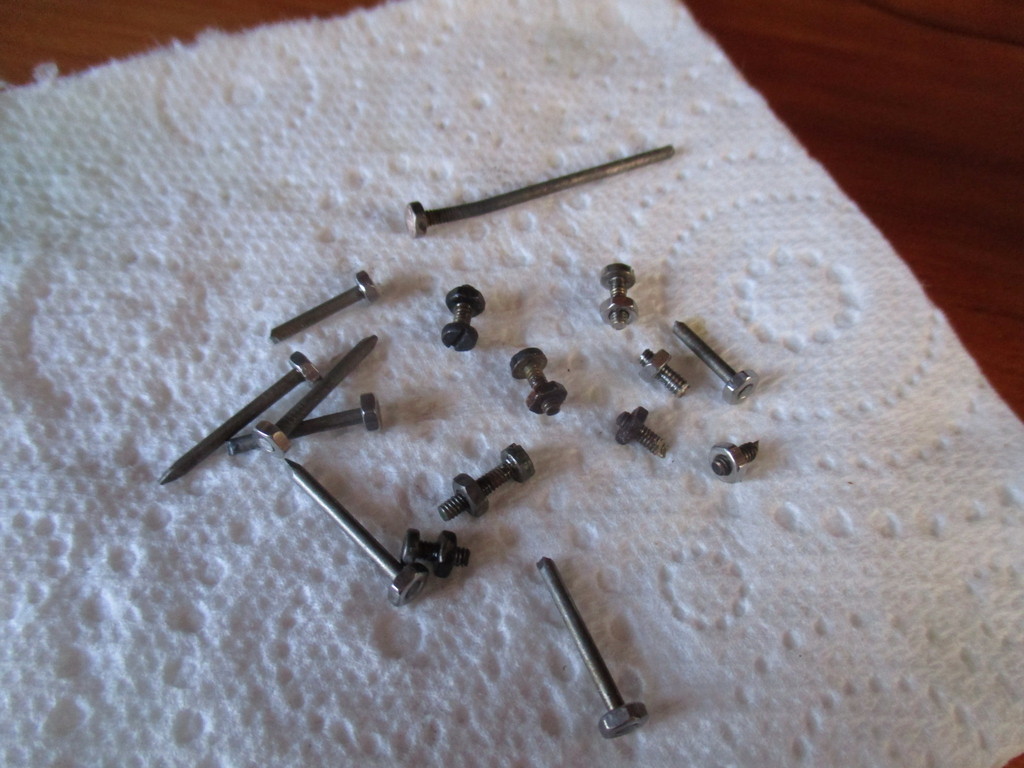
Prototype sway braces are attached with bolts. Before realising I only need sways on one bent, I'd cobbled together enough dummy nuts/bolts for all four..
I'm resisting the urge to buy nut/bolt/washer castings here, because if I start now, I'd have a higher standard to maintain, and never stop using them - NBWs are great, but in my hands they'd become a real money pit. Not to mention all the inevitable hold-ups when such popular items are out of stock.
Mark my words though - I will cave one day.
Using the bents as a guide for the stringers' spacing. Each stringer had been marked with a letter, to ensure each piece ends up in the right place. Firebricks weigh the parts down overnight.
These bricks actually came from a Perry 0-6-2T, that had been converted to diesel-firing, and ran at a theme park. It was donated to the Woodford Railway where I work, in 2014. It's been converted back to wood/coal, so with no need for these firebricks, I took some home, where they see plenty of use.
11/08/20
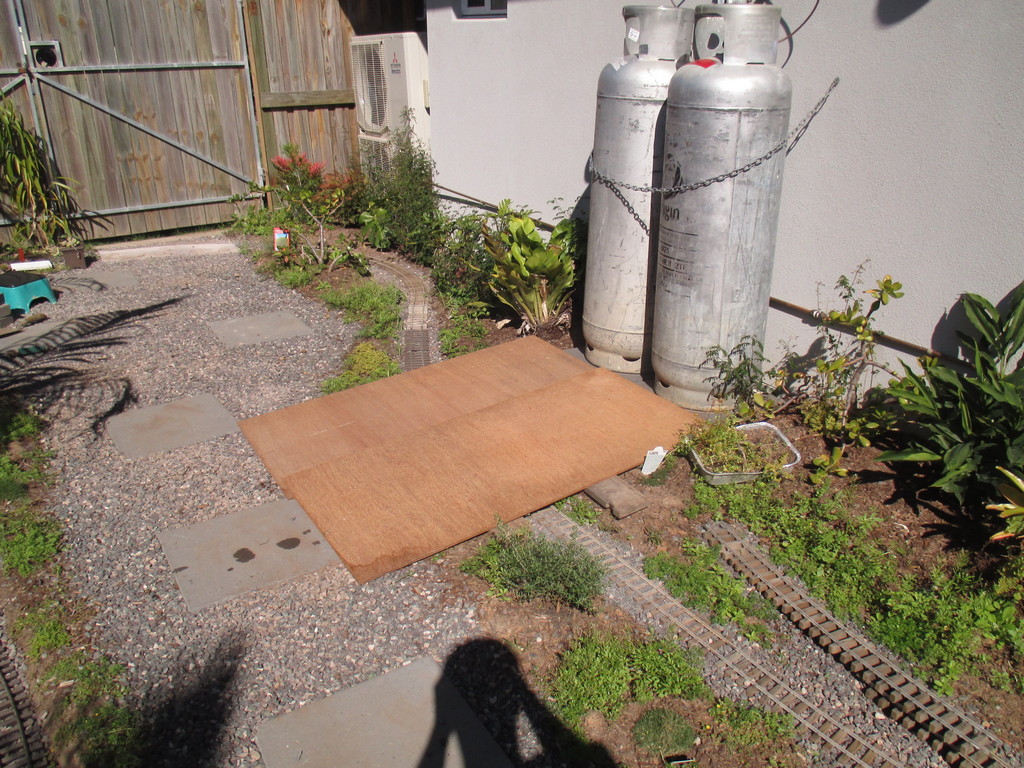
Gas man's coming to change the bottles tomorrow, so out came the planter box from it's brick-and-gravel socket.
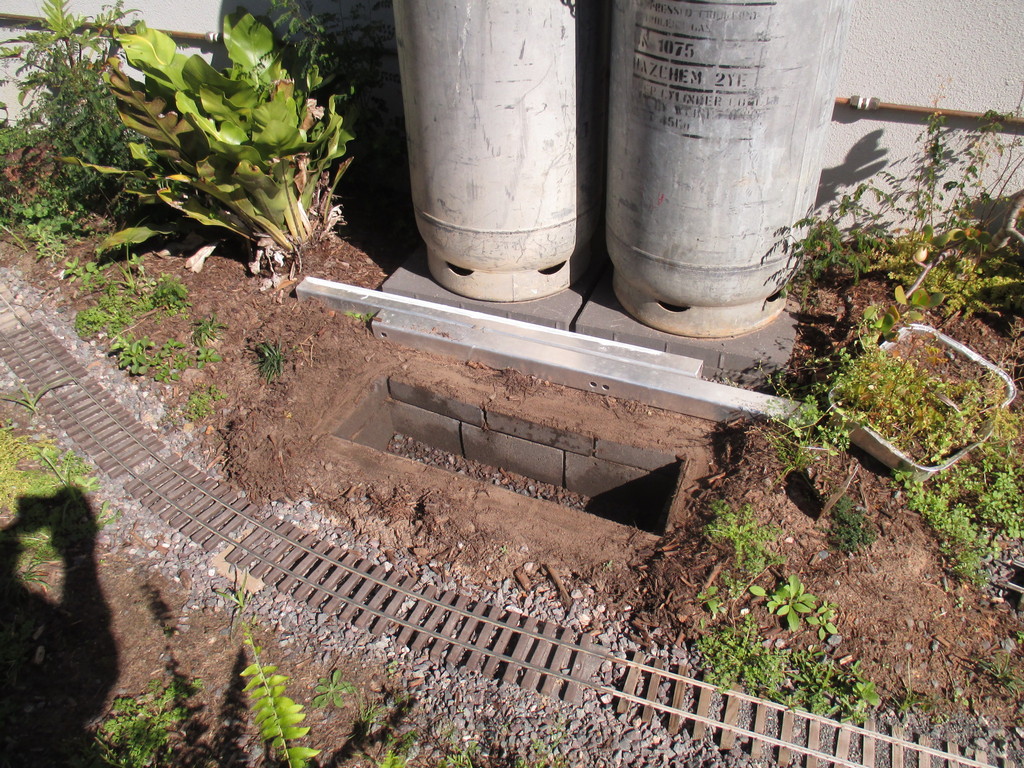
These bottles only need changing 3-4 times a year - the bloke's doing them as I write this on the 12th, and he doesn't seem to be having any trouble with the setup. I was going to make a nicer-looking portable one-piece ramp with this marine ply, but I might just keep plonking it down like this.
Regards,
Aaron
Nice of you to say, regarding my writing. I do agonise over it - each of these postings takes me at minimum, an hour each, to write. I tend to go into unnecessary detail, then proof-read it and realise how long-winded it is, and end up condensing everything into (relatively) concise paragraphs.
Never thought about staining MDF with this stuff. Will have to try it if I happen to use MDF for something..
04/08/2020
Whilst the bridge parts soak in vinegar, the navvies press on with laying track. I find the job painful and exhausting enough, so a cheap mirror from evilbay is a lifesaver for laying track. A great way to find flaws in the alignment as one goes along, that are often otherwise invisible from the usual viewing angles. I can't recommend it enough.
07/08/20
The bridge parts took far longer to stain than expected. The piles and to a lesser extent, the stringers, were somewhat resistant to the stain.
There's a few virgin-wood-coloured streaks in these components, but they don't look awful and will further fade in time.
When I ripped down cedar boards to make sleepers, I had only an 11" table saw - which was of course too large to safely split the sleepers to a scale-ish depth. So the depth of my sleepers were the full 18mm thickness of the boards I'd used. I can get away with that when ballasting track, but on bridges, I'm replacing the sleepers with spares, that have been split on my new 2" table saw. To maintain the gauge, alternating sleepers had their dogspikes cut away with the dremel. I was surprised at how well the newly distressed and stained sleepers, matched the originals that had been stored outdoors for two years.
Half of the bridge is re-timbered, and guard rails fitted. I'm leaving the guard rails overhanging this section, as they'll be spiked to the other half of the bridge, to help rigid-ify the two pieces of track. I confess to having forgotten to properly research guard rails on curved bridges, so I'm not sure if the ends are positioned quite properly. Too late now of course, but it looks good enough for me.
10/08/20
The bents have been assembled, and although I cut sway braces (the diagonal planks) for all four bents, I realised only one was going to be standing high enough over the terrain, to warrant the sways being fitted. After the glue had dried, the spacer blocks on top were drilled through, and panel nails fitted as reinforcement.
Forgot to consider abutments, but had some spare sleepers. These were epoxied to a piece of aluminium, using the traditional mixing stick/spatula.
I knew I had a reason to keep that annoying bundle of short rail offcuts.
Prototype sway braces are attached with bolts. Before realising I only need sways on one bent, I'd cobbled together enough dummy nuts/bolts for all four..
I'm resisting the urge to buy nut/bolt/washer castings here, because if I start now, I'd have a higher standard to maintain, and never stop using them - NBWs are great, but in my hands they'd become a real money pit. Not to mention all the inevitable hold-ups when such popular items are out of stock.
Mark my words though - I will cave one day.
Using the bents as a guide for the stringers' spacing. Each stringer had been marked with a letter, to ensure each piece ends up in the right place. Firebricks weigh the parts down overnight.
These bricks actually came from a Perry 0-6-2T, that had been converted to diesel-firing, and ran at a theme park. It was donated to the Woodford Railway where I work, in 2014. It's been converted back to wood/coal, so with no need for these firebricks, I took some home, where they see plenty of use.
11/08/20
Gas man's coming to change the bottles tomorrow, so out came the planter box from it's brick-and-gravel socket.
These bottles only need changing 3-4 times a year - the bloke's doing them as I write this on the 12th, and he doesn't seem to be having any trouble with the setup. I was going to make a nicer-looking portable one-piece ramp with this marine ply, but I might just keep plonking it down like this.
Regards,
Aaron
Last edited by Old Man Aaron on Wed Jul 21, 2021 2:00 pm, edited 1 time in total.
Regards,
Aaron - Scum Class Works
Aaron - Scum Class Works
Re: What to do with a tiny, barren wasteland?
I like that mirror idea, use it myself. It's good to see nicely laid track, level and with smooth curves. Really makes for trouble free running later on.
Railway is coming along well.
Grant.
PS hope you don't cave in on the nuts, bolts, washers bit, cos then I might have to.
Poor old screwdrivers, they occasionally get used for their intended purpose as well. I keep saying to myself every time I pick one up, "really shouldn't be using this" but I do.
Railway is coming along well.
Grant.
PS hope you don't cave in on the nuts, bolts, washers bit, cos then I might have to.
Re: What to do with a tiny, barren wasteland?
Looks like good progress is being made. No wonder your posts take so long to write, you have a fine attention to detail in both your writing and your modelling.
Rik
Rik


Re: What to do with a tiny, barren wasteland?
Aaron, looking good, I too think the mirror is a great idea, and as for the screwdriver, I have a box of coffee stirrers that do just the job, for this type of thing 

Who is online
Users browsing this forum: No registered users and 1 guest