Finishing the unfinished
-
Soar Valley Light

- Driver

- Posts: 1451
- Joined: Sun Dec 08, 2013 5:18 pm
- Location: North West Leicestershire
Re: Finishing the unfinished
Amen to that David! 
"Smith! Why do you only come to work four days a week?
"'cause I can't manage on three gaffer!"
"'cause I can't manage on three gaffer!"
-
RylstonLight

- Trainee Fireman

- Posts: 209
- Joined: Fri Oct 26, 2012 3:10 pm
- Location: Pontefract West Yorkshire
Re: Finishing the unfinished
Happy New Year and thank you for all the kind comments but I have to suggest that my modelling is not altogether high fidelity, but more about "willing suspension of disbelief". I tend to be selective with what I model as "ultra-scale" as most can be much lower-fidelity.
The workshop was designed as a photographic stage, and so most of the background clutter and equipment is suggested by rough wooden shapes. As cameras have got better I am gradually improving the wooden ones to more scale models. Eg the lathe is still blocks of wood, but the drill press is slightly more detailed now. The photographs also help by maintaining maximum depth of field resulting in timed exposures, not a problem as nothing is moving. But shallow depth of field gives away a photograph of a model.
Below is an example of "willing suspension of disbelief". I find it easier to believe if free-lance models have plausible backstory that is suggested visually. The RLR in heritage times needed modern rolling stock and rather like the WHR looked abroad to import second hand equipment. The first modelled is No 63. I hope this is seen as a SAR-type metal-bodied wagon.
Once you know that it is a "Really Useful Box Company" plastic box stuck onto a basic plastic chasssis, with some added plasticard detailling; then it is harder to see the supposed 1:1 wagon.
Honestly not the high standards scale modellers are churning out all the time. However Peter Denny of Buckingham Branch Line (and a clockwork garden railway) fame used to claim that if everything the eye's sees is to the same standard it will tend to believe the model scene as real. I think it even more so with the camera lens if used judiously.
The modelling may no the the best but if you are willing to "disbelieve" and see into my world then that is a complement too
The workshop was designed as a photographic stage, and so most of the background clutter and equipment is suggested by rough wooden shapes. As cameras have got better I am gradually improving the wooden ones to more scale models. Eg the lathe is still blocks of wood, but the drill press is slightly more detailed now. The photographs also help by maintaining maximum depth of field resulting in timed exposures, not a problem as nothing is moving. But shallow depth of field gives away a photograph of a model.
Below is an example of "willing suspension of disbelief". I find it easier to believe if free-lance models have plausible backstory that is suggested visually. The RLR in heritage times needed modern rolling stock and rather like the WHR looked abroad to import second hand equipment. The first modelled is No 63. I hope this is seen as a SAR-type metal-bodied wagon.
- No 63.png (384.3 KiB) Viewed 5787 times
Once you know that it is a "Really Useful Box Company" plastic box stuck onto a basic plastic chasssis, with some added plasticard detailling; then it is harder to see the supposed 1:1 wagon.
Honestly not the high standards scale modellers are churning out all the time. However Peter Denny of Buckingham Branch Line (and a clockwork garden railway) fame used to claim that if everything the eye's sees is to the same standard it will tend to believe the model scene as real. I think it even more so with the camera lens if used judiously.
The modelling may no the the best but if you are willing to "disbelieve" and see into my world then that is a complement too
Andy S. at the Rylston Light Railway

Re: Finishing the unfinished
Bloomimng eck - great point well made - I was looking at the pic thinking you'd done a great LGB conversion and then after reading all your post and I look again, I can see the plastic box - great lesson!
Where did I put that uncoupler?

Re: Finishing the unfinished
Some very interesting points Andy.
Even although a railway item is generally the focul point of many pictures, my aim is to make them fit IN the scene rather than on it, if that makes sense. I'm sure you must get a lot of enjoyment setting up these wonderful scenes, I know I do. The camera certainly sees a lot the "objective" eye fails to notice.
Grant.

Re: Finishing the unfinished
Still brilliant work no matter how you look at them. 
ROD
Life is so easy when I run my trains.


https://gardenrails.org/forum/viewtopic ... 41&t=11364
https://www.youtube.com/@fairywoodlightrailway
Life is so easy when I run my trains.


https://gardenrails.org/forum/viewtopic ... 41&t=11364
https://www.youtube.com/@fairywoodlightrailway

Re: Finishing the unfinished
Lovely work. I use a longer version of there narrow box to hold my steamy bits'n'bobs in, and have often wondered if it could make a useful wagon. Now I know (in the right hands, anyway!) 
Phil
Sporadic Garden Railer who's inconsistencies know no bounds
My Line - https://gardenrails.org/forum/viewtopic ... 41&t=11077
Sporadic Garden Railer who's inconsistencies know no bounds
My Line - https://gardenrails.org/forum/viewtopic ... 41&t=11077
-
RylstonLight
- Trainee Fireman
- Posts: 209
- Joined: Fri Oct 26, 2012 3:10 pm
- Location: Pontefract West Yorkshire
Re: Finishing the unfinished
Especially in the garden, the number of good shots I have ruined by not noticing a bright red wheelbarrow wheel in the mid-distance that draws the eye to it.
The Rylston Light is between incarnations, and I was planning the next version so that scenes "fall into" themselves to minimise real world parts of the garden intruding. It will have to be seen if it ever achieves the intent.
Andy S. at the Rylston Light Railway
-
RylstonLight
- Trainee Fireman
- Posts: 209
- Joined: Fri Oct 26, 2012 3:10 pm
- Location: Pontefract West Yorkshire
Re: Finishing the unfinished
AND continuing the Lister project:
I managed to get several short runs in the (1:1) workshop that allowed me to "machine" out the void behind the new grill. Done with sequential drilling up to 10mm with electric hand drill, then use of handheld mini-drill (predates Dremel but same principle) with a ball mill.
As you can see pretty crude:
But when the grill is placed lightly up against the void the irregular edges are hidden:
And then next step will be spraying the raw metal, but not with today's weather. The rest of the afternoon was devoted to small repair jobs and my rolling programme of adding tare weight markings to rolling stock (interspersed with the odd nap!).
I managed to get several short runs in the (1:1) workshop that allowed me to "machine" out the void behind the new grill. Done with sequential drilling up to 10mm with electric hand drill, then use of handheld mini-drill (predates Dremel but same principle) with a ball mill.
As you can see pretty crude:
- Lister void.png (361.91 KiB) Viewed 6621 times
But when the grill is placed lightly up against the void the irregular edges are hidden:
- Lister void offer.png (378.16 KiB) Viewed 6621 times
And then next step will be spraying the raw metal, but not with today's weather. The rest of the afternoon was devoted to small repair jobs and my rolling programme of adding tare weight markings to rolling stock (interspersed with the odd nap!).
Andy S. at the Rylston Light Railway
Re: Finishing the unfinished
I have a nap or two every day... 
ROD
Life is so easy when I run my trains.
https://gardenrails.org/forum/viewtopic ... 41&t=11364
https://www.youtube.com/@fairywoodlightrailway
Life is so easy when I run my trains.
https://gardenrails.org/forum/viewtopic ... 41&t=11364
https://www.youtube.com/@fairywoodlightrailway
-
RylstonLight
- Trainee Fireman
- Posts: 209
- Joined: Fri Oct 26, 2012 3:10 pm
- Location: Pontefract West Yorkshire
Re: Finishing the unfinished
Lister project continues:
This may get mired again as Big Jim has made me think again. RC size has greatly improved since the project stalled last time. Thanks Jim for link to Boaz project.
However there was some progress on painting until the wind got up again. It was finally finished as light was failing.
Tony, the Lister Renovation Project co-ordinator, stood back to admire the paint job after he'd lovingly applied the last brush-stroke. He insists that careful research showed that this was the nearest match to Lister green. The CME came across from the running shed and stood a full minute before gulping and walking back out to the twilight without a word. Old Tom muttered something about it "maybe be even more in yer face in 'daylight", with a definite impish smile. Hard to tell under the incandescent lights.
Still progress has been made.
This may get mired again as Big Jim has made me think again. RC size has greatly improved since the project stalled last time. Thanks Jim for link to Boaz project.
However there was some progress on painting until the wind got up again. It was finally finished as light was failing.
Tony, the Lister Renovation Project co-ordinator, stood back to admire the paint job after he'd lovingly applied the last brush-stroke. He insists that careful research showed that this was the nearest match to Lister green. The CME came across from the running shed and stood a full minute before gulping and walking back out to the twilight without a word. Old Tom muttered something about it "maybe be even more in yer face in 'daylight", with a definite impish smile. Hard to tell under the incandescent lights.
- Lister green.png (353.28 KiB) Viewed 6583 times
Still progress has been made.
Andy S. at the Rylston Light Railway
Re: Finishing the unfinished
Just wonderful.
Grant.
Grant.
-
tom_tom_go

- Driver
- Posts: 4824
- Joined: Wed Feb 23, 2011 3:08 am
- Location: Kent, UK
- Contact:


Re: Finishing the unfinished
Personally I'd settle for one at 1:19 !! It really is a work of art in it's own right.
Philip
Re: Finishing the unfinished
So would I in any scale....
Agree with Phillip....
ROD
Life is so easy when I run my trains.
https://gardenrails.org/forum/viewtopic ... 41&t=11364
https://www.youtube.com/@fairywoodlightrailway
Life is so easy when I run my trains.
https://gardenrails.org/forum/viewtopic ... 41&t=11364
https://www.youtube.com/@fairywoodlightrailway


Re: Finishing the unfinished
You can almost smell the grease and oil fumes in the air.
If at first you don't succeed, use a bigger hammer!

-
RylstonLight
- Trainee Fireman
- Posts: 209
- Joined: Fri Oct 26, 2012 3:10 pm
- Location: Pontefract West Yorkshire
Re: Finishing the unfinished
Thanks everyone
The Lister project continues with a look at the livery in daylight. As you can see it looks better for matting down and some light weathering.
A slightly elevated view allows a comparison of weathering techniques. I find weathering where the surface is worn away (eg the footplate wear where the driver's feet sit) is best achieved by literally wearing it down with light wet and dry to reveal the previous layer. However I find built-up weathering ( eg the grime in corners of the frames or the rust on the grill) is best with building up by layers of paints powders and dyes. An overall light spray of ModelMates weathering dye (rust) gives a patina of use. I did like the oil colour (it really looked like a oil-water separation effect) but have run out and the company is no more. If anyone knows of similar products I would be grateful for the heads-up.
There will be a slight hiatus on this project as after Big Jim's temptation, I am researching small RC receivers and Li-lo batteries. Mmmmm.
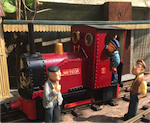
And as an aside did the Lister make it out into the yard under its own steam? One answer:
The Lister project continues with a look at the livery in daylight. As you can see it looks better for matting down and some light weathering.
- Lister reflection.png (477.33 KiB) Viewed 6438 times
A slightly elevated view allows a comparison of weathering techniques. I find weathering where the surface is worn away (eg the footplate wear where the driver's feet sit) is best achieved by literally wearing it down with light wet and dry to reveal the previous layer. However I find built-up weathering ( eg the grime in corners of the frames or the rust on the grill) is best with building up by layers of paints powders and dyes. An overall light spray of ModelMates weathering dye (rust) gives a patina of use. I did like the oil colour (it really looked like a oil-water separation effect) but have run out and the company is no more. If anyone knows of similar products I would be grateful for the heads-up.
- Lister from above.png (477.46 KiB) Viewed 6438 times
There will be a slight hiatus on this project as after Big Jim's temptation, I am researching small RC receivers and Li-lo batteries. Mmmmm.
And as an aside did the Lister make it out into the yard under its own steam? One answer:
- WD40.png (386.95 KiB) Viewed 6438 times
Andy S. at the Rylston Light Railway
Re: Finishing the unfinished
What, no easy-start?
Have you tried the Humbrol range of weathering washes?
Have you tried the Humbrol range of weathering washes?
If at first you don't succeed, use a bigger hammer!
-
RylstonLight
- Trainee Fireman
- Posts: 209
- Joined: Fri Oct 26, 2012 3:10 pm
- Location: Pontefract West Yorkshire
Re: Finishing the unfinished
Looked at them with uncertainty, but saved from the decision by the sheer amount of empty spaces on the rack!
Andy S. at the Rylston Light Railway
Who is online
Users browsing this forum: No registered users and 3 guests