Otto bash
Re: Otto bash
looking rather excellent cant wait too see it finished
-
tom_tom_go

- Driver

- Posts: 4824
- Joined: Wed Feb 23, 2011 3:08 am
- Location: Kent, UK
- Contact:

Re: Otto bash
Looking good - great to see the build step by step - the 10mm wider version gets my vote!
Where did I put that uncoupler?


Re: Otto bash
Yes, that's my feeling too. Wider it will be.....
Rik
Rik

Re: Otto bash
Rik, I'm wondering if the spectacle plate could be a little lower. On looking at the relationship between the drivers head and the roof plate in the video. Just a thought, perhaps cardboard could be used to see how it would look before cutting brass.
Grant.
Grant.
Re: Otto bash
Hi Grant
Yes, I think you're right. The plate is mounted in a slot and so can be adjusted before I fix it into place. Ironically, I did try a card template before cutting the first plate, somehow it looked OK in card - except I didn't take and look at any photos before transferring to brass. I'm finding that photos seem to be more revealing than the eye somehow.
Rik

Re: Otto bash
Great build Rik, can i ask a really stupid question, you say you have used cardboard for the running plates and other stuff, is this just templates for cutting out for the brass, i have never done anything like this before and i am wanting to have a go at a bit of scratch/ kit bashing myself. do you have to solder the brass and how do i go about something like that. I have seen a few old battered locos for sale really cheap and thought after seeing your thread maybe.........
ROD
Life is so easy when I run my trains.


https://gardenrails.org/forum/viewtopic ... 41&t=11364
https://www.youtube.com/@fairywoodlightrailway
Life is so easy when I run my trains.


https://gardenrails.org/forum/viewtopic ... 41&t=11364
https://www.youtube.com/@fairywoodlightrailway
Re: Otto bash
HiBCATRR wrote: ↑Tue Aug 15, 2017 7:16 am Great build Rik, can i ask a really stupid question, you say you have used cardboard for the running plates and other stuff, is this just templates for cutting out for the brass, i have never done anything like this before and i am wanting to have a go at a bit of scratch/ kit bashing myself. do you have to solder the brass and how do i go about something like that. I have seen a few old battered locos for sale really cheap and thought after seeing your thread maybe.........
When I've finished the build, I will post a more detailed article about the build on my blog. There are already a few accounts on there which you might want to take a look at in the meantime:
- A semi-scratchbuild - http://riksrailway.blogspot.com/2014/09 ... 0-6-0.html
- Yes - I just use card for templates - so as not to waste more expensive materials like plasticard or brass (says he who has just wasted a chunk of brass!)
- No - no need to solder the brass. I did solder in a section in the middle - but that's just a temporary fix while I'm waiting for a wider piece to be delivered. I'll fix the brass spectacle place into place, either with screws, nuts and bolts or maybe just some Araldite - not sure yet.
Rik
Re: Otto bash
Thanks Rik for you’r reply, i will certainly look at your blogs when i have time, at the moment i am waiting for the weather to clear up a bit so i can get on with the paving. Then it’s full steam ahead (PUN)  with the garden layout start next week.
ROD
Life is so easy when I run my trains.
https://gardenrails.org/forum/viewtopic ... 41&t=11364
https://www.youtube.com/@fairywoodlightrailway
Life is so easy when I run my trains.
https://gardenrails.org/forum/viewtopic ... 41&t=11364
https://www.youtube.com/@fairywoodlightrailway
Re: Otto bash
Sorry - just seen your other question re soldering brass.
The most important thing is to have a heavyweight soldering iron. Mine is 75 watt, but others use 100W. This ensures you can get enough heat into the brass for the solder to run - it just won't work with a small iron.
I use ordinary multicore solder, but you can also use flux to paint over the edges to be joined. Find some way of clamping the two pieces together, apply the heat from the iron (if you have used flux, it should start to bubble and spit). Apply the solder to the joint (run iron solder slowly along the joint if it's longer). Remove the heat and solder and wait until it's cooled - can take a while if they are big bits of brass.
There are some videos on YouTube showing the process - worth looking at a few to get a feel for how to do it.
Rik
PS - Having asbestos fingers helps
Re: Otto bash
ROD
Life is so easy when I run my trains.
https://gardenrails.org/forum/viewtopic ... 41&t=11364
https://www.youtube.com/@fairywoodlightrailway
Life is so easy when I run my trains.
https://gardenrails.org/forum/viewtopic ... 41&t=11364
https://www.youtube.com/@fairywoodlightrailway
-
Killian Keane
- Trainee Fireman

- Posts: 194
- Joined: Wed Nov 16, 2016 9:17 pm
Re: Otto bash
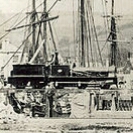
Greak work!  by pure coincidence I did an approximate scale drawing of Kettering no. 3 earlier this week to get a feel for it as a 16mm scale loco on 32mm gauge, looking forward to see how it turns out
Blokes with tea can build anything
Re: Otto bash
Mine will very much be an 'approximate' model, inspired by the original.Killian Keane wrote: ↑Thu Aug 17, 2017 6:37 pm Greak work!
Btw - if you want me to send you a selection of the photos I took at Penrhyn Castle, let me know.
Rik
-
Killian Keane
- Trainee Fireman
- Posts: 194
- Joined: Wed Nov 16, 2016 9:17 pm
Re: Otto bash
Thanks for the offer Rikge_rik wrote: ↑Thu Aug 17, 2017 8:00 pmMine will very much be an 'approximate' model, inspired by the original.Killian Keane wrote: ↑Thu Aug 17, 2017 6:37 pm Greak work!
Btw - if you want me to send you a selection of the photos I took at Penrhyn Castle, let me know.
Rik
From what youv'e done so far I can see youv'e got the spectacle plate closer to the prototype than I did
Blokes with tea can build anything
Re: Otto bash
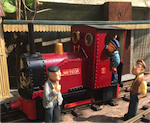
Part 8 - Taking shape (and weight)
Latest progress. The new brass sheet arrived and I've cut out the spectacle plate. It's a few mm wider than the temporary wide plate - I did try making it even wider but it didn't look quite right. Because Otto is wider than No.3, it's difficult to get the proportions right.
It may not look like a lot of progress has been made since the last posting but a lot has been done 'behind the scenes'. A fair amount of lead flashing strip has been shaped and forced into the saddle tank, the old side tanks (now bunkers), behind the front buffer beam and in the smokebox (to counterbalance the lead in the bunkers).
Some of the gaps where mouldings have been removed have been filled, sanded, filled and sanded again.
The chassis has been sprayed black and some of the rivet detail has been added (eg to the buffer beams).
There's still plenty to do. I hope to fit the electronics this weekend so I can do some test running. The spectacle plate needs to be fitted into place permanently after some half round beading has been soldered around its edge (awaiting delivery). I'm not sure about the chimney - it's the Otto one cut-down, but it looks far too chunky. I might have to sort through my stock of biros and pens to see if I can find something a bit more delicate and in keeping with the original. Then it'll be time to spray the body and to start adding in some of the finer details like safety valve, tank filler and all that lovely copper pipework.
Rik
Latest progress. The new brass sheet arrived and I've cut out the spectacle plate. It's a few mm wider than the temporary wide plate - I did try making it even wider but it didn't look quite right. Because Otto is wider than No.3, it's difficult to get the proportions right.
- IMG_6128.JPG (86.79 KiB) Viewed 4785 times
It may not look like a lot of progress has been made since the last posting but a lot has been done 'behind the scenes'. A fair amount of lead flashing strip has been shaped and forced into the saddle tank, the old side tanks (now bunkers), behind the front buffer beam and in the smokebox (to counterbalance the lead in the bunkers).
- IMG_6130.JPG (92.13 KiB) Viewed 4785 times
Some of the gaps where mouldings have been removed have been filled, sanded, filled and sanded again.
- IMG_6127.JPG (107.46 KiB) Viewed 4785 times
The chassis has been sprayed black and some of the rivet detail has been added (eg to the buffer beams).
- IMG_6129.JPG (92.82 KiB) Viewed 4785 times
There's still plenty to do. I hope to fit the electronics this weekend so I can do some test running. The spectacle plate needs to be fitted into place permanently after some half round beading has been soldered around its edge (awaiting delivery). I'm not sure about the chimney - it's the Otto one cut-down, but it looks far too chunky. I might have to sort through my stock of biros and pens to see if I can find something a bit more delicate and in keeping with the original. Then it'll be time to spray the body and to start adding in some of the finer details like safety valve, tank filler and all that lovely copper pipework.
Rik

Re: Otto bash
Looking good overall, Rik. I think the spectacle plate looks good as you have it now. I thought your previous wider one still looked a bit skinny, tbh.
Philip
-
tom_tom_go
- Driver
- Posts: 4824
- Joined: Wed Feb 23, 2011 3:08 am
- Location: Kent, UK
- Contact:
-
Peter Butler

- Driver
- Posts: 5258
- Joined: Sun Sep 09, 2012 10:33 pm
- Location: West Wales
Re: Otto bash
Very nice conversion Rik. Proportions look good despite the variation from the original. Spectacle plate a vast improvement on the first one and worth the effort.
A spray primer will make all the difference to the overall effect and tie everything together Please show a picture of that before the final colour spray.
A spray primer will make all the difference to the overall effect and tie everything together Please show a picture of that before the final colour spray.
The best things in life are free.... so why am I doing this?
Re: Otto bash
Hi Philip
Yes - I agree. The problem is that Otto is wider than the Black, Hawthorn and so even if I did the spectacle plate to scale it would still look overly skinny. Proportionally, the plate is wider than the original but seems to look about right in proportion to the width of the firebox.
Rik
Re: Otto bash
Hi Tom
Yep - looks like the felt tip and biro drawer is going to have to be raided yet again!
Rik
Who is online
Users browsing this forum: No registered users and 4 guests