I wonder if someone has experience with airbrush so I can learn from. Basically, I have an Iwata pressure system with the Neo airbrush used for Iwata. It works well in the first week, but now it didn't work anymore. A lot of air came out but very little or no paint. I used maximal pressure, the same outcome happened. I used Testors airbrush paint. Then I clean everything to ensure no blockade but it didn't help.
I noted that if I use water or alcohol not much spray coming out but when I switched to mineral spirits, alot of spray came out, perfectly. I wish to mix paint with mineral spirits but the problem is that they are not mixable.
airbrush issue: alot a air but no paint
-
mymodeltrain
- Fireman

- Posts: 253
- Joined: Fri Aug 09, 2013 5:46 pm
-
Big Jim
-
mymodeltrain
- Fireman
- Posts: 253
- Joined: Fri Aug 09, 2013 5:46 pm
I use Testors airspray paint; it is very thin. In addition, I am puzzled why it is ok with mineral spirits. Right after spraying with mineral spirit, I put a few drops of Testors paint, and immediately, no spray coming out. There is no adjustable delivery mode on my airbrush.Big Jim:123259 wrote:If you are getting air out but no spray then it is a problem with the paint side of things, either a blockage or if your airbrush has an adjustable delivery it could be set wrong. Maybe the paint is not thinned enough, I try and aim for the consistency of milk.
-
LNR

- Driver

- Posts: 1890
- Joined: Sat Feb 27, 2016 5:26 am
- Location: Melbourne, Australia
Bit hard without pics. of the workings, but I have the original Professional Olympos which some say the Iwata is a copy of.
If you unscrew the rear cover there will be a tiny knurled chuck with the rear end of the needle stem protruding from it. If the chuck is undone or slipping that is what controls the material, it is also the method by which the amount of material is controlled. This assumes that yours is push down for air and pull back for material ie double action.
I can follow with further tips, but need you to confirm that yours is of similar operation.
Grant.
If you unscrew the rear cover there will be a tiny knurled chuck with the rear end of the needle stem protruding from it. If the chuck is undone or slipping that is what controls the material, it is also the method by which the amount of material is controlled. This assumes that yours is push down for air and pull back for material ie double action.
I can follow with further tips, but need you to confirm that yours is of similar operation.
Grant.
-
mymodeltrain
- Fireman
- Posts: 253
- Joined: Fri Aug 09, 2013 5:46 pm
Yes, I confirm the Neo airbrush for Iwata has the same function as you describe: Push down for air and pull back for paint. This afternoon, I play around a bit by loosening the chuck but no lucks so far. I hope you could provide some guidance. Thanks.LNR:123261 wrote:Bit hard without pics. of the workings, but I have the original Professional Olympos which some say the Iwata is a copy of.
If you unscrew the rear cover there will be a tiny knurled chuck with the rear end of the needle stem protruding from it. If the chuck is undone or slipping that is what controls the material, it is also the method by which the amount of material is controlled. This assumes that yours is push down for air and pull back for material ie double action.
I can follow with further tips, but need you to confirm that yours is of similar operation.
Grant.
-
LNR
- Driver
- Posts: 1890
- Joined: Sat Feb 27, 2016 5:26 am
- Location: Melbourne, Australia
OK I've checked the Iwata parts list for the Neo and it has similar parts.
So using the pic. of my Olympos you will see the small lever behind the operating button, this controls the amount of material(paint in this case) allowed into the air stream. If the lever is held to the back of the button (right forward) that is maximum material, conversely if the lever flops right back with no resistance then that is zero material.
The setting is achieved by slackening the chuck, pushing the needle all the way forward and TIGHTENING the chuck. At this setting you would have full material. To cut back material, undo the chuck, and while holding the needle all the way forward, pull the operating button say half way back, hold, and TIGHTEN chuck in this position. You would then have half material setting.
In this position you won't feel any resistance on the operating button until it comes back far enough to hit the material lever. Back here is good for weathering by pulling on full air, then just adding tiny amounts of paint.
Now I'm not saying this may fix your problem, but one other thing to mention, these are pretty accurate pieces of equipment designed for precision use, the orifices are very small and I have found that especially using matt paint, too high a pressure tends to dry the paint at the jet and so block it immediately.. I use very low pressure generally 10 psi, very occasionally 15, but never any more. It also keeps overspray in check.
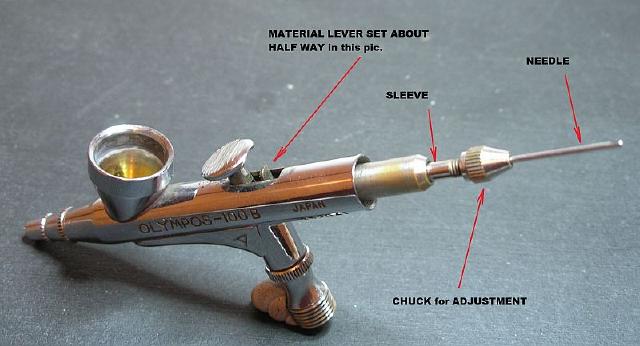
Sorry this is so long winded, hope it is of some help.
Grant.
So using the pic. of my Olympos you will see the small lever behind the operating button, this controls the amount of material(paint in this case) allowed into the air stream. If the lever is held to the back of the button (right forward) that is maximum material, conversely if the lever flops right back with no resistance then that is zero material.
The setting is achieved by slackening the chuck, pushing the needle all the way forward and TIGHTENING the chuck. At this setting you would have full material. To cut back material, undo the chuck, and while holding the needle all the way forward, pull the operating button say half way back, hold, and TIGHTEN chuck in this position. You would then have half material setting.
In this position you won't feel any resistance on the operating button until it comes back far enough to hit the material lever. Back here is good for weathering by pulling on full air, then just adding tiny amounts of paint.
Now I'm not saying this may fix your problem, but one other thing to mention, these are pretty accurate pieces of equipment designed for precision use, the orifices are very small and I have found that especially using matt paint, too high a pressure tends to dry the paint at the jet and so block it immediately.. I use very low pressure generally 10 psi, very occasionally 15, but never any more. It also keeps overspray in check.
Sorry this is so long winded, hope it is of some help.
Grant.
-
mymodeltrain
- Fireman
- Posts: 253
- Joined: Fri Aug 09, 2013 5:46 pm
Thanks LNR, at least this is the mechanism that I am not aware of, and probably, I messed with it while opening the parts. I will practice a bit tonight using your instruction; hope it will solve the problem.LNR:123265 wrote:OK I've checked the Iwata parts list for the Neo and it has similar parts.
So using the pic. of my Olympos you will see the small lever behind the operating button, this controls the amount of material(paint in this case) allowed into the air stream. If the lever is held to the back of the button (right forward) that is maximum material, conversely if the lever flops right back with no resistance then that is zero material.
The setting is achieved by slackening the chuck, pushing the needle all the way forward and TIGHTENING the chuck. At this setting you would have full material. To cut back material, undo the chuck, and while holding the needle all the way forward, pull the operating button say half way back, hold, and TIGHTEN chuck in this position. You would then have half material setting.
In this position you won't feel any resistance on the operating button until it comes back far enough to hit the material lever. Back here is good for weathering by pulling on full air, then just adding tiny amounts of paint.
Now I'm not saying this may fix your problem, but one other thing to mention, these are pretty accurate pieces of equipment designed for precision use, the orifices are very small and I have found that especially using matt paint, too high a pressure tends to dry the paint at the jet and so block it immediately.. I use very low pressure generally 10 psi, very occasionally 15, but never any more. It also keeps overspray in check.
Sorry this is so long winded, hope it is of some help.
Grant.
Thanks
-
mymodeltrain
- Fireman
- Posts: 253
- Joined: Fri Aug 09, 2013 5:46 pm
LNR,mymodeltrain:123268 wrote:Thanks LNR, at least this is the mechanism that I am not aware of, and probably, I messed with it while opening the parts. I will practice a bit tonight using your instruction; hope it will solve the problem.LNR:123265 wrote:OK I've checked the Iwata parts list for the Neo and it has similar parts.
So using the pic. of my Olympos you will see the small lever behind the operating button, this controls the amount of material(paint in this case) allowed into the air stream. If the lever is held to the back of the button (right forward) that is maximum material, conversely if the lever flops right back with no resistance then that is zero material.
The setting is achieved by slackening the chuck, pushing the needle all the way forward and TIGHTENING the chuck. At this setting you would have full material. To cut back material, undo the chuck, and while holding the needle all the way forward, pull the operating button say half way back, hold, and TIGHTEN chuck in this position. You would then have half material setting.
In this position you won't feel any resistance on the operating button until it comes back far enough to hit the material lever. Back here is good for weathering by pulling on full air, then just adding tiny amounts of paint.
Now I'm not saying this may fix your problem, but one other thing to mention, these are pretty accurate pieces of equipment designed for precision use, the orifices are very small and I have found that especially using matt paint, too high a pressure tends to dry the paint at the jet and so block it immediately.. I use very low pressure generally 10 psi, very occasionally 15, but never any more. It also keeps overspray in check.
Sorry this is so long winded, hope it is of some help.
Grant.
Thanks
I just worked on the airbrush after returning home from work. Basically, I loosened the chuck and removed the needle, cleaned and locked it up and tried to spray with water. It worked very well. Initially, I slightly pulled the needle out abit and sprayed in that setting; it sprayed well and I saw some droplets of water since I think the needle didn't go all the way. But in that condition, I guess small residues were pushed out from the orifice. Then, I pushed the needle all the way up, locked it up and loosened the chuck abit. Then, I noted that the airbrush worked normally. I tested to confirm with water alone and then using Testors paint; everything works perfectly. Thanks very much for teaching me the mechanism how airbrush works. I will continue to learn the process.
-
LNR
- Driver
- Posts: 1890
- Joined: Sat Feb 27, 2016 5:26 am
- Location: Melbourne, Australia
Glad your getting results but I'm a little confused,
Grant.
The chuck must be locked to the needle at all times, and the needle as far forward as it goes. The chuck locks the sleeve(in my pic.) to a position on the needle. Were it to slip or not be tightened up, the lever and sleeve would merely slide along the needle and not release any paint.locked it up and loosened the chuck abit.
Grant.
-
mymodeltrain
- Fireman
- Posts: 253
- Joined: Fri Aug 09, 2013 5:46 pm
First, I pulled the needle out abit and locked it up. The chuck was locked all the way tightly then I sprayed with water, it works well. However, in this setting I saw some droplets of water at the tip of the airbrush; I assumed because the needle was not pushed all the way up thus the orifice was not fully covered by the needle.LNR:123291 wrote:Glad your getting results but I'm a little confused,The chuck must be locked to the needle at all times, and the needle as far forward as it goes. The chuck locks the sleeve(in my pic.) to a position on the needle. Were it to slip or not be tightened up, the lever and sleeve would merely slide along the needle and not release any paint.locked it up and loosened the chuck abit.
Grant.
Who is online
Users browsing this forum: No registered users and 26 guests