The G&DLR begins.

-
Sylvian Tennant
- Fireman

- Posts: 327
- Joined: Wed Aug 10, 2011 4:48 pm
- Location: Teesside
Top stuff - will be looking forward to see yours too. This building above all seems great for adding stuff to it.
One of the reasons for the interior was that I'm going to be adding lights to it. I have a station masters house too but I don't think I'll be doing anything as intensive as this build (curtains help everything!)
I've managed to make some further headway today as a student rep meeting was avoided since my missus locked me in the house (accidentally, she says!)


The doors don't really match the outside design but I'm not too fussed about that. I've made a table for the booking office and some benches for the waiting room.
Most of the interior work is ready for painting all that I needs making is a small fireplace to add logic or the chimney hopefully this should come about in the next few days.
One of the reasons for the interior was that I'm going to be adding lights to it. I have a station masters house too but I don't think I'll be doing anything as intensive as this build (curtains help everything!)
I've managed to make some further headway today as a student rep meeting was avoided since my missus locked me in the house (accidentally, she says!)
The doors don't really match the outside design but I'm not too fussed about that. I've made a table for the booking office and some benches for the waiting room.
Most of the interior work is ready for painting all that I needs making is a small fireplace to add logic or the chimney hopefully this should come about in the next few days.
Facebook - https://www.facebook.com/Area51Models/
Instagram - https://www.instagram.com/area51greumach/
Instagram - https://www.instagram.com/area51greumach/
-
Sylvian Tennant
- Fireman
- Posts: 327
- Joined: Wed Aug 10, 2011 4:48 pm
- Location: Teesside
More work on the station building itself.
All of the major components are now built up ready for painting and this partial mock up shows how some of the layout will look.


One of the final major builds was the fireplace - I think there should be enough room for the door to open...not that it does in reality.

One further component that I had almost gotten was the chair for the station master!

Tomorrow should hopefully start seeing the interior paint jobs taking affect.
Does anyone have anyone have any images of station master's desks so I can add legitimate clutter onto it?
All of the major components are now built up ready for painting and this partial mock up shows how some of the layout will look.
One of the final major builds was the fireplace - I think there should be enough room for the door to open...not that it does in reality.
One further component that I had almost gotten was the chair for the station master!
Tomorrow should hopefully start seeing the interior paint jobs taking affect.
Does anyone have anyone have any images of station master's desks so I can add legitimate clutter onto it?
Facebook - https://www.facebook.com/Area51Models/
Instagram - https://www.instagram.com/area51greumach/
Instagram - https://www.instagram.com/area51greumach/
-
Peter Butler

- Driver

- Posts: 5254
- Joined: Sun Sep 09, 2012 10:33 pm
- Location: West Wales
Just as long as there is enough room for a mug of tea I wouldn't bother too much about it.Sylvian Tennant:122578 wrote:
Does anyone have anyone have any images of station master's desks so I can add legitimate clutter onto it?
Looking very good so far, the painting will really bring it to life.
The best things in life are free.... so why am I doing this?
Brilliant - blimey you are setting an example for this that i'm not sure i'll be able to follow (gulps involuntarily!) - When I've a mo I'll post up pics of the pub I built from Modeltown, not in the same level of detail as yours, but like yours I have modded it to make it more pub like.
Will post over the weekend
Will post over the weekend
Where did I put that uncoupler?

Or if you look down this webpage, there is a good photo of the desk in there - allegedly 'untouched since 1948' - although note it is a Daily mail article so you can take most of the sensation out with a pinch of salt!
http://www.dailymail.co.uk/news/article ... -sale.html
http://www.dailymail.co.uk/news/article ... -sale.html
Where did I put that uncoupler?
-
Sylvian Tennant
- Fireman
- Posts: 327
- Joined: Wed Aug 10, 2011 4:48 pm
- Location: Teesside
Thank you for you kind comments - painting has started but as per work, uni and the missus hinder my efforts slightly. I do like your progress on your line Peter.
Excellent work Mark - they'll come in really useful as there is just the little accessories to build up for it atm. Luckily I tend to have an aversion of the Daily Mail but I guess it has given some good reference photos there.
Never put your work down! truth be told I'm not a by-the-book modeller and in real life this work might not look as impressive. It's very much a quick check with the steel rue - looks good job.
One suggestion - Wilko are stocking garden equipments. I'd defiantly invest in wooden plant labels - alternatively and far more easily available are lollipop sticks from most stationary retailers (I bought a load from Boxes). Also, if you're building kits from the likes of IP Engineering -Keep the frets (or leftover parts). They have proved incredibly useful for wagon parts and adornments.
Facebook - https://www.facebook.com/Area51Models/
Instagram - https://www.instagram.com/area51greumach/
Instagram - https://www.instagram.com/area51greumach/
-
tom_tom_go

- Driver
- Posts: 4824
- Joined: Wed Feb 23, 2011 3:08 am
- Location: Kent, UK
- Contact:
This is looking good.
I keep too much scrap bits from kits, off cuts, etc but you end up using them one day. For example, the broken Accucraft axle boxes that were in my junk yard for years outside made it onto my inertia wagon.
The IP wooden frets are also useful and have been used to strength interiors of wagons and door frames.
I promised you a few pics of my Modeltown pub - here you go


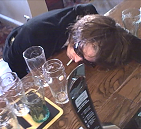
As you've all can see from the great station building being built in this subject area, these kits are great for bashing - I added lighting and found an image of a pub interior and resized it on the computer to make it seem to scale - likewise, the front window fill that comes with the kit didn't feel right for my layout so i fitted a see through front window and then used coffee sticks to create some privacy to those sitting inside for part way up the window.
This will be going next to my station at Junction as the railway watering hole - just creating the road it will sit on then I'll need to bed it into its surroundings - although it will be one of the buildings I'll bring in during the winter - although as i said earlier, I think your station building knocks my efforts out of the park!
Where did I put that uncoupler?
-
Sylvian Tennant
- Fireman
- Posts: 327
- Joined: Wed Aug 10, 2011 4:48 pm
- Location: Teesside
I love it! it really captures the essence of ones own 'local'. Out of curiosity has any details been placed upstairs at any chance and is it lit.
I'm really just asking as I have a station masters house to build and unsure as to whether or not I should add some details in. I'm defiantly considering partitions, painting and lighting but I just thought that adding some curtains would help to just give it the impression of someone living there but not having to build a full kitchen unit, beds, chairs etc as time, effort and materials are limited.
I'm really just asking as I have a station masters house to build and unsure as to whether or not I should add some details in. I'm defiantly considering partitions, painting and lighting but I just thought that adding some curtains would help to just give it the impression of someone living there but not having to build a full kitchen unit, beds, chairs etc as time, effort and materials are limited.
Facebook - https://www.facebook.com/Area51Models/
Instagram - https://www.instagram.com/area51greumach/
Instagram - https://www.instagram.com/area51greumach/
-
Sylvian Tennant
- Fireman
- Posts: 327
- Joined: Wed Aug 10, 2011 4:48 pm
- Location: Teesside
Danke 
It's some really nice and effective work there.
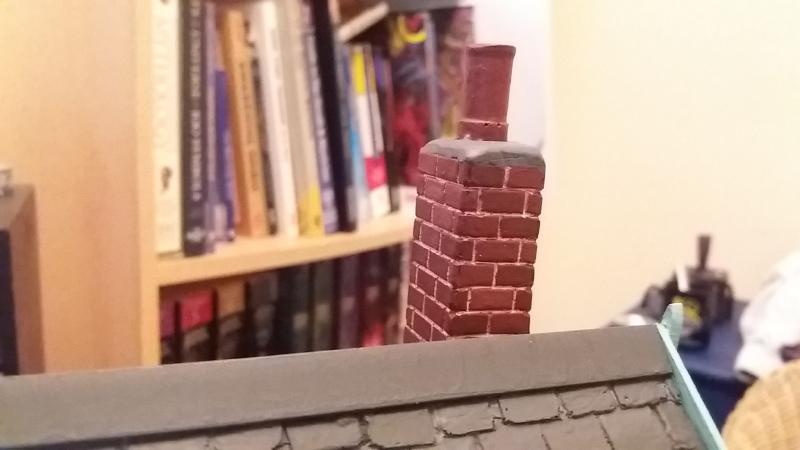
So the interior painting work is pretty much complete now. Still need to make up some bits (inc mug of tea) for the desk and maybe hand a time table and picture of the grand station master and his little apprentice.
I'm quite proud of my brick work for the fireplace.


More to come soon.
It's some really nice and effective work there.
So the interior painting work is pretty much complete now. Still need to make up some bits (inc mug of tea) for the desk and maybe hand a time table and picture of the grand station master and his little apprentice.
I'm quite proud of my brick work for the fireplace.
More to come soon.
Facebook - https://www.facebook.com/Area51Models/
Instagram - https://www.instagram.com/area51greumach/
Instagram - https://www.instagram.com/area51greumach/
-
Sylvian Tennant
- Fireman
- Posts: 327
- Joined: Wed Aug 10, 2011 4:48 pm
- Location: Teesside
The station building is now about 80% complete. I need to add a couple of extra details, something to place the lights on, fire buckets and paint it up.


More to come soon
More to come soon
Facebook - https://www.facebook.com/Area51Models/
Instagram - https://www.instagram.com/area51greumach/
Instagram - https://www.instagram.com/area51greumach/
-
Sylvian Tennant
- Fireman
- Posts: 327
- Joined: Wed Aug 10, 2011 4:48 pm
- Location: Teesside
hello chaps and chappesses.
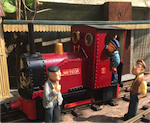
Here's the station building so far. Not complete my any means but well on the way. All that's really left to do is paint the roof and chimney, add the little details to the interior & exterior, glaze the windows and add signage and posters around it. The fire buckets are from GRS with table salt sprinkled over superglue and painted Revell Africa Sand/Brown. i decided to leave the canopy and seating off as I already have some to place elsewhere on the station Grosmont doesn't have a canopy. plus i felt they looked a little toylike in appearance.


As you can see I've added some lighting - but in the form of pound shop battery realities which give a lovely warm flicker - they are very easily removable and due to the height of the building itself in relation to the windows don't obscure anything inside. I bought a load with this in mind - as well as lighting my future signals and carriages.


I may also consider slots for the roof as this weather recently could see the roof itself exploring next doors garden. Also on consideration is guttering as it adds some detail and logic to the building itself.
Once this is done I shall start work on the tower tower and Staton masters house as they are both represent Stonework so can paint them both at the same time.
Here's the station building so far. Not complete my any means but well on the way. All that's really left to do is paint the roof and chimney, add the little details to the interior & exterior, glaze the windows and add signage and posters around it. The fire buckets are from GRS with table salt sprinkled over superglue and painted Revell Africa Sand/Brown. i decided to leave the canopy and seating off as I already have some to place elsewhere on the station Grosmont doesn't have a canopy. plus i felt they looked a little toylike in appearance.
As you can see I've added some lighting - but in the form of pound shop battery realities which give a lovely warm flicker - they are very easily removable and due to the height of the building itself in relation to the windows don't obscure anything inside. I bought a load with this in mind - as well as lighting my future signals and carriages.
I may also consider slots for the roof as this weather recently could see the roof itself exploring next doors garden. Also on consideration is guttering as it adds some detail and logic to the building itself.
Once this is done I shall start work on the tower tower and Staton masters house as they are both represent Stonework so can paint them both at the same time.
Facebook - https://www.facebook.com/Area51Models/
Instagram - https://www.instagram.com/area51greumach/
Instagram - https://www.instagram.com/area51greumach/
-
Sylvian Tennant
- Fireman
- Posts: 327
- Joined: Wed Aug 10, 2011 4:48 pm
- Location: Teesside
Station Building complete! well almost (i'll probably be almost forever)
But for all intensive purposes it's done. All that's needed is some clutter for the station masters desk and some figure (something maybe Doctor Who related before Capaldi shuffles off)


The bits I had considered putting on I ended up just adding as it'd be irritated by them.
I'm quite happy with the outcome but now onwards! to the station masters house. Apologies for all the pictures of stuff you may have seen before.
But for all intensive purposes it's done. All that's needed is some clutter for the station masters desk and some figure (something maybe Doctor Who related
The bits I had considered putting on I ended up just adding as it'd be irritated by them.
I'm quite happy with the outcome but now onwards! to the station masters house. Apologies for all the pictures of stuff you may have seen before.
Facebook - https://www.facebook.com/Area51Models/
Instagram - https://www.instagram.com/area51greumach/
Instagram - https://www.instagram.com/area51greumach/
-
Soar Valley Light

- Driver
- Posts: 1451
- Joined: Sun Dec 08, 2013 5:18 pm
- Location: North West Leicestershire
Who is online
Users browsing this forum: No registered users and 3 guests