
Having just sorted the timing and other problems out on my Carodoc and my Merlin. I feel the need to have ago at my poorly Archangel Brick.
Does anyone have any idea or info on setting the timing on this single cylinder, slip eccentric fitted old lady.
It has been to a very good loco repair shop who sadly failed to make any headway. They did mention that he felt that the timing was wrong but he could not seem to get it to go right.
Basically she gets up steam no problem just seems to fail to procced under her own power. On blocks she will run after fashion.
More life in a dead Archangel Brick
More life in a dead Archangel Brick
Last edited by Big Jim on Sun Sep 07, 2014 10:25 pm, edited 2 times in total.
If at first you don't succeed, use a bigger hammer!
-
funandtrains
- Fireman

- Posts: 283
- Joined: Thu Nov 22, 2012 9:36 pm
- Location: Croydon, Surrey

Setting up slip eccentric valve gear is very easy if you can look into the valve chest. From pictures I've looked at the valve chest is on top of the cylinder so to get at it I would think that the boiler will have to come off. Have you got a picture of the under side ? as archangel were scratch built I imagine each one ends up a bit different.
Dan,
James: "Dan, can you use your hearing and tell me if that trains coming ?"
DLR
www.freewebs.com/dlrail
James: "Dan, can you use your hearing and tell me if that trains coming ?"
DLR
www.freewebs.com/dlrail
I have tried, on and off, to get hold of Stewart but have not had any luck. They annoying thing is he used to live about 5 miles from where I live now.Why not get Archangel to fix it for you. I have read that they suffer from wear to the valve gear so you might need a new set
It may have to go back to him but I feel a little fiddling before hand is in order.
Mind you working as a mechanic the one thing that it certain to get my back up is when a customer brings in a car and says either "I looked on an internet forum and..." or "I had a little fiddle with it".
If at first you don't succeed, use a bigger hammer!
-
funandtrains
- Fireman
- Posts: 283
- Joined: Thu Nov 22, 2012 9:36 pm
- Location: Croydon, Surrey
I think I may have just got the record for the longest time between posts on a thread.
Right the Brick.
I have spent some time recently in a friends workshop playing with this old beastie.
We have checked and re checked the timing, repaired some of the motion. Had the cylinder apart and each time it still refused to work. It appeared to be getting pressure both sides of the piston. Gaskets were changed but still nothing.
It turns out that the exhaust was leaking back into the valve chest. This problem was cured by the changing of the exhaust pipe. The exhaust port on the valve chest and cylinder were drilled to accept a small pipe and this was sealed in place. This replaced the previous exhaust pipe that was fixed flush with the valve chest top cover. The used steam or air only being contained by a very thin bit of gasket which despite my best efforts would not maintain a seal.
There was much celebration when the chassis ran smoothly on air for the first time in nearly 20 years.
The engine is now in bits and soaking in thinners to remove many layers of paint and will be resprayed soon and running on steam.
If at first you don't succeed, use a bigger hammer!


 DSC_0022 by bigjimiflash, on Flickr[/img]
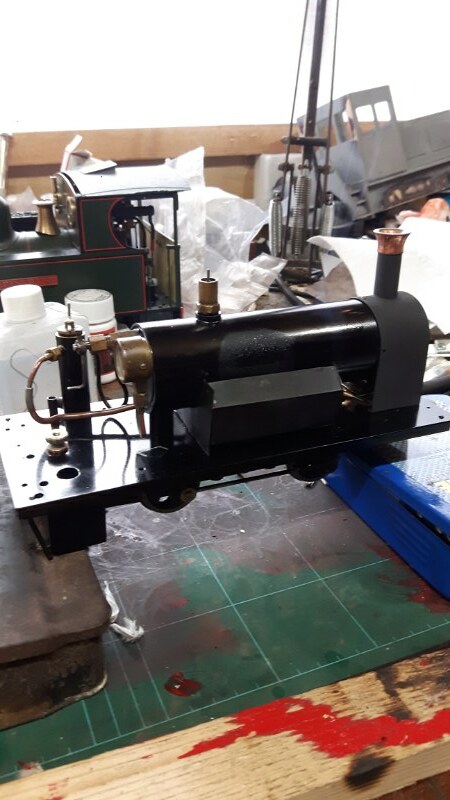
This is the before picture.
The paint was in very bad condition, It had been re painted at least twice before. If it had been original I would have just given it a sympathetic spiv up, however it was way beyond that.
For some reason there are various spurious holes in the footplate which suggest there was another type of burner fitted originally. I did debate filling these in but decided against it. There are various knocks and scratches on the boiler and the tanks, nothing serious but I have left them as they were.
A few drill holes in the tanks suggest that fillers were fitted at one point along with name plates. These I may replace but no name really suggests it self at the moment.
If at first you don't succeed, use a bigger hammer!
I did wonder about detailing the loco, but it is such a simple machine there doesn't seem to be much point as by the time I have added a bunker and various other odds and ends I have gone away from the nice, simple early loco that it is.
I did wonder about building a tram body to fit the chassis, just to ring the changes but I think it will stay as is.
I can't see it getting much use but it is a nice member of the fleet. Ol, Bill should be back together on Monday and that just leaves the Merlin in bits ready for work to commence.
I did wonder about building a tram body to fit the chassis, just to ring the changes but I think it will stay as is.
I can't see it getting much use but it is a nice member of the fleet. Ol, Bill should be back together on Monday and that just leaves the Merlin in bits ready for work to commence.
If at first you don't succeed, use a bigger hammer!

Pictures of the steam test before the body was fitted.
 20170109_142619 by bigjimiflash, on Flickr
A very poor picture of it in steam and moving under its own power for the first time in yonks.
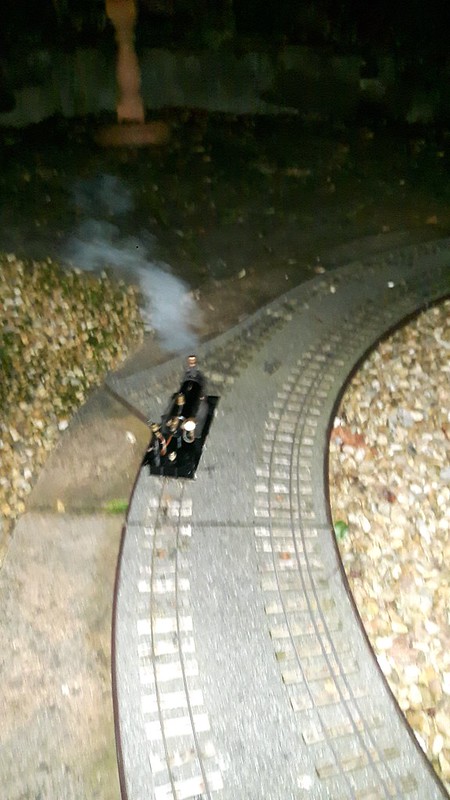 20170111_203052 by bigjimiflash, on Flickr
Body back on and ready to go.
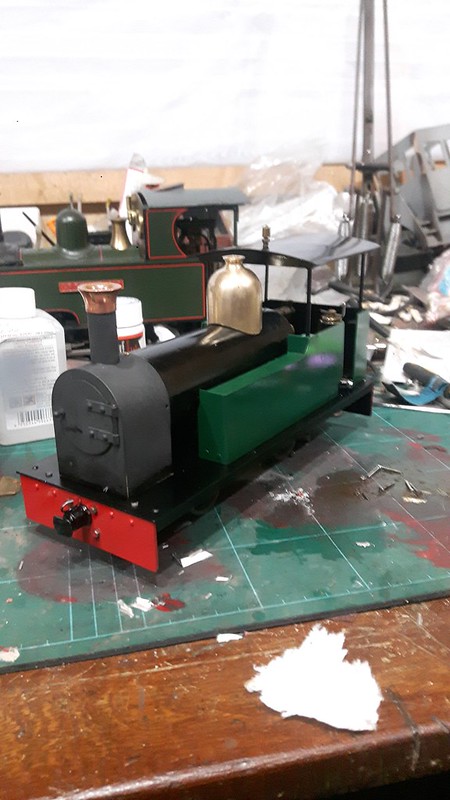 20170113_173941 by bigjimiflash, on Flickr
20170109_142619 by bigjimiflash, on FlickrA very poor picture of it in steam and moving under its own power for the first time in yonks.
20170111_203052 by bigjimiflash, on FlickrBody back on and ready to go.
20170113_173941 by bigjimiflash, on FlickrIf at first you don't succeed, use a bigger hammer!
Running with a train of what I think are Archangel Wagons.
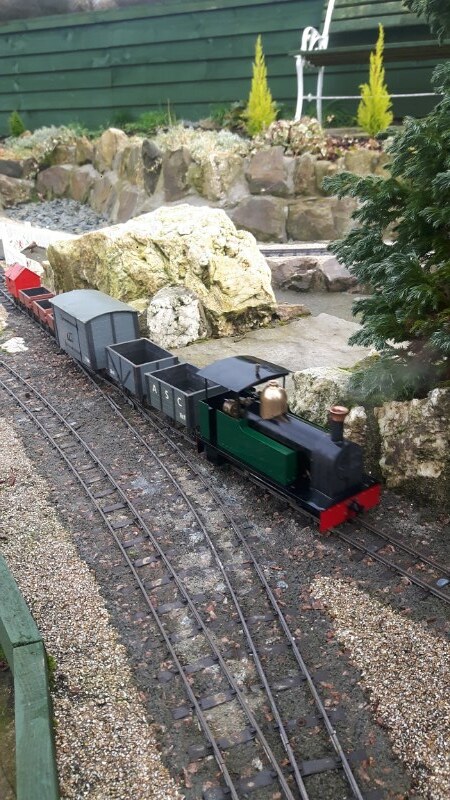 20170114_131949 by bigjimiflash, on Flickr
More pictures in the Photos Section
20170114_131949 by bigjimiflash, on FlickrMore pictures in the Photos Section
If at first you don't succeed, use a bigger hammer!
Who is online
Users browsing this forum: No registered users and 1 guest