A place for the discussion of garden railways and any garden style/scale portable and/or indoor layouts
-
bazzer42
- Driver

- Posts: 1215
- Joined: Sun Nov 25, 2012 1:37 pm
- Location: Forest of Dean
Post
by bazzer42 » Sun Nov 06, 2016 9:44 pm

Not a lot of progress but the footplate is cut and valences fitted. Need to add some detail and emphasise the gap between the angle plates. The first cab side was completed before I worked out that without the footplate I can't add the seat and driver and therefore double check clearance. I have had to add an extra 10mm to the cab to give enough driver clearance but may be able to reduce this a bit later on.
I have added some plasticard discs to the wheels to hide their parentage (and the valve gear holes). Cutting circles in anything more than .25mm plasticard is a nightmare.
I think the biggest problem will be building a coupling that looks like it is an additional ballast/weight with some multi height slots.
-
Peter Butler
- Driver
- Posts: 5266
- Joined: Sun Sep 09, 2012 10:33 pm
- Location: West Wales
Post
by Peter Butler » Sun Nov 06, 2016 9:52 pm
Cutting holes in plasticard can be made easy by using hole cutters in either a power drill or preferably a bench drill.
A set of hole cutters is not too expensive and gives many useful sizes to choose from. A really useful tool.
The best things in life are free.... so why am I doing this?
-
bazzer42
- Driver
- Posts: 1215
- Joined: Sun Nov 25, 2012 1:37 pm
- Location: Forest of Dean
Post
by bazzer42 » Wed Nov 09, 2016 7:21 pm


Bit of side detail added this afternoon and axleboxes fitted, cheated by securing them to the protective plates attached to the frame sides. I also added some rust to the wheels but you won't see that from those poor photos.
I did try cutters in a hand drill and failed dismally, Peter. Didn't think of using my pillar drill.
-
Peter Butler
- Driver
- Posts: 5266
- Joined: Sun Sep 09, 2012 10:33 pm
- Location: West Wales
Post
by Peter Butler » Wed Nov 09, 2016 11:53 pm
Good progress and nice detailing.... can't be long now!
The best things in life are free.... so why am I doing this?
-
tom_tom_go
- Driver
- Posts: 4824
- Joined: Wed Feb 23, 2011 3:08 am
- Location: Kent, UK
-
Contact:
Post
by tom_tom_go » Thu Nov 10, 2016 7:37 am
Glad it is not just me that has a messy bench when in the middle of a project!
That is a great example of Plastikard building as well. Will it be R/C with sound?
-
bazzer42
- Driver
- Posts: 1215
- Joined: Sun Nov 25, 2012 1:37 pm
- Location: Forest of Dean
Post
by bazzer42 » Thu Nov 10, 2016 2:11 pm
tom_tom_go:120831 wrote:Glad it is not just me that has a messy bench when in the middle of a project!
That is a great example of Plastikard building as well. Will it be R/C with sound?
That is relatively tidy for me and eye-rollingly untidy for Mrs B! I would like to try the Deltang set up as there appears to an esc and receiver on one card. If that left room (after 6 x AA) I do like the price of the acme sound systems - £36 seems a bargain. I have yet to try sound from scratch so it might be fun to try...
Going to try ballast weights/couplers by laminating layers of plasticard at 3mm, if it works will use it as a master to cast from resin to save building more than one. Looking at a google image last night (don't tell the wife) I did think that they appeared fairly angular so hoping to file, drill something from straight cut card.
PS Peter don't hold your breath....won't be long....mmmmm
-
jim@NAL
- Driver
- Posts: 1115
- Joined: Sun Sep 23, 2012 11:01 am
- Location: haverhill suffok
Post
by jim@NAL » Fri Nov 11, 2016 8:16 pm
very nice looking loco
-
bazzer42
- Driver
- Posts: 1215
- Joined: Sun Nov 25, 2012 1:37 pm
- Location: Forest of Dean
Post
by bazzer42 » Sat Nov 12, 2016 7:52 pm
Thanks Jim. Started a buffer beam ballast weight coupling thing yesterday. Laminated 22 pieces of plasticard to get the height, then loads of sanding and filling to get to the drilling stage. A job for tomorrow but a test drill on 2mm card tonight did see plastic melting to the drill but cutting a perfect hole. I'm a bit concerned that a deeper hole may be problematic especially as I think the the drill is already on the slowest setting, need to check that first.


I also finished the hood for the bonnet in between waiting for squadron putty to dry. Seem to have a little warp so may need to laminate another layer on tomorrow.
-
Peter Butler
- Driver
- Posts: 5266
- Joined: Sun Sep 09, 2012 10:33 pm
- Location: West Wales
Post
by Peter Butler » Sat Nov 12, 2016 9:27 pm
Better and better! Looking wonderful. I must admit to never drilling through such a thickness of plastikard but I doubt any distortion will occur. Possibly a slow drill is causing it to overheat, whereas a sharp faster one might do the job quicker and clear the waste without generating too much heat?
Good luck and please let us know.
The best things in life are free.... so why am I doing this?
-
bazzer42
- Driver
- Posts: 1215
- Joined: Sun Nov 25, 2012 1:37 pm
- Location: Forest of Dean
Post
by bazzer42 » Sun Nov 13, 2016 4:41 pm
The buffer block cut well with a twist drill not a woodworking drill however having a 5.5mm drill next to a 5mm bit was a recipe for a disaster...however managed to line the bigger hole with .25mm plasticard. Thought something looked wrong! I've ordered some longer 8ba bolts to fit as I am nervous about cutting the side of the holes away and getting a tidy finish. Time to make a mould.
Managed to cut the front cab sides with a slot for the glazing.


-
bazzer42
- Driver
- Posts: 1215
- Joined: Sun Nov 25, 2012 1:37 pm
- Location: Forest of Dean
Post
by bazzer42 » Mon Nov 14, 2016 7:19 pm
In the pink today, silicone pink to be precise. Castings have come out wellish with a 75 per cent success rate. The one with black swirls wasn't mixed enough and has developed lumps. Added a washer on top to act as a guide for drillin, just need the bolts to arrive.


-
LNR
- Driver
- Posts: 1561
- Joined: Sat Feb 27, 2016 5:26 am
- Location: Australia
Post
by LNR » Mon Nov 14, 2016 9:16 pm
Hey!!! well done. They have come out nicely.
Grant.
-
bazzer42
- Driver
- Posts: 1215
- Joined: Sun Nov 25, 2012 1:37 pm
- Location: Forest of Dean
Post
by bazzer42 » Mon Nov 14, 2016 10:48 pm
Thanks Grant, there is some shrinkage on the rear corners but there is a square skin so it will be invisible when mounted but I may add some filler to prevent any damage in the future.[/i]
-
Dannypenguin
- Trainee Driver

- Posts: 632
- Joined: Tue Feb 26, 2013 9:57 am
- Location: Forest of Dean, UK
-
Contact:
Post
by Dannypenguin » Tue Nov 15, 2016 3:15 pm
Lovley looking diesel, and I'm especially liking those buffer castings

keep it up!
-
markoteal
- Trainee Driver
- Posts: 763
- Joined: Mon Apr 18, 2016 6:23 pm
- Location: Yorkshire
Post
by markoteal » Tue Nov 15, 2016 3:26 pm
Yes - be good to see an article in the future how you go about doing the silicone casting - interested to learn about it
Where did I put that uncoupler?
-
bazzer42
- Driver
- Posts: 1215
- Joined: Sun Nov 25, 2012 1:37 pm
- Location: Forest of Dean
Post
by bazzer42 » Tue Nov 15, 2016 8:44 pm
The casting is quite simple (and crude) but I will do something if only to highlight what I would do different or where it can go wrong. I have a collection almost made its!
-
jim@NAL
- Driver
- Posts: 1115
- Joined: Sun Sep 23, 2012 11:01 am
- Location: haverhill suffok
Post
by jim@NAL » Tue Nov 15, 2016 9:26 pm
that casting works great
-
bazzer42
- Driver
- Posts: 1215
- Joined: Sun Nov 25, 2012 1:37 pm
- Location: Forest of Dean
Post
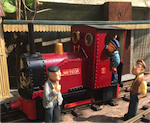
by bazzer42 » Thu Nov 24, 2016 9:22 pm


Well, neither Rome or a Ruston were built in a day. In my defence we have seen David Essex (her choice) and Passenger over the last 3 days.
The biggest compromise so far has been the wide cover to fit over the lgb motor protruding into the cab. I was unable to shave anything off the cover as the motor mounts on it. Some levers have been fettled from styrene and Ted has had a coat of paint. Whilst I enjoy the painting part my skills seem to have withered since my 1/35 Tamiya Tiger days. Need to sort the seat out and that may well be a bolt to space the height with a plasticard bendy seat support with no bendy. A few more rivets on the chassis and it may be roof bending time. Oh for a Futurama bending unit...
-
Peter Butler
- Driver
- Posts: 5266
- Joined: Sun Sep 09, 2012 10:33 pm
- Location: West Wales
Post
by Peter Butler » Thu Nov 24, 2016 9:40 pm
David Essex should come to see you..... obviously you have much more tallent!
The best things in life are free.... so why am I doing this?
-
tom_tom_go
- Driver
- Posts: 4824
- Joined: Wed Feb 23, 2011 3:08 am
- Location: Kent, UK
-
Contact:
Post
by tom_tom_go » Thu Nov 24, 2016 10:07 pm
The figures in the pictures, where are they from please?
Loco is really coming on, looks great!
Who is online
Users browsing this forum: No registered users and 3 guests