
James from Devon:117405 wrote:Hi Mightymax.mightymax:117385 wrote:Hi James, love seeing projects as they are built. Love the station, what are them edging stones you used on the platform, and where do they come from?
thanks for your comments, much appreciated
Keith is right. I used air drying clay to make 4 large and 4 half sized slabs so they were all slightly different, rustic looking. I used chinese takeaway tubs and made moulds from RTV silicone and then cast hundreds from resin. Once set, i used car spray paint primer and once that was dry i sprayed them dark grey. Before that dried, I oversprayed with brown and a little white to get them the colour i wanted. Last step was to spray them with varnish ...a good few coats to make them last.
Platform was made from reinforced concrete ... I made a 20mm high mould. I glued the edge slabs on with no more nails and then as keith said, filled in the gap with cement...you can buy dye from Amazon for about a fiver! It takes some time but I am happy with the results.
Let me know if you want any more info.
Cheers
That's a great bit of information, I'll give that a go myself I think for my planned halt to be built over the summer.thankyou.
Jim
Staple Hill Railway - New Line
-
James from Devon
- Trainee Fireman

- Posts: 210
- Joined: Mon Feb 01, 2016 6:58 pm
- Location: Devon
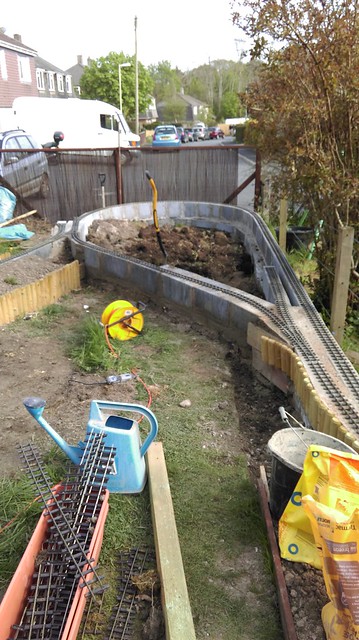
Managed to make some more progress on the line this week. I took out the temporary railway that I built with posts and boards, I was amazed how much warping and twisting had occurred in just over a year. I am glad to be running on a concrete base from now on. I also learned a very valuable lesson...never again will I fix track down with panel pins, it was murder getting them out without damaging the track. All track now screwed down on the new railway.
I am about 3/4 of the way round now with the new line and there is enough track to run on, albeit backwards and forwards.
Here are some more pictures:
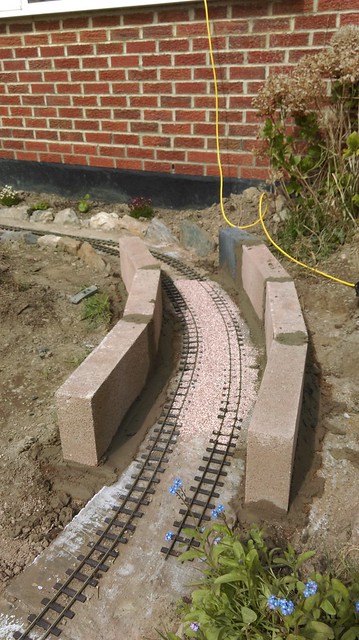
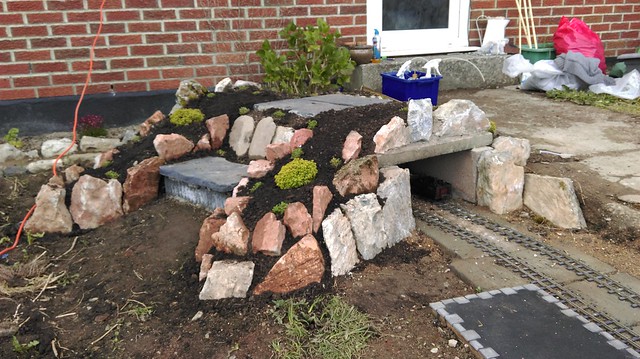
This is start of the tunnel, not only is it nice to have one, this has a purpose as you need to walk over it to get into the garden now that there is track all the way around. I went for the traditional breeze block and paving slab method.
Taking shape, I have some large flat rocks to add to the top of the mouth uprights which will finish off the front and hide the paving slab.

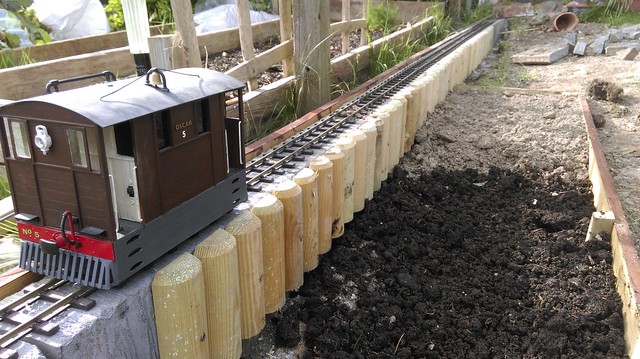
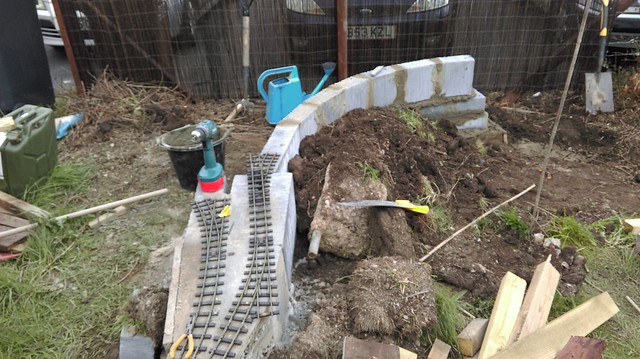
I decided to build a retaining wall on the base of the embankment, I am happy with how this turned out and of course the soil won't wash away in the rain.
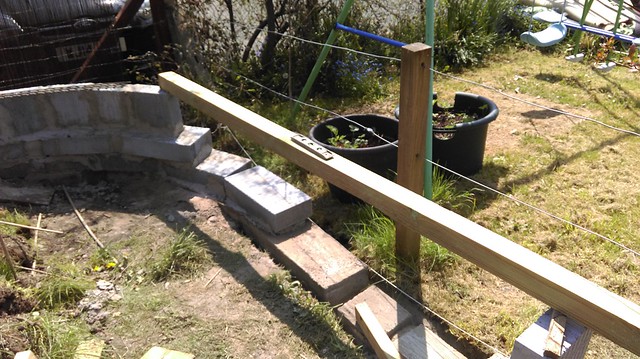
Long straight at the opposite side of the garden.
I am starting to experiment with ballast, I have settled on this type.
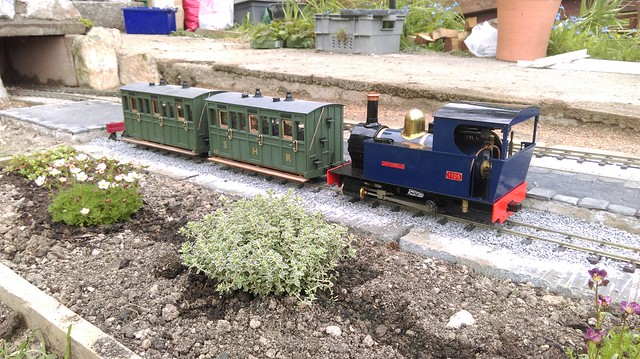
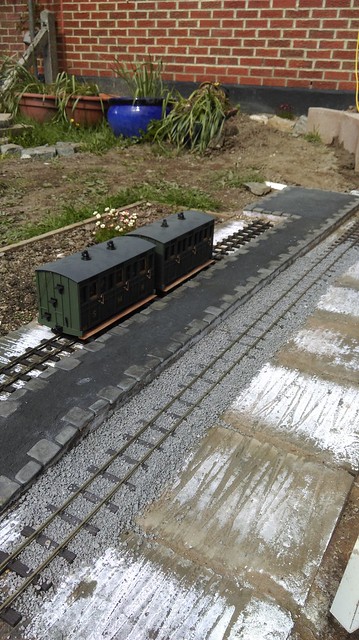
And to finish this update, Lady Isabella in the newly ballasted bay platform.
Hope you like these, hopefully there will be some more to add after the weekend.
Happy steaming!
Jim
I am about 3/4 of the way round now with the new line and there is enough track to run on, albeit backwards and forwards.
Here are some more pictures:
This is start of the tunnel, not only is it nice to have one, this has a purpose as you need to walk over it to get into the garden now that there is track all the way around. I went for the traditional breeze block and paving slab method.
Taking shape, I have some large flat rocks to add to the top of the mouth uprights which will finish off the front and hide the paving slab.
I decided to build a retaining wall on the base of the embankment, I am happy with how this turned out and of course the soil won't wash away in the rain.
Long straight at the opposite side of the garden.
I am starting to experiment with ballast, I have settled on this type.
And to finish this update, Lady Isabella in the newly ballasted bay platform.
Hope you like these, hopefully there will be some more to add after the weekend.
Happy steaming!
Jim
Garden railways don't run on steam or electric rather wine and Jedi master level patience

I think you may well be surprised how much of your soil will wash away despite the retaining wooden fence. However when I had something similar many moons ago I just picked up a bag or two of cheap supermarket compost whenever I was forced into a shopping trip and it was a moments work to top it up. Made shopping a bit more bareable too !
Lovely line by the way and great progress !
Barry
Lovely line by the way and great progress !
Barry
-
Soar Valley Light

- Driver

- Posts: 1451
- Joined: Sun Dec 08, 2013 5:18 pm
- Location: North West Leicestershire
Great work Jim,
Your works is clearly of a good standard.
I, too, would be very interested in more details about your ballasting methods if you get the chance please.
Keep up the good work and keep the posts coming.
Andrew
Your works is clearly of a good standard.
I, too, would be very interested in more details about your ballasting methods if you get the chance please.
Keep up the good work and keep the posts coming.
Andrew
"Smith! Why do you only come to work four days a week?
"'cause I can't manage on three gaffer!"
"'cause I can't manage on three gaffer!"
-
James from Devon
- Trainee Fireman
- Posts: 210
- Joined: Mon Feb 01, 2016 6:58 pm
- Location: Devon
Hi guys
Thanks for the lovely comments, of course, if any of you are ever down this way you'd be welcome to come in and have a run and a cuppa!
The ballast is Trugrip68, its for resin bonding normally. I got the idea from a post on this forum. You can get sample bags from here:
http://resinbondedaggregates.com/produc ... esin-bound
One sample bag does about 7 feet of track and the samples are free postage. Its not the cheapesty solution but scale ballast is very hard to come by I found. it does come up lighter than the image on the above website as you can see in my pics.
I am also a little worried about loss of earth on the bank, I will keep topping up but I am going to plant chamomile lawn on this section so I am hoping that once that is established the root network will hold it all in place a little better. I guess time will tell.
I tend to get a couple of days off work and go for it from first thing until it gets dark such is my excitement at getting it all running, I normally pay for that the day after with many aching muscles!
In other good news, I bought some bridge sides from ebay, they arrived today so that's Saturday's project.
Garden railways don't run on steam or electric rather wine and Jedi master level patience


It's all looking very good, thanks for the update! I really like the carriages (IP mini L&B?), and the shot of them sitting in the bay too - it has a real sense of "something about to happen"...
I've found earth creeping down from walls etc to be a bit of an issue, but planting does help keep it in place, and helps disguise the resultant gap too...
Cheers,
Andrew.
I've found earth creeping down from walls etc to be a bit of an issue, but planting does help keep it in place, and helps disguise the resultant gap too...
Cheers,
Andrew.


-
James from Devon
- Trainee Fireman
- Posts: 210
- Joined: Mon Feb 01, 2016 6:58 pm
- Location: Devon
Hi All,
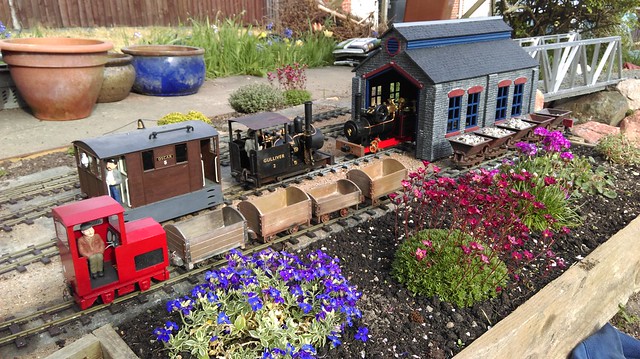
Here is the update for this week. It has been typical bank holiday weather so I have been working on a loco shed - pic below. Only about 10 feet of blockwork and track to complete the first circuit which is very exciting! I have the day off work on Thursday so I am planning on getting that finished.
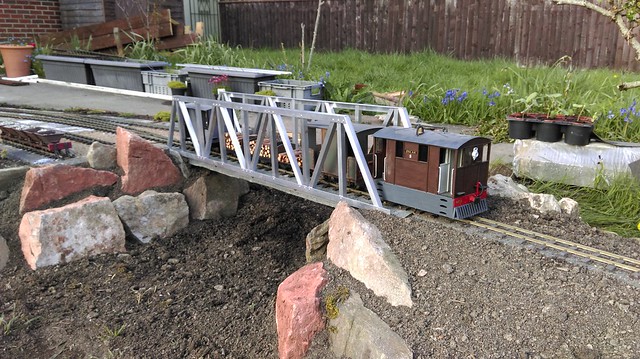
Got the bridge sides fitted (Thanks Derek - Bazzer from Ebay, love them!)
There were some questions about the ballast... On the website I shared the link to, the image shows the ballast with its resin bond added which darkens it considerably. I wont use anything like that, the stretches that I have done are bonded with good old fashioned PVA/water/washing up liquid mix which seems to be holding it in place just fine so far.
Here are the pics:
This is the bridge with sides, rock facing and a short train!
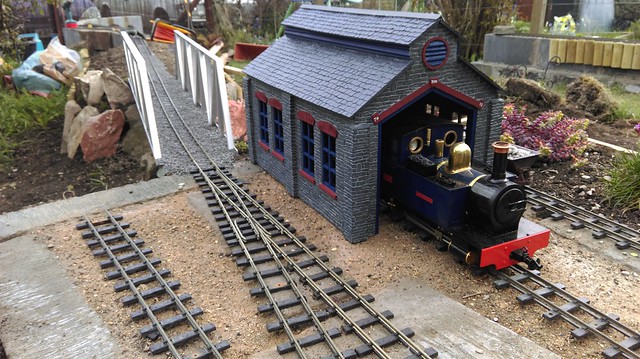
New loco shed almost finished, minus doors as yet! This came from Modelworks, its a lovely kit to put together. I need to put in the base for the yard which will be more black mortar with coal mixed in. The shed can then be bolted down!
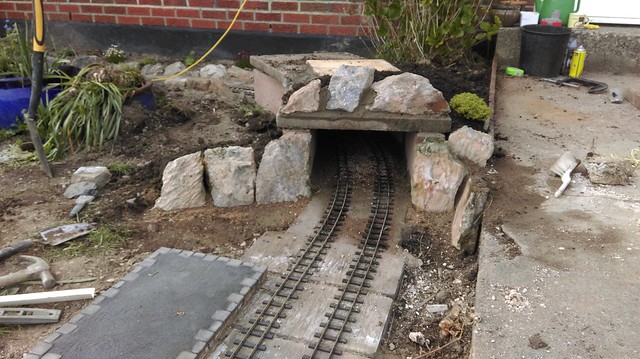
Tunnel almost there, got some plants in as ground cover so hopefully this will start looking less "new" soon! I am still on the look out for some stone to finish the top of the tunnel mouths.
This is the far end of the garden and I was laying out points to check line up of the blocks, this is the main junction which will give options for short route around the garden, dogbone balloon loops or taking the route over a bridge across the path and a long route of both sides of the garden. The track curving off to the right will form a raised bed with a quarry area.
Thats it for now.
Hope you like them and I will keep you all updated!
Cheers
Jim
Here is the update for this week. It has been typical bank holiday weather so I have been working on a loco shed - pic below. Only about 10 feet of blockwork and track to complete the first circuit which is very exciting! I have the day off work on Thursday so I am planning on getting that finished.
Got the bridge sides fitted (Thanks Derek - Bazzer from Ebay, love them!)
There were some questions about the ballast... On the website I shared the link to, the image shows the ballast with its resin bond added which darkens it considerably. I wont use anything like that, the stretches that I have done are bonded with good old fashioned PVA/water/washing up liquid mix which seems to be holding it in place just fine so far.
Here are the pics:
This is the bridge with sides, rock facing and a short train!
New loco shed almost finished, minus doors as yet! This came from Modelworks, its a lovely kit to put together. I need to put in the base for the yard which will be more black mortar with coal mixed in. The shed can then be bolted down!
Tunnel almost there, got some plants in as ground cover so hopefully this will start looking less "new" soon! I am still on the look out for some stone to finish the top of the tunnel mouths.
This is the far end of the garden and I was laying out points to check line up of the blocks, this is the main junction which will give options for short route around the garden, dogbone balloon loops or taking the route over a bridge across the path and a long route of both sides of the garden. The track curving off to the right will form a raised bed with a quarry area.
Thats it for now.
Hope you like them and I will keep you all updated!
Cheers
Jim
Garden railways don't run on steam or electric rather wine and Jedi master level patience
-
James from Devon
- Trainee Fireman
- Posts: 210
- Joined: Mon Feb 01, 2016 6:58 pm
- Location: Devon
Hi Rik.ge_rik:117827 wrote:Brilliant progress, Jim! The line is really coming together. It'll look even better when the planting becomes established.
Rik
Thanks for your comment. I have to admit that I am excited to see all the planting established...I will have to be patient! Actually, I do have to credit you for some of the ideas for my line. Your excellent website about your railway really shows how beautiful a garden line can look with careful planting. Your line looks like its always been there...top job!
Cheers.
Jim.
Garden railways don't run on steam or electric rather wine and Jedi master level patience
Thanks Jim. Glad you've found my blog to be useful. You give me and my horticultural skills far too much credit. I use the Darwinian approach to gardening - nature decides what will grow and what won't. I then let Mind Your Own Business fill in the gaps.James from Devon:117831 wrote: ........ Actually, I do have to credit you for some of the ideas for my line. Your excellent website about your railway really shows how beautiful a garden line can look with careful planting. ..........
Rik
-
tom_tom_go

- Driver
- Posts: 4824
- Joined: Wed Feb 23, 2011 3:08 am
- Location: Kent, UK
- Contact:
Hi James,James from Devon:117648 wrote:The ballast is Trugrip68, its for resin bonding normally. I got the idea from a post on this forum. You can get sample bags from here:
http://resinbondedaggregates.com/produc ... esin-bound
One sample bag does about 7 feet of track and the samples are free postage. Its not the cheapesty solution but scale ballast is very hard to come by I found. it does come up lighter than the image on the above website as you can see in my pics.
Was it the same stuff I tried?
http://gardenrails.myfreeforum.org/ftop ... asc-60.php
Yours looks great but it was too light for me, even a bluey kind of colour?
You are making lightening progress, well done!
-
James from Devon
- Trainee Fireman
- Posts: 210
- Joined: Mon Feb 01, 2016 6:58 pm
- Location: Devon
Hi Tom
Yes it is the same stuff and yours was the post that I referred to. I like the colour, is has darkened very slightly after I bonded it with PVA and here in devon, it is close to that used on the South Devon Railway.
Thanks for the comments about my line, the main circuit got connected up this weekend so I can now run trains!
As an aside, I loved reading your building diary, a lovely and well thought out railway that you have there. You gave me an awful lot of inspiration so thank you!
Jim
Garden railways don't run on steam or electric rather wine and Jedi master level patience
-
James from Devon
- Trainee Fireman
- Posts: 210
- Joined: Mon Feb 01, 2016 6:58 pm
- Location: Devon
A lovely weekend here in Devon and the exciting news is that I finished the blockwork and track laying on the main circuit and one of the two balloon loops. I was able to treat myself to a cuppa while watching some trains run around the garden which was lovely!
Here are some pictures from the work...
I was getting concerned that as I neared the end of the block laying on the the loop that my levels may have been a little out (this is my first block laying ever) so I got a long post and had a final check.....
And the result was..... a massive sigh of relief!
Almost there...

The complete circuit and loop, I have removed the turf from this side of the garden which has now filled the resulting void in the middle of the loop. This will be the site of an as yet, unnamed village.

Another view
A busy moment at Staple Hill shed
Baguley with a coal train
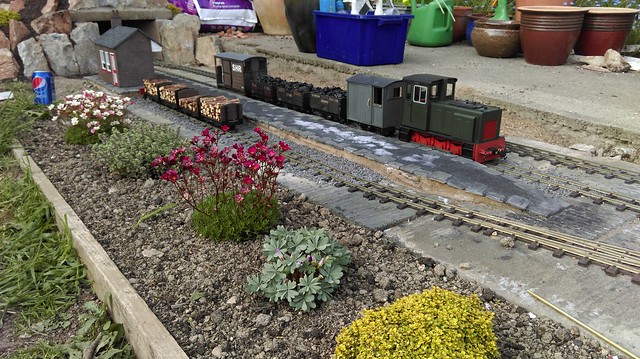
Next up this week is laying the slabs and pathways with a couple of benches to sit on and enjoy the trains.
Hope you like these and thanks for all the encouragement.
Here are some pictures from the work...
I was getting concerned that as I neared the end of the block laying on the the loop that my levels may have been a little out (this is my first block laying ever) so I got a long post and had a final check.....
And the result was..... a massive sigh of relief!
Almost there...
The complete circuit and loop, I have removed the turf from this side of the garden which has now filled the resulting void in the middle of the loop. This will be the site of an as yet, unnamed village.
Another view
A busy moment at Staple Hill shed
Baguley with a coal train
Next up this week is laying the slabs and pathways with a couple of benches to sit on and enjoy the trains.
Hope you like these and thanks for all the encouragement.
Garden railways don't run on steam or electric rather wine and Jedi master level patience
-
James from Devon
- Trainee Fireman
- Posts: 210
- Joined: Mon Feb 01, 2016 6:58 pm
- Location: Devon
Hi Grant
Thanks for the comments, I make the most of a dry day or two when it comes along! I have put up a willow screen at the front of the garden which gives some privacy from the road. We are lucky that we live in a very quite cul-de-sac in a very small village, security has never been a problem here. Also, we have lovely neighbours either side so we left the open fence that was always there so we can have a chat!
Cheers
Jim
Garden railways don't run on steam or electric rather wine and Jedi master level patience
-
Peter Butler

- Driver
- Posts: 5252
- Joined: Sun Sep 09, 2012 10:33 pm
- Location: West Wales
Wow, Jim.... if you have achieved this since your first post at the end of March you are a real Superman!!!! It looks wonderful and the planting is going to be very colourful when it becomes established. I can see you have planted your own Pepsi tree too.... good luck with that one!
The best things in life are free.... so why am I doing this?
Who is online
Users browsing this forum: No registered users and 1 guest