OK time for a bit of smug.
Assembled the frame, running gear, valve gear, etc, set the valve gear by eye, plumbed the airbrush compressor in and she ran first time.
Katie,


-
Boustrophedon

- Trainee Fireman

- Posts: 235
- Joined: Wed May 22, 2013 7:43 pm
The drilling of the hole for the return crank pin is the operation that gives me the most worry. Do people bother? Once it is pinned no further adjustment is possible and I can see no real way of setting it in the right position except by eye.
The return crank was one of the few parts that I felt could have been better made. The holes on mine were way too big to be closed with the pinch bolt to grip the pin. I squeezed mine in a vice with feeler gauges filling the slot, til it was an acceptable push fit on the crank pin. I intend to use heavy duty loctite in lieu of the pin.
The finish on the return crank leaves something to be desired too, the casting is very rough under the chrome.
As with the tacky RC "quicklink" push rod end on the reversing rod, I intend to make something smarter once I have it running.
Oh and "star" washers- yuk!
-
Boustrophedon
- Trainee Fireman
- Posts: 235
- Joined: Wed May 22, 2013 7:43 pm
Some say that it's best to run them in an a rolling road, so I built one in meccano. Since the wheel base seems to be exactly 3 inches, it didn't even have to be in two sections.
It's very noisy though.

The chassi has had 3 hours of running in on air, with a lubrication every half hour. She's noticeably easier to turn over and is running much more smoothly.
It's very noisy though.
The chassi has had 3 hours of running in on air, with a lubrication every half hour. She's noticeably easier to turn over and is running much more smoothly.
-
Boustrophedon
- Trainee Fireman
- Posts: 235
- Joined: Wed May 22, 2013 7:43 pm
After about 5 hours on compressed air, I completed the installation of the boiler and all the related pipe work. It took me a lot longer than I expected, the bending of neat pipe runs is a job not to be rushed.
After that I steamed her up, the gas lit first time with a pop. Only slight hiccough was the safety valve blowing off at 20psi, only it wasn't 20psi it was nearer 40 and the pressure gauge was stuck... It now seems to have freed itself.
Not getting anywhere with embedding the video, so here is the link:
https://youtu.be/5SfLaY4vmbI
-
Chris Cairns

- Driver

- Posts: 2366
- Joined: Mon Oct 29, 2007 7:25 pm
- Location: Glasgow, Scotland
<object width="640" height="480"><param name="movie" value="http://www.youtube.com/v/5SfLaY4vmbI?ve ... ram><param name="allowFullScreen" value="true"></param><param name="allowscriptaccess" value="always"></param><embed src="http://www.youtube.com/v/5SfLaY4vmbI?ve ... n_US&rel=0" type="application/x-shockwave-flash" width="640" height="480" allowscriptaccess="always" allowfullscreen="true"></embed></object>Boustrophedon wrote:Not getting anywhere with embedding the video
Making good progress there.
Chris Cairns
-
Boustrophedon
- Trainee Fireman
- Posts: 235
- Joined: Wed May 22, 2013 7:43 pm
-
Boustrophedon
- Trainee Fireman
- Posts: 235
- Joined: Wed May 22, 2013 7:43 pm
I had great difficulty fitting the star lock washers, the bu**ers just would not go on. In the end I put them face down on a piece of soft wood and used a large centre punch with a hammer to open the leaves slightly. After this the went on- still with difficulty.
I shall make some little bushes/collars secured with grub screws in due course.
A thought occurred to me whilst fitting the "penguins"; since the frames are laser cut, why are the frames not made to include the penguins? This would remove two components from the inventory at very nearly zero production cost.
-
Boustrophedon
- Trainee Fireman
- Posts: 235
- Joined: Wed May 22, 2013 7:43 pm
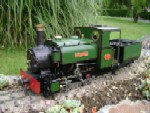
Test run in the garden.
<object width="640" height="480"><param name="movie" value="http://www.youtube.com/v/wc4la6b-scM?ve ... ram><param name="allowFullScreen" value="true"></param><param name="allowscriptaccess" value="always"></param><embed src="http://www.youtube.com/v/wc4la6b-scM?ve ... n_US&rel=0" type="application/x-shockwave-flash" width="640" height="480" allowscriptaccess="always" allowfullscreen="true"></embed></object>
<object width="640" height="480"><param name="movie" value="http://www.youtube.com/v/wc4la6b-scM?ve ... ram><param name="allowFullScreen" value="true"></param><param name="allowscriptaccess" value="always"></param><embed src="http://www.youtube.com/v/wc4la6b-scM?ve ... n_US&rel=0" type="application/x-shockwave-flash" width="640" height="480" allowscriptaccess="always" allowfullscreen="true"></embed></object>
-
Chris Cairns
- Driver
- Posts: 2366
- Joined: Mon Oct 29, 2007 7:25 pm
- Location: Glasgow, Scotland
On my part built Billy kit the previous owner had fitted the expansion links but the starlock washers were not fully home so I managed to tighten them up using long nosed pliers.Boustrophedon wrote:I had great difficulty fitting the star lock washers, the bu**ers just would not go on
However on my kit built Katie the previous owner had not only mounted the regulator servo upside down but had fitted the regulator arm back to front as well. I had to remove the starlock washer to refit the regulator control as per the instructions, however I've not managed to get the starlock washer to sit fully home this time.
Roundhouse sell a special bit for fitting those starlock washers - http://www.roundhouse-eng.com/multtool.htm
Your Katie is running well now. Nice plume of steam!
Chris Cairns

-
Boustrophedon
- Trainee Fireman
- Posts: 235
- Joined: Wed May 22, 2013 7:43 pm
OK so now I need help and advice. I have soldered the bodywork up using a combination of 200W soldering iron to pre tin the parts and a small blow torch to sweat them together. It's not perfect, but I know enough to know when to leave it be and not to make it worse by fiddling. I will have to remove a little surplus solder.
Now the roof. What do people do with the hatch thing on the top? It seems to fix using a double sided sticky pad, needless to say this does not appeal to me. And the hole, the great big hole. I know the hatch was designed to be an aerial for the RC in the good ole' days of 27MHz, but I am not using that, so what to do?
I am tempted to leave it off, but that still leaves the hole. I don't like the hole.


-
Chris Cairns
- Driver
- Posts: 2366
- Joined: Mon Oct 29, 2007 7:25 pm
- Location: Glasgow, Scotland
I have the same conundrum Don, and was waiting to see what advise you would receive - sadly only 2 suggestions.Boustrophedon wrote:What do people do with the hatch thing on the top? I don't like the hole.
The hole in the Katie roof is bigger and in a different location to the one on the Billy roof. Worth pointing out that the dummy roof vent is no longer supplied in the Billy kit, but it is for the Katie, George & Lady Anne kits?
As the dummy roof vent is not used for an aerial with 2.4 GHz you could either solder or glue the dummy roof vent direct to the roof, folding the etched slide ends so it is raised off the roof.
My 2nd hand kit built Katie has a few detailing parts missing, and is coupled to a kit built William tender which houses the battery pack & power switch. So I'm probably going to fill in the smaller holes (used for the roof mounted battery pack) and get a dummy roof vent to hide that large hole.
Or alternatively you could fill in the hole for the roof mounted whistle and solder in a small plate to use the large aerial hole to mount the whistle instead?
Chris Cairns
-
Boustrophedon
- Trainee Fireman
- Posts: 235
- Joined: Wed May 22, 2013 7:43 pm
Chris; I have already folded the sides on the dummy roof vent to raise it and intend to solder it just a little further forward and possibly back to front, so that it covers the hole. I am also going to solder up the screw holes for the RC battery pack.
If I fit RC, I will not be mounting the batteries under the roof. I intend to try to make the installation as invisible as possible and arrange thing so that it can be driven manually with the RC turned off.
If I fit RC, I will not be mounting the batteries under the roof. I intend to try to make the installation as invisible as possible and arrange thing so that it can be driven manually with the RC turned off.
Who is online
Users browsing this forum: No registered users and 1 guest