
After my experience with the Locomotion Leek and Manifold coaches [blue and white] these were offered for sale as WIP. They were sold at Llanfair Show to the Llechfan Railway crew and the money was plunged into immediate replacements.
The Locomotions final downfall - and trials of a potential replacement are documented here, with thanks to the Hampton Loade gang that day.
http://modelsteam.myfreeforum.org/about84193.html [SVR, 17/8/15]
As a result four of the Newqidas in Deutsche green were ordered off Ebay at a very favourable price.

Upon arrival, their bogies were stripped of the plastic 45mm wheels and the buckeye couplings and loops.


There were some parts of the chassis underframe detailing to saw out, mainly under where the couplings were. Once this was done, the pre-ordered GRS metal 32mm wheelsets were slipped into place - perfect replacments - and the bogies reinstated.
At a Barley Pit Railway open day, the 'tongues' that lead directly off the bogies had their holes drilled through. Replacement Accucraft chopper couplings were removed from the shanks, and the hook and nuts used to hold the chopper couplings to the Newqida bogie tongs. Once all had been secured, these coaches were engineering/runningwise, ready to go into service.
They were immediately tested on the Barley Pit Line - one of the two lines I had visited to test modifications of the failed Locomotion carriages.


The results here were magnificent. They rolled freely, coupled well, did not lift each other up, are as a rake not too heavy and most importantly, did not derail or shed wheelsets. This run was inspected on tenterhooks but as they ran with 'Cadno' more laps without any derailments whatsoever, confidence grew.
Memory recalls that the Locomotions had four derailments at Butterley on their inaugural run, last January so this was already steps better than the L&M's.
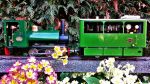
They were packed up and kept in the bag overnight as they were taken down to the second railway which had been testing grounds for the bogie coaches - the Severn Valley's Paddock Garden Railway. This time however, for aesthetic comparison, 'Vixen' was placed on duty to haul them.


A lovely day was had - and again, there were zero derailments or wheelsets shod. Vixen ran round with them and even managed a few loops of the usually RC-only 'main line' which goes through the middle of the garden and up round a gradient U-bend.
Furthermore, the rounded cab of Vixen's IoM ancestry complemented the rounded roofs of the Newqidas which made for a far more pleasing rake compared to the Locomotion coaches.
Now that the running matters had been settled and the new coaches a tried success, the customisation could begin. I chose to do the running capability first incase they too were failures - to have painted, lined, transferred and customised them only to find them insufficient would have been somewhat disappointing.
~~~~~~~~~~~~~~~~~~~~~~~~~~~
The coaches are easily dismantled - roof is clip off, the windows and their frames push out and finally the seats are plastic moulds which are held in place with screws which sit in beneath the coach body floor and the heads sit in little alcoves in the chassis.

The window frames and mouldings 'reinforce' the strength of the plastic coach body. Without these they are a little less rigid.
Essentially, this is how the coaches come apart into 'kit form'.

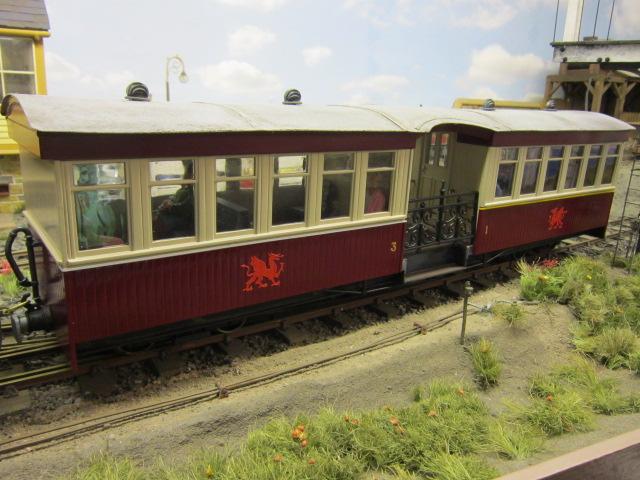
It was decided that the bodies would be repainted, much like the rake that had been loaned on trial in August. However my coaches would be further Anglicized, with the roofs modified [all German vents and gear gone, roof smoothed and English / GWR vents added on] followed by the balcony bars being replaced with gates akin to the Welshpool and Llanfair's Pickering Coaches and the balcony gangways replaced with central balcony fencing.
The Llanfair Show proved fruitful in getting up and close with the real Pickerings and so some shots were taken. I found that all their balcony fittings were black; as opposed to the plans I had had for the Locomotions whose balcony ends would have been in company colours. Furthermore, all of their visible droplights and window frames were in mahogany/maroon.
Back to the Newqidas...disassembled one by one, the bodies were readied.

After some thinking and research, I had decided that there were to go into Great Western livery. Some further investigation saw the 1927-1934 'modern' livery introduced by C. B. Collett as the choice of option - classic enough to be recognised, modern and easy enough to model on flatsided coaches such as these Newqidas, which have no beading.
http://www.gwr.org.uk/liveriescoach1928.html
German transfers sanded off and bodied smoothed down. Sprayed in three layers of Halfords grey primer, followed by all over of the Halfords Primula Yellow three layers. The tops were then masked off with several layers of tape and newspapers making sure the interiors were not stained brown.

The first three coaches were all treated identically. Their slip-fit doors at each end were also painted in chocolate brown [Halfords Rover Russet Brown].

These await GRS UK's Welshpool and Llanfair GWR Coach transfers and gold-black banding. Their pop-in window frames have bene painted maroon already.
~~~
The fourth coach was designated the Composite coach. A Guard's and luggaeg compartment was made by purchasing some 4mm plasticard and creating a divisional wall between the passenger area and the guards area on which the roof would sit correctly along with the rest of the coach.
The insides are bare at the moment - the seats and glazing easily come out. All I did was get the 4mm plasticard and draw templates that sit as snugly tight within the window holes as possible. Behind them is a large 'board' of plasticard that supports them both and is also glued to the inside of the coach body. Thus inside is as hollow as the rest - ready for a Guards and wheelchair access compartment.
[URL=http://s876.photobucket.com/user/Galvei ... p.jpg.html]

Plan is for windowless double doors as per Mk1 Luggage compartments
I sanded it down to get smoothness, then got the carfiller, mixed it up and used a cocktail stick to swab it over the seams. That was set then sanded down to create the near perfect surface.
Once painted over, it highlighted any pits or seams. It took me three tries to get it as perfect as seen here. Next up is the GWR Cream - Halfords Primula Yellow.

The Guards coach has also had the roofing treatment prepared.

The roofs are being de-Germanised - most of the vents and the brake hooks are just clipouts. Their sockets had plasticard glue on the underside bases so the holes could also be carfillered. The two protruding vent tubes were sawn off and sanded down, then treated the same. On the 'bare' roof you can see where the filler was applied. I now await GWR / English style vents to simply glue on then they will be painted in grey/white as per GWR.
The above photos are how they stand at the time of posting. I have got Fox Transfers GWR Coat of Arms crests and GRS WLLR [Wales] GWR texts transfers ready. I am seeking out 16mm [or close as] GWR roof vents for a 2 x 8 arrangement and also suitable fencing/gating for the Balconies. I have ordered some GRS GWR vents from their '64mm' range and pray that they won't be too large for my coaches.
Once I have the roof vents, I can glue them onto the roof and then spray them in primer grey before following up with GWR off-white.
East Coast Rotors do them in packs of 1, 2 and 3. I made them an offer of £95 for 4 including shipping.
Costs sofar for 4 Carriages:-
£95 - carriages + postage
£85 - GRS steel replacement wheels
£20 - Accucraft chopper couplings
£48 - Halfords paint, 2 X Primer; 3 x cream and 2 x brown and 1 x maroon [for windows/droplights]
£13 - GWR-WLLR[Wales] coach transfers
£10 - GWR Coat of arms crests
£17 - roof vents
£288 sofar. That's approx £72 per coach.
If I can keep them under £300 the rake 'll be happy.