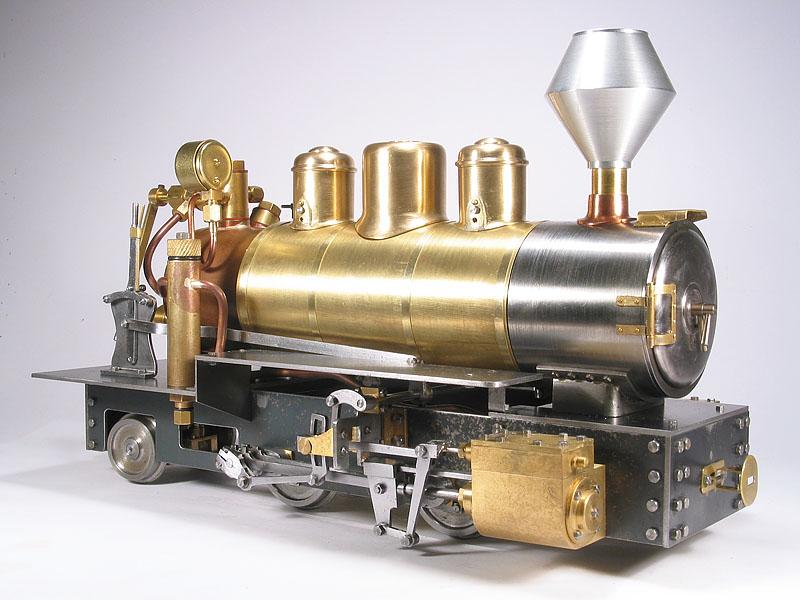
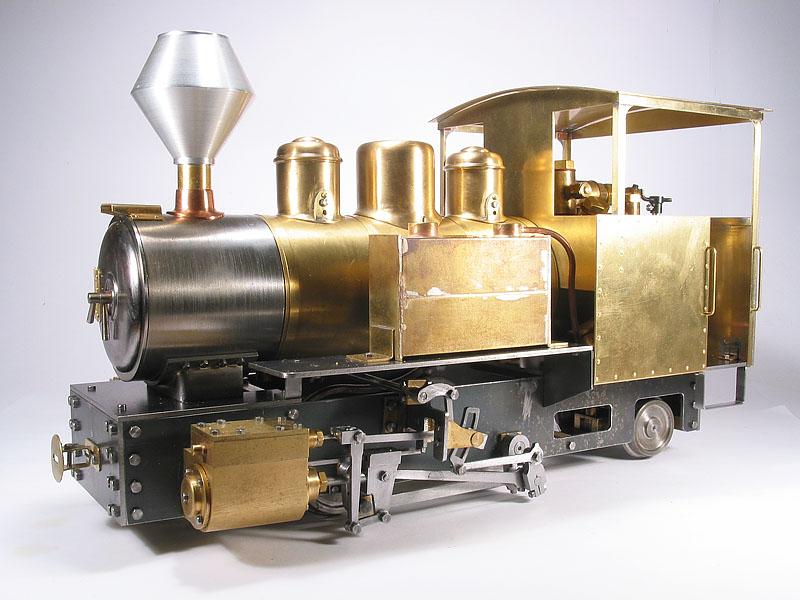
The model that eventuated is a modified 'Eric', based on Fowler 15989, which was built in 1923 for the Warburton Timber Tramway located in the Upper Yarra valley NE of Melbourne.
The model is in 1:20.3 scale on 45mm gauge. With the nominal prototype being a 90HP 0-4-2T running on 3' gauge, rather than the smaller 2' gauge Kiama Fowler used as the basis of the SM32 'Eric' design, it uses 'Eric' mechanical parts with slightly smaller bodywork.
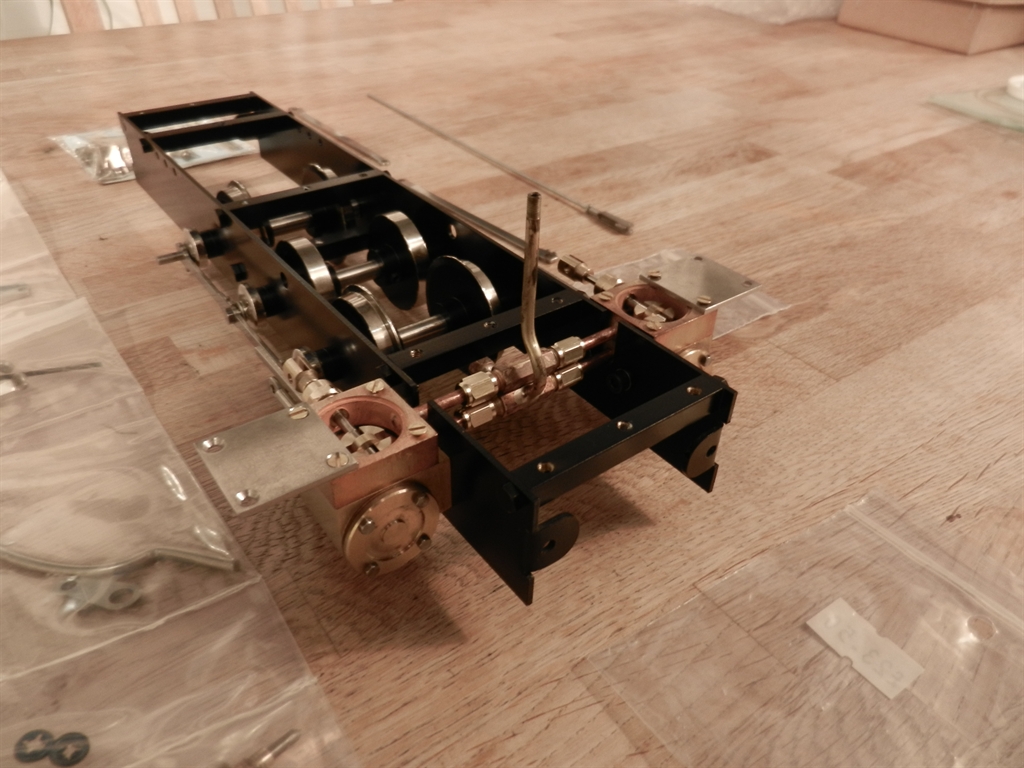
The first step was to build the basic rolling chassis to find out if it would get around a minimum 4' radius curve, which is my design minimum. As it happened there wasn't quite enough space between the frames for the trailing truck, so the frame had to be partly cut away at the back to get it around the curve.
I like to be able to remove wheel sets from the chassis and this time, rather than milling conventional axleboxes, I turned them from square stock and fitted a simple keep that stops them rotating in the chassis. I made the coupling and connecting rod bearings the same way and pressed them into the rods. The photo shows the frame after it was modified to clear the trailing wheels.
Next step was making the cylinders, which were built straight out of the book. It took longer to track down a piece of suitable metal than to machine them I think.

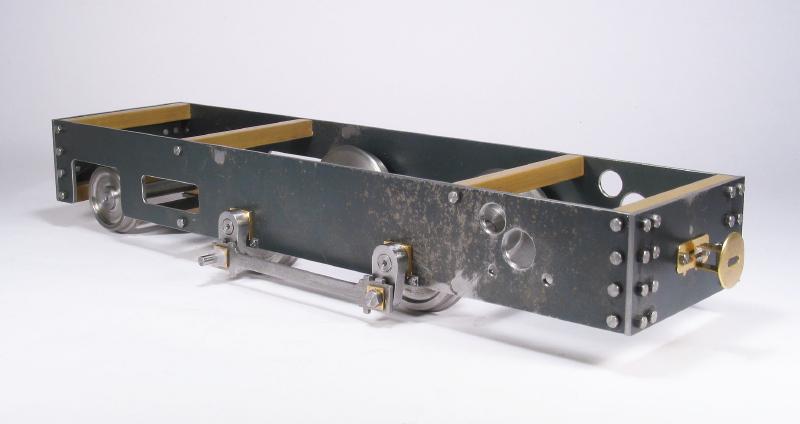
Then it was on to the valve gear and other rods. This is based on 'Eric', but the model has a different coupled wheelbase, so some parts have a different length to the drawings. This was all hacked out of 1/16" mild steel with a piercing saw and files. I find it quicker to make these bits by hand than fiddle around milling small parts. The photo shows the chassis about 5 weeks into the build, ready to be test run on air.

Once it was running on air, it was time to fit the reverser and smokebox. The reverser is more or less standard 'Eric', but the smokebox was made to match the prototype and the smokebox door was made to open. The smokebox was rolled out of 1mm mild steel and the spark arrestor was turned up from a chunk of aluminium to keep the front end weight from getting too heavy. The photo shows it in this state.

It was now time to fit a boiler. There was no suitable commercial boiler available so this became my first boiler build. I've been getting plenty of practice at silver brazing and the boiler is a simple single flue gas fired one, so I was reasonably confident I could do it.
My existing gas torch and brazing hearth were too small for this size of job, but luckily one of the local hardware places has started stocking decent size LPG torches and I found a place an hours drive away that sold insulating firebricks in small quantities. With enough heat and plenty of flux the brazing went OK. I set up the hearth in the open garage door on a freezing cold Anzac Day and was soon toasty warm. Not something I'd want to be doing on a 40C day in summer........
The photo shows it after pickling and cleaning up with steel wool, ready to be tested.

The new boiler passed the hydraulic test with no leaks, so it was fitted into the chassis and the boiler fittings, lubricator and steam pipework were fitted. Like 'Eric', this one isn't superheated. To be honest, my other saturated loco isn't noticeably wetter at the front end and doesn't use excessive amounts of water compared to locos with a stream drier, so I didn't bother fitting the steam pipe through the flue. This photo shows the boiler fitted and the steam plumbing complete.

Next step was the burner and gas tank. The Fowler has a very open cab, so the butane tank was brazed up out of square brass tube, tested hydraulically and fitted out of sight in a side tank. The poker burner is similar in design to a Roundhouse one, with rows of holes, instead of slots. The photo shows the gas system fitted and ready for a steaming test. The boiler passed it's steam test, but the loco wasn't run in steam, as I didn't want steam oil everywhere before I started painting.

With a working loco, it was time for the cosmetic bits to make it look like Fowler 15989. This photo shows the footplates, boiler cleading, sandboxes and dome shade in place.
Next up was the cab, which is the simple colonial type beloved of Fowler designers. The drivers may have disagreed though on a cold wet winters day in the Upper Yarra Valley. The rivets are dummy, pressed in using a punch and die in the mill. The parts are assembled with soft solder and the cab screwed to the cab floor. This photo shows the cab fitted.
Last major parts were the side tanks. Again with punched dummy rivets and soft soldered together. The top of both tanks is removable for access to the mounting screws. In the case of the l/h tank, the removable top also gives access to the gas tank filler. This photo shows the model more or less complete with the water tanks and a few other odd bits and pieces of detailing added.

By now it was the Queens Birthday weekend in early June and it was ready for the paint shop. Progress ground to a halt as I had to sort out air compressor and other painting issues and then clear the backlog of models in the paint queue.
Painting was my usual method for metal models. i.e. etch primer and then synthetic enamel topcoat dried for an hour at 80C in a fan forced oven. The colours used are the same satin dark green and two shades of black used on my other timber tram locos.
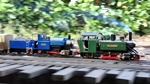
Dismantling for painting started a couple of weeks ago and it was finally bolted back together again today. The following photo shows it posed in the backyard on a cold grey afternoon in this little slice of SE Australia. This must be heaven, it's too cold for the other place....

The last photo shows it with a load of sawn timber on a pair of typical log bogies. It's normal train will be six of these.

Prototype Notes
For those interested, the model is a representation of Fowler builders no. 15989 of 1923, delivered to the Warburton Steam Tramway, which was located in the Upper Yarra Valley in the hills behind Melbourne.
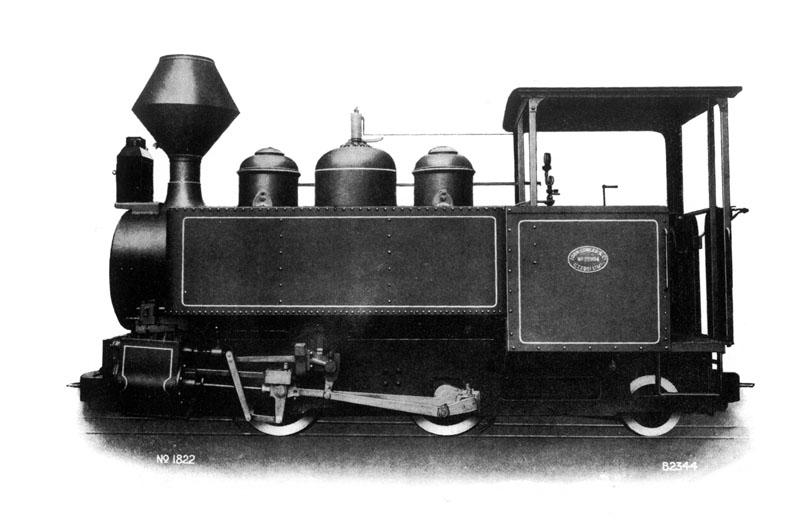
15989 was a standard Fowler 90HP 0-4-2T and although built for the 3' gauge used on timber trams in the area, it was similar in design to a number of 2' gauge locos supplied by Fowler to cane trams in Queensland.
I've only found two photos of this loco in service and as far as I know there are no drawings or builders photos of it available. The model is therefore a stand-off scale model based on photos of this and other Fowler locos of the same design that came to Australia. A few crucial dimensions came from a contemporary Fowler catalogue. The remains of the loco are reported to still exist in private hands, but again I've not found any photos and it isn't on display. This builders photo shows one of 15989's 2' gauge siblings that ran on a Queensland cane tram.
The sole purpose of the Warburton Steam Tramway was to carry sawn hardwood timber from bush mills in the forests to the east of Warburton to the Victorian Railways broad gauge Warburton branch line. It ran from a location called 'The Points' near where the Mississippi Creek joins Big Pat's Creek, where it picked up loaded timber bogies from several horse tramways and then hauled them to the VR exchange sidings at La La near Warburton.
The line was built before WW1 and traffic expanded through the 1920s, but saw milling in the district was hard hit by bush fires in the early 1930s. Steam loco operation ceased in 1935 and the line was then operated with reduced traffic by Days rail tractors, until it closed in 1950.
There is a very good book on the timber tramways of the Warburton district called 'Mountains of Ash', by Mike McCarthy, published by the LRRSA in Australia, which is still available.
Regards,
Graeme