 O&K round windows by Kent & North Wales Light Railway, on Flickr
Billy cab mod- finished!

I like that better than the oval ones. I've been discussing with our structures engineer at my work (he does all our structural repair on the aeroplanes) how to go about doing this with minimal damage to the "Billy" cab, and he has offered some good advice plus the use of some special tools. It also turns out that he has lots of LGB garden railway stuff at his house, so he doesn't find my request for help working on a little train to be odd at all 
OK well I took the summer off hobby stuff, but the weather has turned terrible now and it's time to venture back into the cellar to work on trains.
I took the cab into the sheet-metal shop at work today and did some surgery. I have decided that it will actually be far less work to just make a new front cab sheet rather than fool around trying to blank off the original spectacles and then cut round ones.
Plus, I have never really been sure what those square tank-like things are on the front of the cab: are they water tanks or coal bunkers? Anyway, my "Billy" has a tender, which means it doesn't need either of those things, so, off they came as well.
A bit of soldering and the cab is ready for a trial fit. I forgot to cut a hole for the reversing rod, which is irritating, but shouldn't be too much hassle to do anyway. I still have to drill the holes for the whistle, and solder on the spectacle rings, then open up the holes a bit. They are meant to be 25mm but the closest size on the punch at work was 7/8ths, so I will solder on the outer rings and then file the openings to suit.
I have admired Chris Bird's "Edrig" which he made into a tender locomotive, and I think "Billy" is going to look quite similar. I may or may not change the dart to a more British-looking one.
I realize there are not many narrow-gauge tender locomotives around, but I rather like the look of them.
I've finished soldering the outer spectacle rings, and drilling the holes for the whistle and the reversing rod.
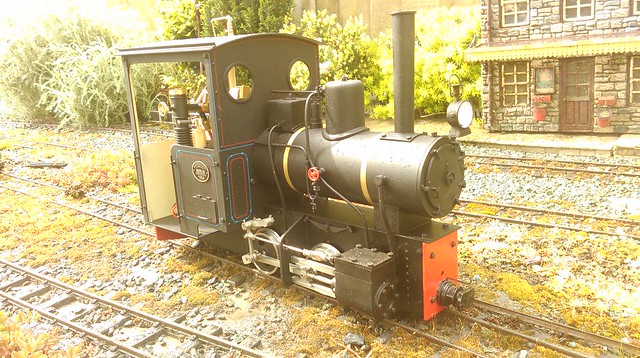
I'm pleased the modifications to the cab make the locomotive look like I was hoping.
Here is the engine with its new cab attached to make sure everything fits as before. I forgot to drill the hole for the sand dome control but that will take 30 sec.
Next I suppose is paint... a task which I dread.


I'm pleased the modifications to the cab make the locomotive look like I was hoping.
Here is the engine with its new cab attached to make sure everything fits as before. I forgot to drill the hole for the sand dome control but that will take 30 sec.
Next I suppose is paint... a task which I dread.
-
Peter Butler

- Driver

- Posts: 5260
- Joined: Sun Sep 09, 2012 10:33 pm
- Location: West Wales
That's worked well, did you reuse the Roundhouse cab sides with a new front or is it all new ?
Dan,
James: "Dan, can you use your hearing and tell me if that trains coming ?"
DLR
www.freewebs.com/dlrail
James: "Dan, can you use your hearing and tell me if that trains coming ?"
DLR
www.freewebs.com/dlrail
-
invicta280
- Trainee Driver

- Posts: 669
- Joined: Wed Sep 21, 2011 9:24 pm
- Location: kent england

That's the most important thing.Keith S:114204 wrote: I'm pleased the modifications to the cab make the locomotive look like I was hoping.
Nice work. You do realise that now you have started kitbashing, you are on a very slippery slope.........
If the Yellowknife retailers are still an etch primer free zone, it might be worth having a chat with your workmate in the sheetmetal shop. As far as I know that green primer they use on aircraft frames will also stick to brass.
Regards,
Graeme
-
-steves-

- Administrator

- Posts: 2445
- Joined: Thu Jul 28, 2011 1:50 pm
- Location: Cambridge & Peterborough
I think you have done a great job, however as a personal preference, I prefer them with the side tanks on, be odd if we all liked the same things, but as far as the job goes, fantastic, hope you are proud of yourself, I know I would be. I am only working in plastic and wood at the moment regarding kit bashing, I have yet to take the plunge with brass as each cut seem a little more final, lol. I have done some engineering in the past, little steam engines and castings etc, and I know that everything has to be perfect for things to work, so a big well done from me 
The buck stops here .......
Ditton Meadow Light Railway (DMLR)
Member of Peterborough and District Association
http://peterborough.16mm.org.uk/
Ditton Meadow Light Railway (DMLR)
Member of Peterborough and District Association
http://peterborough.16mm.org.uk/
Thanks guys, I really appreciate the comments. I have always liked working with brass and soldering; the main handicap for me has always been a lack of a place to work and a lack of the proper tools. Now I have my own house with a room in the basement for a workshop, I have built a floor and a bench and I am trying to collect some tools.
This project has had one very frustrating aspect, and that was soldering the spectacle rings. Swift Sixteen recommends soldering them rather than gluing them, which makes sense to me, but for some reason these were very difficult to solder on properly. I thought I had done a reasonable job, and then while I was cleaning the cab for paint, one of them pulled halfway off with the scouring pad and was the very devil to solder back on. I can't explain why it was so recalcitrant, but the inner ones are getting glued!
I couldn't make up my mind whether to keep the tanks or not, I like the standard "Billy" well enough, but eventually I decided I liked it slightly better without them because of the tender.
One thing I discovered, which might prove helpful for anyone else who hates painting as much as I do: I followed Chris Bird's directions and put the cab in an 80 degree oven for an hour, not really sure what to expect but lo! and behold, the paint was completely dry after an hour in the oven! This certainly beats the three-day curing time I am used to! I wonder if it is cured well enough that I can mask and paint the inside cream today, or whether it would be better to wait.
PS Graeme: I found etch primer!! One can, at the very back of the shelf. I was very pleased, no more mucking about with acid!
Billy new cab-finished!
The new cab is painted and all put back together, the engine test steamed and everything is in order. Except of course I lost the oil drain thingy so I had to put a screw in there. I suppose it will eventually turn up.
It's not Doncaster quality but I am quite pleased with the new cab, I think the engine looks better and it's certainly one of a kind now.


It's not Doncaster quality but I am quite pleased with the new cab, I think the engine looks better and it's certainly one of a kind now.

RE: Your question about the "Side Tanks"?
I believe them to be coal bunkers, or coal bunker extensions. The Billy loco is based on the O&K Well Tank design. Andrew Barclay built their own versions of this design, the most well known is "Douglas" in the Talyllyn Railway.
However as with most things from Roundhouse, they have had to steer a middle road. Well Tank locos are "almost" invariably inside framed locos. The reason is obvious, you build a rigid box as part of the frames. Building an outside frame loco causes all sorts of issues with the box tank.
The filler for a Box Tank loco is usually somewhere between the frames or ahead of the smoke box.
Box Tank locos have certain build advantages but certain operational disadvantages. Mostly the lack of water space and the inability to use standard "Flood" type injectors.
However a low centre of gravity is a serious plus in certain track conditions. This low centre of gravity is also why the boiler can mounted higher on the frames. Necessary of course, because inside frames have been used and you can't get the boiler down low between them.
Andrew

-
invicta280
- Trainee Driver
- Posts: 669
- Joined: Wed Sep 21, 2011 9:24 pm
- Location: kent england
-
Peter Butler
- Driver
- Posts: 5260
- Joined: Sun Sep 09, 2012 10:33 pm
- Location: West Wales
I found the original spray can I used to paint the locomotive the first time- it's not just the same colour, it's the same paint! I recall buying lots of it because I wanted to use the same colour on my Brandbright coaches. Good job I did, because it doesn't look like that particular colour is available anymore.
Thanks for the information Andrew- I have found out one more thing about O$K locomotives- there is actually an outside-framed engine with a well-tank in their catalogue- it looks very similar indeed to a "Billy"-looks a lot like KjellAn's "Alf" in fact:

But I don't think it's one which Barclay made a copy of, and probably didn't show up too much in the UK.
I didn't know much about narrow-gauge engines when I ordered the kits for my engine; it was only later that I decided I didn't like the body style as much as other engines I see on U.K. lines. Now with the cab modifications I feel it matches my UK rolling-stock much better, even though it now looks less like any "real" engine.
Thanks for the information Andrew- I have found out one more thing about O$K locomotives- there is actually an outside-framed engine with a well-tank in their catalogue- it looks very similar indeed to a "Billy"-looks a lot like KjellAn's "Alf" in fact:
But I don't think it's one which Barclay made a copy of, and probably didn't show up too much in the UK.
I didn't know much about narrow-gauge engines when I ordered the kits for my engine; it was only later that I decided I didn't like the body style as much as other engines I see on U.K. lines. Now with the cab modifications I feel it matches my UK rolling-stock much better, even though it now looks less like any "real" engine.
-
-steves-
- Administrator
- Posts: 2445
- Joined: Thu Jul 28, 2011 1:50 pm
- Location: Cambridge & Peterborough
Well I have to eat my words ...... Now I have seen this sprayed up and in place, I have to admit it actually looks very very nice indeed and to be honest, I think it looks awesome without those tanks on, a good choice sir
The buck stops here .......
Ditton Meadow Light Railway (DMLR)
Member of Peterborough and District Association
http://peterborough.16mm.org.uk/
Ditton Meadow Light Railway (DMLR)
Member of Peterborough and District Association
http://peterborough.16mm.org.uk/

Who is online
Users browsing this forum: No registered users and 1 guest