Discussion of Rolling Stock related topics should go here
-
River Lin
- Fireman

- Posts: 410
- Joined: Wed Dec 11, 2013 8:40 pm
- Location: Leicester
Post
by River Lin » Wed Jun 18, 2014 10:40 pm
Hi all.
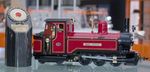
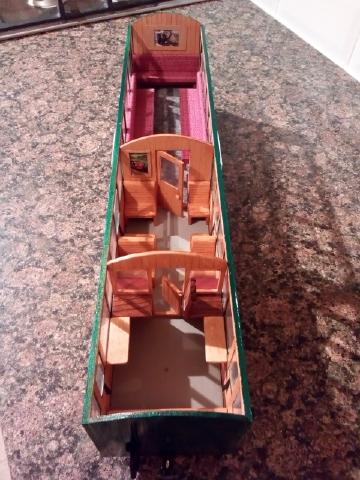
Nearly finished my scratch-built WHR Pickering brake and Buffet car. Anybody got any information about the type of interior lighting they would have had during their WHR period. Was it an oil lamp yellow flicker or a white electric glow.
David.
David T.
-
MDLR
- Driver

- Posts: 4027
- Joined: Thu Jan 15, 2009 10:38 pm
- Location: Near Ripley, Derbyshire, UK
-
Contact:
Post
by MDLR » Thu Jun 19, 2014 8:52 pm
Dunno, but you can get LEDs for either. You may have to cannibalise a number of electronic tee lights from a pound shop to get flickering oil ones - good for buildings, as well!
-
JMORG
- Trainee Driver

- Posts: 940
- Joined: Fri Dec 09, 2011 1:16 pm
- Location: Gloucester
Post
by JMORG » Fri Jun 20, 2014 9:22 am
The would most likely be oil lighting, as the locomotives were not fitted with Generators.
Obviously, looking at the preserved examples would not be a good idea, as I believe oil lighting is no longer allowed!

-
River Lin
- Fireman
- Posts: 410
- Joined: Wed Dec 11, 2013 8:40 pm
- Location: Leicester
Post
by River Lin » Fri Jun 20, 2014 12:14 pm
Thanks Brian andJmorg.
Flickering yellow it is then. I have a stock of those battery tea lights from the local pound shop Brian from when I fitted a couple in my Gladstone coach.
D.
David T.
-
Marquis DeCarabas
- Fireman
- Posts: 492
- Joined: Fri Jan 28, 2011 8:46 am
- Location: ex cathedra cantuar
Post
by Marquis DeCarabas » Fri Jun 20, 2014 1:35 pm
Oil (originally) - you can see in various photos where the vents and saddle for the vents are - they were on Top Clock and Bottom Engine of the glazed saloon, though of course by the time Clock and Engine were of relevance they were removed and the carriage was possibly unlit in WHR days.
I have a photograph dated c. 1924 of the Gladstone car at Port with the lamp housings and saddles visible (just!) - the Gladstone was used for through running eventually [1] so the lamps would have been foul of the Short Tunnel at the very least - it may well have been converted to electric lighting at about the same time that a fair proportion of the Small Combine's fleet but I would need to check through the photos to look for jumpers.
[1] there is a cheeky little pic of it in a down train at TyB about 1930.
De Carabas
At the service of angelislington
-
River Lin
- Fireman
- Posts: 410
- Joined: Wed Dec 11, 2013 8:40 pm
- Location: Leicester
Post
by River Lin » Sat Jun 21, 2014 3:48 pm
Hi all.
Fitted the lighting into the roof of my buffet car this pm. Used the switch/battery box( button cell type) from a little Poundland electronic tea light and two flickering orange led's from the same units. Tried to keep the wiring as neat as possible by threading through holes that I predrilled into the roof spars when I originally cut them out from 3mm ply.
This lighting setup has actually cost me less than a pound as I used bits from 2 tealights that are 3 for a pound. The wire was free as we have a virgin cabinet on the grass verge outside and there is often some quite long lengths of single strand wiring discarded on the grass after work has been done and it seems good quality.
D.


David T.
-
Andrew
- Moderator

- Posts: 3281
- Joined: Tue Jul 03, 2012 1:33 pm
- Location: Bristol, UK
-
Contact:
Post
by Andrew » Sat Jun 21, 2014 4:31 pm
That looks really good! I lit my Pickering but chickened out of doing so in the buffet because there's so little room to play with - well done!
Andrew.
-
River Lin
- Fireman
- Posts: 410
- Joined: Wed Dec 11, 2013 8:40 pm
- Location: Leicester
Post
by River Lin » Sat Jun 21, 2014 6:27 pm
Hi Andrew.
Waiting until it gets dark to see how bright it looks inside. Although the actual coach originally had 3 lamps one was removed when the central partition was put in.
I will be putting 4 in the Pickering.
I like to put the battery box in the roof as I like to have the roof fully removable with no trailing wires down through the coach. It is also a pain to lift the coach off the rails just to switch the lights on from underneath.
D.
David T.
-
River Lin
- Fireman
- Posts: 410
- Joined: Wed Dec 11, 2013 8:40 pm
- Location: Leicester
Post
by River Lin » Sat Jun 21, 2014 6:44 pm
Hi Andrew.
For myself and anyone else interested, how did you make and fit the metal window bars on your Pickering and Buffet cars?
D.
David T.
-
Marquis DeCarabas
- Fireman
- Posts: 492
- Joined: Fri Jan 28, 2011 8:46 am
- Location: ex cathedra cantuar
Post
by Marquis DeCarabas » Sat Jun 21, 2014 8:44 pm
Oops - I wasn't concentrating when I answered - I think one Pickering was electric in the FR lease period - you weren't asking about the Gladstone car at all, sorry!
I really shouldn't post over the lunchtime pint.
De Carabas
At the service of angelislington
-
MDLR
- Driver
- Posts: 4027
- Joined: Thu Jan 15, 2009 10:38 pm
- Location: Near Ripley, Derbyshire, UK
-
Contact:
Post
by MDLR » Sat Jun 21, 2014 9:27 pm
Nicely done!
-
Andrew
- Moderator
- Posts: 3281
- Joined: Tue Jul 03, 2012 1:33 pm
- Location: Bristol, UK
-
Contact:
Post
by Andrew » Sat Jun 21, 2014 9:45 pm
River Lin:101919 wrote:Hi Andrew.
For myself and anyone else interested, how did you make and fit the metal window bars on your Pickering and Buffet cars?
D.
The hard way! I'm sure there's a better method, but I just drilled the holes and then bent up bits of wire to fit - if I bent them up and they didn't fit I started again. I got better at it as I went along! I used steel wire I think, slightly blue-ish (treated somehow?) , from the model shop. Think I used a little superglue to secure them, and then used a cutting disk (or little abrasive tool?) in my Dremmel to make sure they were all flush inside and so wouldn't foul the glazing. All that took place before painting of course...
Looking forward to a photo of the whole train,
Andrew.
-
Peter Butler
- Driver
- Posts: 5254
- Joined: Sun Sep 09, 2012 10:33 pm
- Location: West Wales
Post
by Peter Butler » Sat Jun 21, 2014 9:59 pm
You have put some hours into that project and it has certainly paid off.... it looks wonderful!
I have just started to make passenger stock myself and I appreciate the additional work involved in fitting the interior as well as making the exterior look ok.
I find windows are the hardest thing to work into the build. Any advice please?
-
Andrew
- Moderator
- Posts: 3281
- Joined: Tue Jul 03, 2012 1:33 pm
- Location: Bristol, UK
-
Contact:
Post
by Andrew » Sat Jun 21, 2014 10:18 pm
Peter Butler:101934 wrote:You have put some hours into that project and it has certainly paid off.... it looks wonderful!
I have just started to make passenger stock myself and I appreciate the additional work involved in fitting the interior as well as making the exterior look ok.
I find windows are the hardest thing to work into the build. Any advice please?
Personally I've pinched various ideas from other people and dreamed up a few of my own to come up with a method that works for me. I make droplights from a three-layer 0.5mm ply sandwich, with the middle layer also containing a layer of 0.5mm clear plastic which I slide into place once the rest's varnished. That way the droplights are self contained units that can be positioned as desired. Each is 1.5mm thick, so I use 1.5mm clear plastic sheet for the other, fixed, windows. I used to glue those in but had trouble with getting glue on the window, so now I created a pocket between the carriage's inner and outer layers for them to sit in. The end of each run of fixed glazing is painted so that where it butts up against the droplights it represents in the inside of the door frame.
Don't know how well that would work for your Bachmann conversions Peter, but I like the technique for wooden bodied coaches. A thin strip cut of leather from an old brown shoe finishes the job inside each door! I did that in my Buffet Car but I believe the original actually had little handles...
All the best,
Andrew.
-
Peter Butler
- Driver
- Posts: 5254
- Joined: Sun Sep 09, 2012 10:33 pm
- Location: West Wales
Post
by Peter Butler » Sat Jun 21, 2014 11:00 pm
Thanks for that Andrew, I have used the sandwich method before and it works well. With so many windows it means such a lot of cutting out and I was hoping for a less repetitive method.
With the Bachmanns the original windows are moulded and fit under locating lugs in the roof section. They only need fixing at the bottom edge so I used a liquid 'Canopy Adhesive' which seems to be for model aircraft and is vibration resistant. It is white when applied but dries clear and leaves no misting on the surface. It does take a while to set though.
The new windows are cut from sheet as a long strip and fitted in the same way.
It does work but there is always another method out there somewhere. This is how we learn.
-
River Lin
- Fireman
- Posts: 410
- Joined: Wed Dec 11, 2013 8:40 pm
- Location: Leicester
Post
by River Lin » Sun Jun 22, 2014 7:56 pm
Hi all.
For my Pickering brake I used the 3 layer sandwich for the glazing with the door glass and window either side done as one piece, giving four pieces of glazing along each side in total. With the Buffet car each and every window pillar is only 3mm wide so I had to fit each piece of glazing separately up to a varnished glazing bar as per the 1inch to the foot rebuild at Portmadog.
D.

David T.
-
Peter Butler
- Driver
- Posts: 5254
- Joined: Sun Sep 09, 2012 10:33 pm
- Location: West Wales
Post
by Peter Butler » Sun Jun 22, 2014 9:48 pm
Absolutely beautiful...... well done for technical skill and artistic interpretation.
-
River Lin
- Fireman
- Posts: 410
- Joined: Wed Dec 11, 2013 8:40 pm
- Location: Leicester
Post
by River Lin » Mon Jun 23, 2014 12:32 pm
Hi Peter.
As delivered from the makers my research suggests that the Pickering was aledgedly 'bright red with gold lining'.
D.
David T.
Who is online
Users browsing this forum: No registered users and 2 guests