My Flashforge Printer Journey.

A place where discussions are about 3D printing.
User avatar
FWLR
Driver
Driver
Posts: 4282
Joined: Sat Aug 05, 2017 9:45 am
Location: Preston, Lancashire, UK

Re: My Flashforge Printer Journey.

Post by FWLR » Tue Jan 12, 2021 10:46 am

I now also have an hinge of sorts. I did try doing Rik's which he has put on the forum, but it turned out somewhat wrong. It was probably my fault with the understanding of the setting, but the rivets came out with very sharp points at the top, I know that's me :error: stupid....It also was a tad thin, so I played around again and this is what I have now. There is only one rivet on either side of the hinge plate, but that can be altered. The main thing is I have managed to print a hinge...

There is a decency warning with the first photo, it's just the way it printed..... :imsorry


F0EF2B38-7C8A-4F7A-A4A9-F227339A1927.jpeg
F0EF2B38-7C8A-4F7A-A4A9-F227339A1927.jpeg (2.86 MiB) Viewed 4235 times

The second photo shows the one on the left, which is what I have come up with and the one on the right is Rik's setting, or my interpretation of it, sorry Rik.
8383F8F6-AC75-4DEE-83CA-C1F615015551.jpeg
8383F8F6-AC75-4DEE-83CA-C1F615015551.jpeg (2.03 MiB) Viewed 4235 times
Again on Rik's also, one of the rivets came off really easy, I guess though that is because I didn't have it on the main body of the print.


Anyway onwards and upwards, hopefully. :thumbright:

User avatar
ge_rik
Administrator
Administrator
Posts: 6554
Joined: Sun Oct 25, 2009 10:20 pm
Location: Cheshire
Contact:

Re: My Flashforge Printer Journey.

Post by ge_rik » Tue Jan 12, 2021 12:47 pm

No problem Rod
Happy that you are using my tutorial and branching out on your own

Rik
------------------------
Peckforton Light Railway - Blog Facebook Youtube

User avatar
FWLR
Driver
Driver
Posts: 4282
Joined: Sat Aug 05, 2017 9:45 am
Location: Preston, Lancashire, UK

Re: My Flashforge Printer Journey.

Post by FWLR » Wed Jan 13, 2021 7:52 am

It's a bit more than achallage for me Rik, but with help from yourself and others on the forum I am making some progress, all be it slow....... :roll:

User avatar
FWLR
Driver
Driver
Posts: 4282
Joined: Sat Aug 05, 2017 9:45 am
Location: Preston, Lancashire, UK

Re: My Flashforge Printer Journey.

Post by FWLR » Wed Jan 13, 2021 8:05 am

I did get to print the Bike also Boris. Although two problems arose from them. Firstly, the original small scale print I did put supports and they were a bit of a pain to take off. 2nd, I scaled it up to 140% and it was a lot better, but the handlebars and one of the foot pedals were a bit thin, the pedal actually broke off. Also it printed with two rafts on the bike wheels, which helped with getting the print off the bed and I kept one on to aid with it standing up.

Maybe the handlebars need to have supports, so I will try it again with the supports on, although is the a way of just having supports where you need them and not covering all of the print :?:

76C85521-CB0D-4AFE-9AC3-A2FD090B61AE.jpeg
76C85521-CB0D-4AFE-9AC3-A2FD090B61AE.jpeg (2.24 MiB) Viewed 4204 times
0059118D-0747-439F-9951-4DC9496A032C.jpeg
0059118D-0747-439F-9951-4DC9496A032C.jpeg (2.5 MiB) Viewed 4204 times

Close up, they do look a bit rough, well a lot. But from a distance they look ok. I don't know how much it cost to print them, I only used about 1 meter of filament and it took about 45 minutes approximately.

I forgot to write down the time and material used.... :imsorry

User avatar
SimonWood
Trainee Driver
Trainee Driver
Posts: 656
Joined: Tue Apr 07, 2015 9:46 pm
Location: West Wales
Contact:

Re: My Flashforge Printer Journey.

Post by SimonWood » Wed Jan 13, 2021 9:01 am

FWLR wrote: ↑Wed Jan 13, 2021 8:05 am Maybe the handlebars need to have supports, so I will try it again with the supports on, although is the a way of just having supports where you need them and not covering all of the print :?:
2 options for this in Flashprint that I'm aware of:

Put supports in manually by going into 'supports' and instead of clicking on the "A" for Auto Supports (at the top) use the '+' for Add (on the left) to add individual supports - once you have selected this you can click on your model wherever you want to add supports.

Put supports in automatically in the usual way, then use the 'x' for Delete (on the left) to remove individual supports - once you have this selected then any supports you click on will be removed.

User avatar
FWLR
Driver
Driver
Posts: 4282
Joined: Sat Aug 05, 2017 9:45 am
Location: Preston, Lancashire, UK

Re: My Flashforge Printer Journey.

Post by FWLR » Thu Jan 14, 2021 9:52 am

Thanks Simon.

I will give it ago after I have done the Grandsons phone case. It's taking 6hrs to do...Mind you it's 6.5 inches, so it has to be tilted....

User avatar
FWLR
Driver
Driver
Posts: 4282
Joined: Sat Aug 05, 2017 9:45 am
Location: Preston, Lancashire, UK

Re: My Flashforge Printer Journey.

Post by FWLR » Wed Jan 20, 2021 10:29 am

Now I haven't been to good lately and I am going to see the heart consultant at 1.45pm about these blooming pains I have been getting again just lately. So the 3d work has had to be put on hold, well it was curtailed somewhat. I have been far too long on the laptop, looking at things on Thingiverse and other stuff.

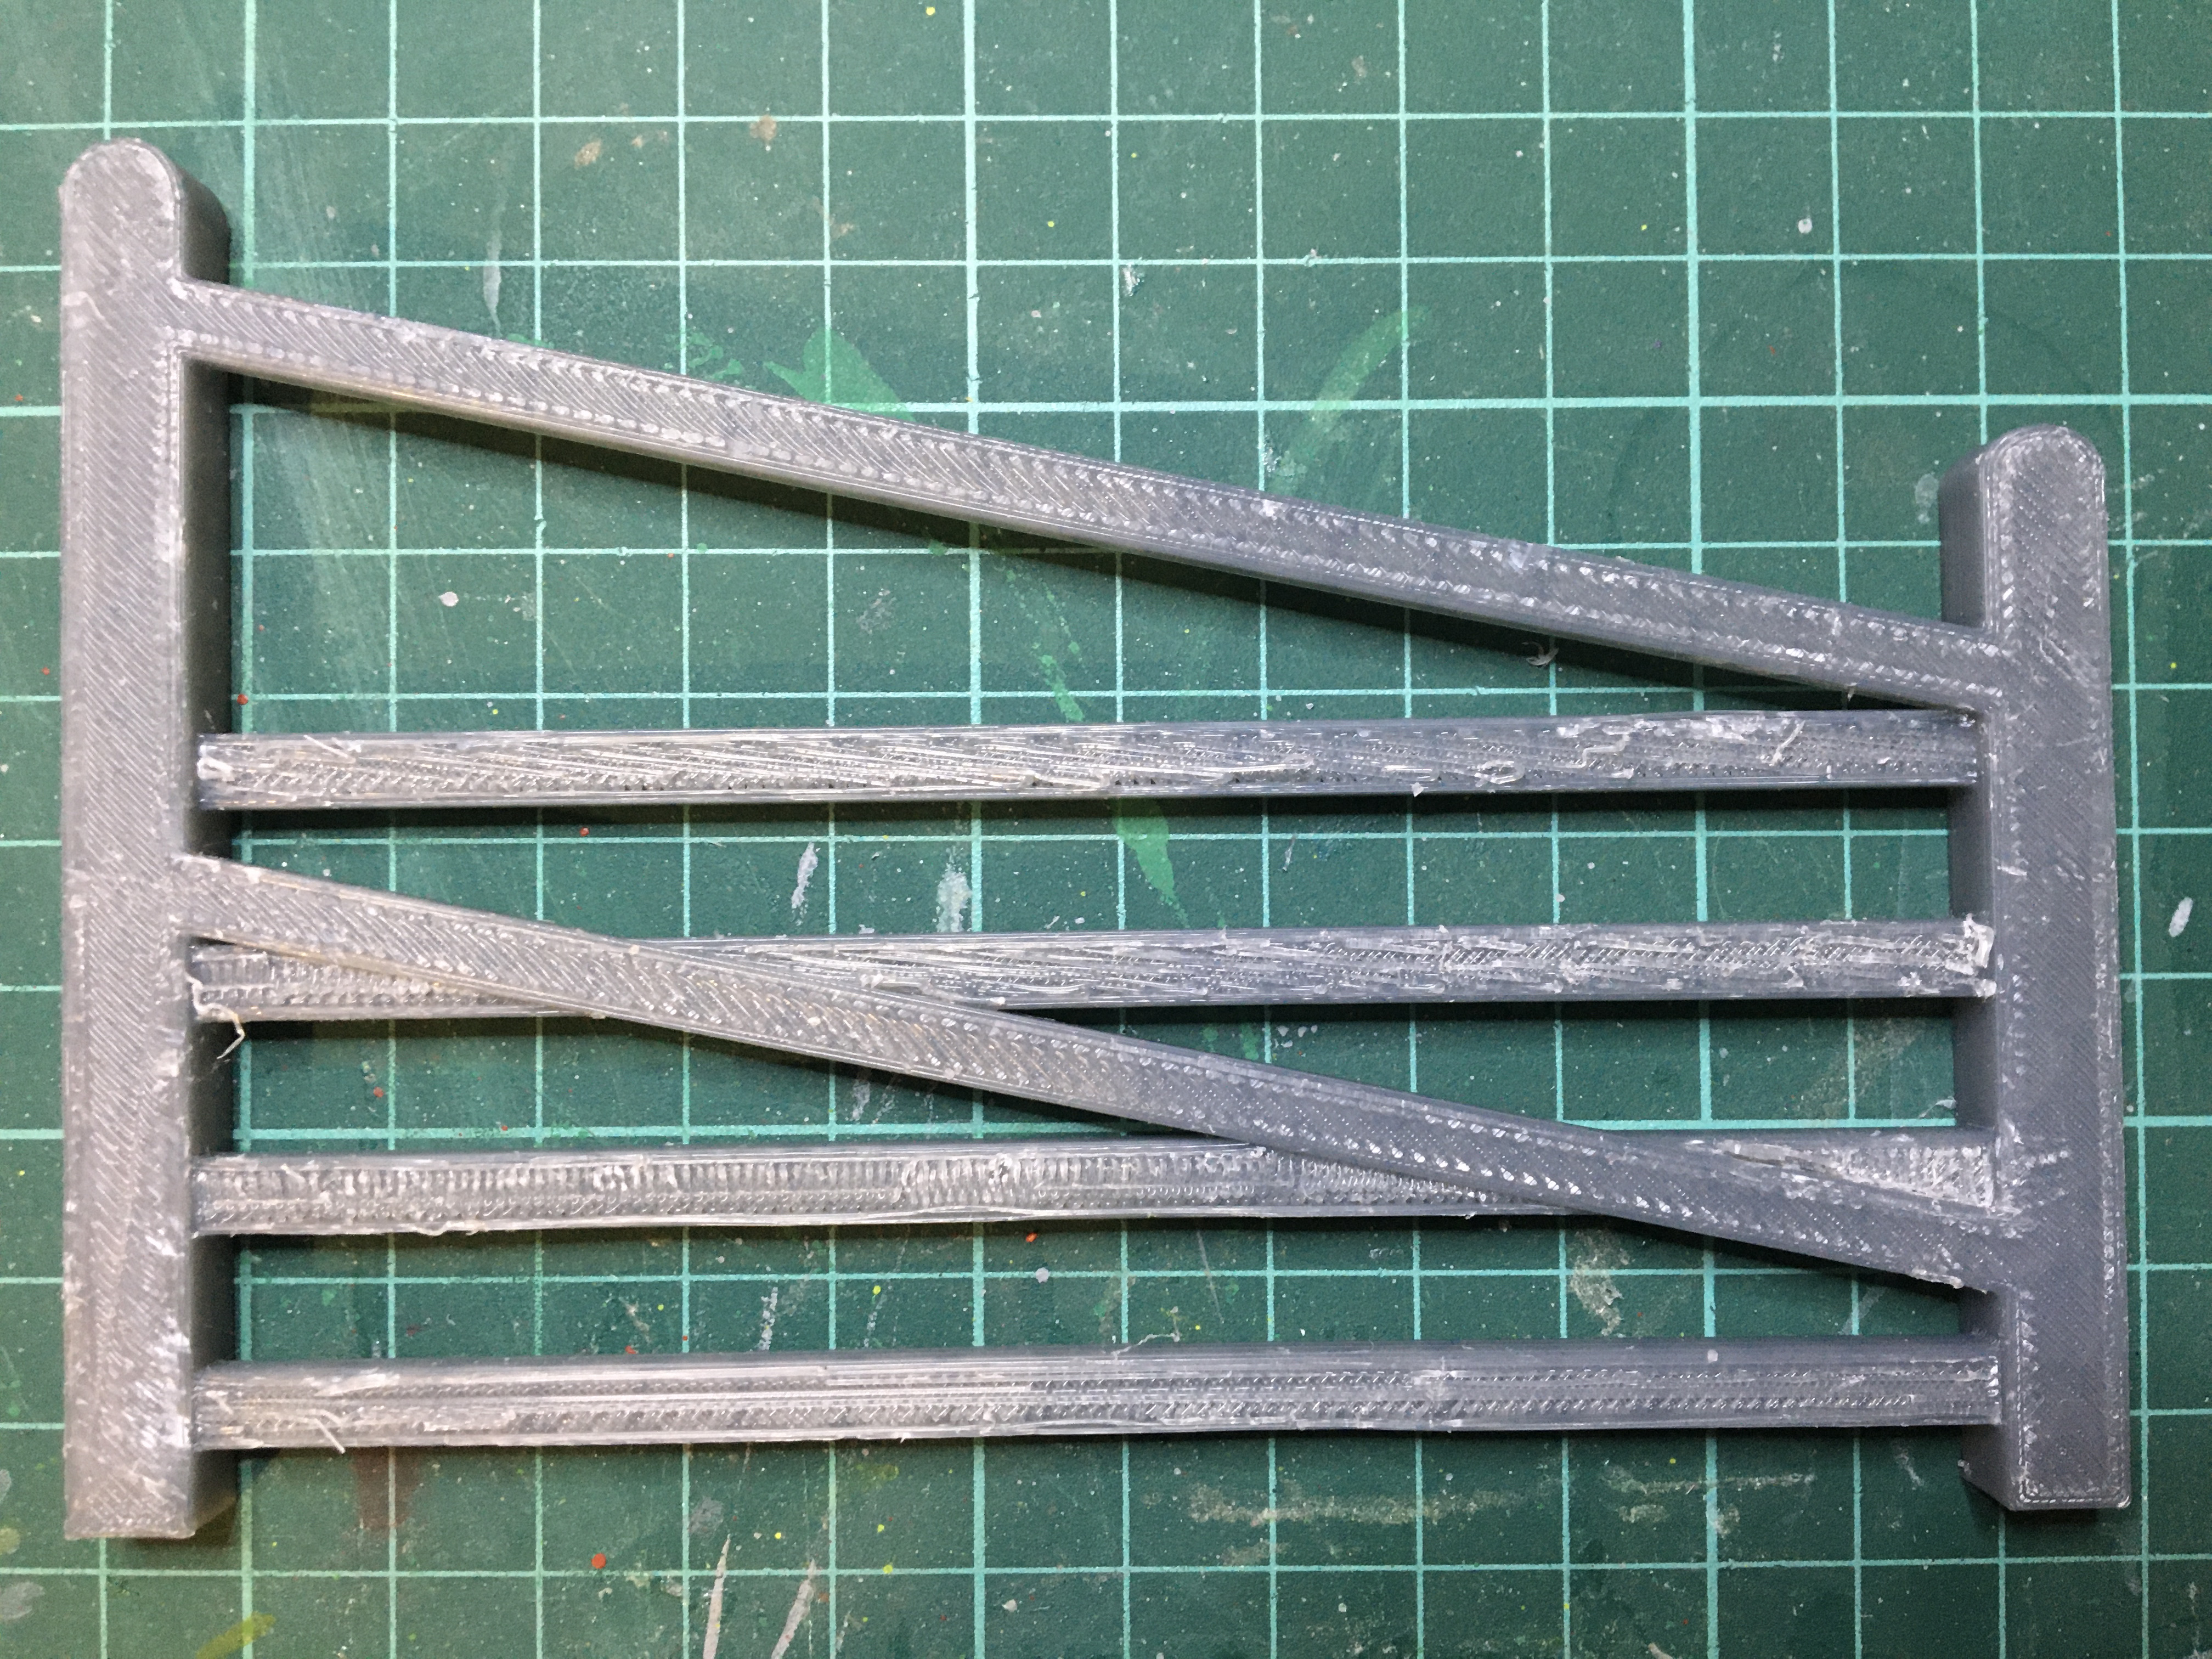
I have though managed to build a gate, it took me two and halve weeks. Anne was getting very upset with me, so I needed to limit my time on it. Because I haven't been working on TinkerCad much, it's slightly difficult trying to remember how things work on it.

Anyway here it is.

Finished on the printer. I haven't done the hinges though. I thought I would see how it turned out.
D868142B-E7DA-478F-B8E9-7E7AFDADEFB6.jpeg
D868142B-E7DA-478F-B8E9-7E7AFDADEFB6.jpeg (2.71 MiB) Viewed 3970 times

Now with most of the raft off.
The second photo is the bottom of the gate. You will see I made a huge "cock-up" by printing it flat. Because I haven't got the two planks that are at 45Deg level with the posts, the raft has been a bit of a pig to get off. There is still some left on, but has this is a trial it will do.

91734E04-2A0B-4427-AEB4-249BCB948174_1_201_a.jpeg
91734E04-2A0B-4427-AEB4-249BCB948174_1_201_a.jpeg (3.18 MiB) Viewed 3970 times
19967235-7FF8-480A-9F1E-AF38538E2C09_1_201_a.jpeg
19967235-7FF8-480A-9F1E-AF38538E2C09_1_201_a.jpeg (3.43 MiB) Viewed 3970 times
The hinges need to go on, but I will need to get the planks level with the posts. I know I think that the posts need to be the same thickness as the planks don't they.

There is the question of the infill also. You can see it really plainly. Don't know what to do about that.

This will have to do for now until I come back from the hospital later on, that's if I am up to it... :dontknow:

User avatar
FWLR
Driver
Driver
Posts: 4282
Joined: Sat Aug 05, 2017 9:45 am
Location: Preston, Lancashire, UK

Re: My Flashforge Printer Journey.

Post by FWLR » Wed Jan 20, 2021 10:32 am

I am also not getting notifications again. I thought it would improve with the new server. still it's no problem really. I do come on everyday without Anne knowing sometimes.... :lol: :lol: :lol:

User avatar
FWLR
Driver
Driver
Posts: 4282
Joined: Sat Aug 05, 2017 9:45 am
Location: Preston, Lancashire, UK

Re: My Flashforge Printer Journey.

Post by FWLR » Wed Jan 20, 2021 10:40 am

The size of the gate is,

Length 134mm

Longest post height 92mm

Shortest post height 71mm

Plank width 5mm

Space between planks 9mm

I am thinking is the correct scale. It was all guess work for me.... :imsorry

User avatar
ge_rik
Administrator
Administrator
Posts: 6554
Joined: Sun Oct 25, 2009 10:20 pm
Location: Cheshire
Contact:

Re: My Flashforge Printer Journey.

Post by ge_rik » Wed Jan 20, 2021 12:05 pm

That looks pretty darned good to me Rod. Well done!

Now you've started you'll soon be on a roll. Won't be long before you start drawing and printing your own rolling stock. How about the Flying Scotsman?

Rik
------------------------
Peckforton Light Railway - Blog Facebook Youtube

User avatar
FWLR
Driver
Driver
Posts: 4282
Joined: Sat Aug 05, 2017 9:45 am
Location: Preston, Lancashire, UK

Re: My Flashforge Printer Journey.

Post by FWLR » Thu Jan 21, 2021 8:05 am

Thanks Rik.

Not sure about the Scotsman, but I do want to do my own rolling stock at some point. :)

It may be some time yet I am thinking :scratch:

User avatar
FWLR
Driver
Driver
Posts: 4282
Joined: Sat Aug 05, 2017 9:45 am
Location: Preston, Lancashire, UK

Re: My Flashforge Printer Journey.

Post by FWLR » Fri Jan 22, 2021 2:33 pm

Now I better put my latest attempt in my thread. The gate has now had some new hinges put on. I am getting better with this honestly, but still a long way to go I think.

E4E360B8-FF26-4A2F-9E33-5733295C767E.jpeg
E4E360B8-FF26-4A2F-9E33-5733295C767E.jpeg (2.24 MiB) Viewed 3360 times
B4E56D5B-412B-4FFC-80D8-6F7C5A17E424.jpeg
B4E56D5B-412B-4FFC-80D8-6F7C5A17E424.jpeg (2.26 MiB) Viewed 3360 times
I am still getting "crap" on my prints and one of the holes for the pins broke off. I am thinking it was because I put them too far onto the post of the gate and I didn't lower them far enough onto the planks. Am I right in thinking this.

Anyway as we are only be able to load 2 photos at a time for the moment, it really isn't a problem, in fact I think it's better.

User avatar
FWLR
Driver
Driver
Posts: 4282
Joined: Sat Aug 05, 2017 9:45 am
Location: Preston, Lancashire, UK

Re: My Flashforge Printer Journey.

Post by FWLR » Fri Jan 22, 2021 2:43 pm

I have also attempted to build a two plank side for a wagon. I know Rik has a "How To Do" on his Blog, but I thought I would have ago myself. It's not perfect, I am having trouble getting the correct distance from the planks and how far down or up a need to place things before I group them together.

This is my attempt, sorry Rik for not doing it as you have. I did put a flat piece first on the Workplane and then put the planks on. Maybe I need to do the planks first and then the flat piece.
9ED7929A-B59A-4DAC-837A-B2340F947356.jpeg
9ED7929A-B59A-4DAC-837A-B2340F947356.jpeg (3.35 MiB) Viewed 3360 times
4B98B3C1-08AA-4E76-BB28-2D98F891A39A.jpeg
4B98B3C1-08AA-4E76-BB28-2D98F891A39A.jpeg (2.26 MiB) Viewed 3360 times
I run a hacksaw blade across the boards to see how it would turn out. I can still the infills, how can I make them less visible and how do would I put planks on the inside also. Is it possible... :?:

User avatar
FWLR
Driver
Driver
Posts: 4282
Joined: Sat Aug 05, 2017 9:45 am
Location: Preston, Lancashire, UK

Re: My Flashforge Printer Journey.

Post by FWLR » Sun Jan 24, 2021 11:23 am

After my poor attempt trying to do a 2 plank wagon side, I did do one doing it the proper way has in Rik's excellent Blog.
This is what I produced. I haven't photo'n it before taking it off the raft, but I did saw blade it, mainly because I have had a comment from a friend of mine who said he thinks 3d printing leaves horrible marks on them. I tend to agree with him when they are for a wagon side or van, so this is how it turned out. I first of all put a thin coat of grey on after saw blading it, then a thin coat of brown. It turned out ok I think for a first attempt.
E4AEC8C1-B7A2-42B0-9492-1B019BDB5501_1_201_a.jpeg
E4AEC8C1-B7A2-42B0-9492-1B019BDB5501_1_201_a.jpeg (2.18 MiB) Viewed 3326 times

You can't see the printing from over six inch's away, well I can't... :roll: ..I will though give it another coat now that it as hardened off.

User avatar
ge_rik
Administrator
Administrator
Posts: 6554
Joined: Sun Oct 25, 2009 10:20 pm
Location: Cheshire
Contact:

Re: My Flashforge Printer Journey.

Post by ge_rik » Sun Jan 24, 2021 11:59 am

No need to apologise, Rod. Mine is certainly not the only way to do do it. Much better that you find your own route.

Rik
------------------------
Peckforton Light Railway - Blog Facebook Youtube

Post Reply

Who is online

Users browsing this forum: No registered users and 4 guests