
RE Soldering steampipe into deadleg lubricator - not necessarily. I managed to get my steampipe square in and then use some Revell liquid gasket in a tube and applied it liberally.
This did the trick on Second Chance.
Mamod SL2 / SL3 Refurb/Restoration
-
Lner fan Sam

- Fireman

- Posts: 491
- Joined: Sun Nov 25, 2012 7:57 pm
- Location: Sunderland, north east of England
-
Chris Cairns

- Driver

- Posts: 2366
- Joined: Mon Oct 29, 2007 7:25 pm
- Location: Glasgow, Scotland
A valid question Chris.Chris Cairns:79671 wrote:Why not a Dead Leg Lubricator then? Cost, Looks, Practicality or Operation?Spule 4 wrote:but if I were to buy a new one I would get a RH or RWM inline one.
One advantage I find with my dead leg lubricators is they use a lot less oil than the in-line displacement types.
Chris Cairns.
Pluses to the inline ones:
They seem to use more oil,
Easy to drain and fill with the bottom drain (some deadlegs have, some don't),
Less chance of steam leaks (either from the lines themselves and clearance issue with the cylinder screws)
They cost GBP 10-12 less than the deadleg. (GBP 25 Vs 13-15).
The appearance does not bother me so much, I have become used to the one hanging on the smokebox of Maj. Hitchcock.
It works fine for now (screw shortened and nub on lubricator filed), but if the Maj. ever gets a proper boiler (it is starting to suffer from zinc rot) it and the Finescale regulator will be going elsewhere.
Garrett
"Some say that Mamods have problems. Whatever. I view them as opportunities for improvement."
"Some say that Mamods have problems. Whatever. I view them as opportunities for improvement."

Hi
Interesting stuff about the two types of lubricators.
I can see pros and cons with each type.
With the dead leg one I would guess steam that condenses in the connecting pipe will just drain back into the steam pipe and get sent off to the cylinders. Only steam that reaches the body of the unit will condense and displace the oil.
Possibly the in-line version can dispense more oil but I'm not sure if I like the idea of the steam/oil mix getting reheated under the boiler on its way from the cab to the cylinders. Has anyone tried installing an in-line unit at the smokebox end?
I'll try installing the dead leg one when I get to that stage and see how it works out.
-
Lner fan Sam
- Fireman
- Posts: 491
- Joined: Sun Nov 25, 2012 7:57 pm
- Location: Sunderland, north east of England
-
laurence703

- Trainee Driver

- Posts: 804
- Joined: Fri Nov 25, 2011 1:49 pm
- Location: Lost
-
Chris Cairns
- Driver
- Posts: 2366
- Joined: Mon Oct 29, 2007 7:25 pm
- Location: Glasgow, Scotland
Chris Cairns.Roundhouse Engineering wrote:The change of oil was brought about a few years after Roundhouse adopted internal gas firing and a small number of engines were experiencing blocked super heater pipes after prolonged use. The blockages were caused by carbonised oil, though this had never been a problem with the earlier externally fired models.
Update from the engine shed:
The cab front and side tanks have been completely stripped back to bare metal. Minor dents have been knocked out and the parts of the side tanks that form the cab floor have been folded back down to their original position alongside the main frames.
The parts have received a couple of coats of grey primer and I am tempted to leave them like this until the loco has had a couple of test runs after which a partial strip for final painting can take place.
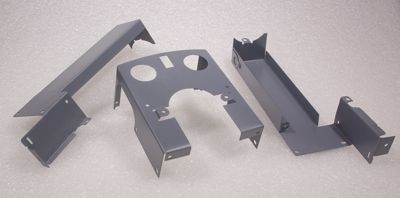
The smokebox has received a coat of satin black BBQ paint which gives it quite a pleasing finish.
Still plenty more work to do but at least it's a bit warmer in the workshop now.
The cab front and side tanks have been completely stripped back to bare metal. Minor dents have been knocked out and the parts of the side tanks that form the cab floor have been folded back down to their original position alongside the main frames.
The parts have received a couple of coats of grey primer and I am tempted to leave them like this until the loco has had a couple of test runs after which a partial strip for final painting can take place.
The smokebox has received a coat of satin black BBQ paint which gives it quite a pleasing finish.
Still plenty more work to do but at least it's a bit warmer in the workshop now.
Re: Mamod SL2 / SL3 Refurb/Restoration
It’s been a (very) long time since the little Mamod made an appearance on the workbench. Other projects have taken priority but one result of lock down has been extra time spent crossing things off the ‘to do’ list and now I can get back to the interesting stuff!
Rather than working with the original boiler I have treated the patient to a new standard version which along with the new safety valve, sight glass and piston/cylinders assemblies bought some time ago gives me all the bits I need for a running locomotive. I use the term ‘running’ in the loosest possible way.
I’m giving serious consideration to going with a 7/8ths scale narrow gauge on the SM-32 track that I have so I’m investigating the 18” narrow gauge look starting with an extended chimney and basic spectacle plate with no cab roof.
I hope to post some pictures shortly.
-
Old Man Aaron

- Trainee Driver
- Posts: 808
- Joined: Wed Oct 19, 2016 11:08 am
- Location: Sunshine Coast QLD, Australia
Re: Mamod SL2 / SL3 Refurb/Restoration
Welcome back! I remember lurking this thread years ago, when I briefly owned an MSS. Soon gave up on mine and sold it on. Just went back to the start of the thread and re-read the story thus far. Certainly looking forward to hearing more, as and when.. A 7/8ths conversion would make a particularly interesting model.
Regards,
Aaron
Regards,
Aaron
Regards,
Aaron - Scum Class Works
Aaron - Scum Class Works
Re: Mamod SL2 / SL3 Refurb/Restoration
Hi Aaron
Thanks for the comment.
I managed an hour or so working on the loco at the weekend. The new boiler needs its sight glass and back plate installed so I thought it might be a good idea to make a Goodall valve so that I can cold pressure test with just water before trying under steam. I've turned up the valve from 1/4 brass bolt and have an odd bit of normal rubber tube for the cold test but need some silicone stuff for a hot one.
One of the reasons for going with 7/8ths is that the chairperson of the home planning authority has an extensive property portfolio in 1/12th spread around the house so I recon I might get a few 1:13.7 items past the approval stage for use in the garden ! Also I'll be scratch building most of the rolling stock so I'm not relying on the availability of kits or ready to roll items.
-
Old Man Aaron
- Trainee Driver
- Posts: 808
- Joined: Wed Oct 19, 2016 11:08 am
- Location: Sunshine Coast QLD, Australia
Re: Mamod SL2 / SL3 Refurb/Restoration
I like your thinking. 
Funnily enough, I also use a few dolls' house items ('24th scale stuff) in my own work. Certainly a lot of odd detailing parts available, to be adapted to 7/8ths modelling.
Funnily enough, I also use a few dolls' house items ('24th scale stuff) in my own work. Certainly a lot of odd detailing parts available, to be adapted to 7/8ths modelling.
Regards,
Aaron - Scum Class Works
Aaron - Scum Class Works
Re: Mamod SL2 / SL3 Refurb/Restoration
Tried a cold pressure test with the new boiler filled to the top with water and my adapted garden spray bottle. No leaks from the sight glass so the next test will be under steam.
- Attachments
-
- pressure_test.jpg (203.23 KiB) Viewed 9213 times
-
- pressure_test_adapter.jpg (192.88 KiB) Viewed 9213 times
Re: Mamod SL2 / SL3 Refurb/Restoration
To bring things up to date I finally got the locomotive running on a loop of track in the garden. Initially there were issues with steam leaks which were resolved by lapping the steam valve faces and fitting a stronger spring. Next task is to sort out a lubricator and improve the speed control with either a steam valve or exhaust throttle.
- first-steamup1.jpg (172.75 KiB) Viewed 5247 times
-
Old Man Aaron
- Trainee Driver
- Posts: 808
- Joined: Wed Oct 19, 2016 11:08 am
- Location: Sunshine Coast QLD, Australia
Re: Mamod SL2 / SL3 Refurb/Restoration
Good to see it running, and looking forward to seeing it at the head of a train. Love the 7/8ths extensions so far.
Regards,
Aaron - Scum Class Works
Aaron - Scum Class Works
Re: Mamod SL2 / SL3 Refurb/Restoration
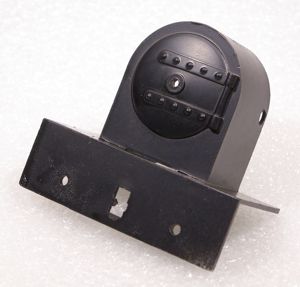
- steam-turret2.jpg (145.89 KiB) Viewed 4538 times
- steam-turret.jpg (124.97 KiB) Viewed 4538 times
I decided to make a steam turret to go in the rearmost boiler ferrule to provide 4 connections. An extended connection to the cab regulator, a top mounting for the whistle and two side connections, one for a pressure gauge(when funds allow) and the other one for the water filler. It’s a banjo style connection sealed with two ‘o’ rings.
Next task is to route the regulator output pipe via a lubricator to the front control block.

Re: Mamod SL2 / SL3 Refurb/Restoration
Very nice and neat machine work there.
Grant.
Grant.
Who is online
Users browsing this forum: No registered users and 16 guests