The Charnwood Forest Light Railway

A place for the discussion of garden railways and any garden style/scale portable and/or indoor layouts
Post Reply
User avatar
Soar Valley Light
Driver
Driver
Posts: 1451
Joined: Sun Dec 08, 2013 5:18 pm
Location: North West Leicestershire

Post by Soar Valley Light » Sat Aug 13, 2016 9:24 pm

Hello Chaps,

Thanks for the comments, suggestions and encouragement.

The gravel washing takes place in a 5ltr plastic paint kettle with holes drilled in the bottom. The normal process is half a shovel full of dirty gravel into the kettle. This is then submerged into a water filled hole in the ground and swilled around, drained and any rubbish picked off the top of the gravel. This process is then repeated before the garden spray is used to spray the now soil free gravel clean. The small amount of fresh water keeps the 'washing well' topped up. It takes me back to seeing coal washeries at work where Baum washers used a dense medium (known as twaddle), to float the coal away from the dirt. In my case the soil in the water makes a dense mix on which the rubbish floats away from the stone.

The surveyors were out again this morning and it became clear that the dirty gravel stockpile was well and truly in the way of any further railway progress. So, the rest of the day saw the washery go into intensive operation, the washery operatives got some Saturday afternoon overtime! This is back breaking work and a method of easing the work was needed today. This turned out to be rinsing the gravel in the pile with the hose before it went into the bucket. It was worthwhile and I think I reduce the stockpile by about a quarter.

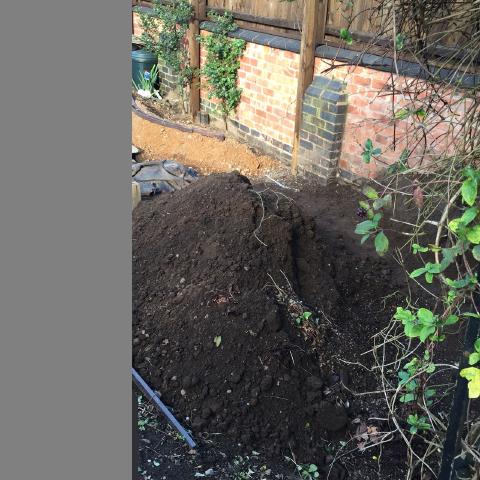
I said yesterday that the current work wasn't worthy of a photo, however, just to prove SOMETHING is happening I took a shot at the end of washery production today.....

Image

In the fore ground is the 'washing' pond, behind it the dirty gravel stockpile. Behind that you can just see the white paint sprayed today marking the course of the railway. The Filcriss will be bent round onto that alignment. Immediately off the end of the white straight line the railway will swing back toward the wall, you can see just how much the gravel pile is in the way! Off to the rear left is the clean gravel being stockpiled in the operating pit. The more observant may also notice that the fruit nets at the far end of the garden have also come down today. I picked the last of the raspberries this morning so there is no more need for them and the avian air traffic control can remove the obstacle from their flight plans!

Provided the back doesn't put paid to it I hope to press on with the washing tomorrow - although I really MUST show my face on the allotment sometime!

All the best,

Andrew
"Smith! Why do you only come to work four days a week?
"'cause I can't manage on three gaffer!"

Joe
Fireman
Fireman
Posts: 465
Joined: Sat Dec 20, 2014 6:18 pm
Location: West Midlands

Post by Joe » Mon Aug 15, 2016 10:23 pm

I like the landscaping, very impresive. Im suprised you didnt use a temporary railway to teansport the gravel 😉. Only kidding i look forward to seeing some plants go in.

Cheers
Joe
Steam is highly under rated

User avatar
Keith S
Driver
Driver
Posts: 1627
Joined: Thu Feb 24, 2011 11:44 pm
Location: Canada

Post by Keith S » Tue Aug 16, 2016 4:37 pm

... and look! You now have a lovely water feature in your garden![/u]

User avatar
Soar Valley Light
Driver
Driver
Posts: 1451
Joined: Sun Dec 08, 2013 5:18 pm
Location: North West Leicestershire

Post by Soar Valley Light » Tue Aug 16, 2016 8:59 pm

Joe,

I thought to myself just how handy some jubilee track and a few binnie tippers might have been! Not fast enough to keep up with my trusty bucket though I fear - and it's already taking too long for my liking!

Keith, I wouldn't describe it as a 'nice' water feature. The water is as murkey as it comes and the slimey sludge gets everywhere!

I'm pleased to report that I've moved about 30% of the gravel pile into a new storage area in the top right corner of the picture above. It's still in an unwashed state but that's fine for the drainage material around the track (I'm filling between the Filcris runners with it). I'm even more pleased to report that the washing of the remaining heap has progressed well to the extent that there is barely a quarter of the pile in the picture left now, and some of that has had a preliminary spray down. There is actually room to get the railway past the heap now but I'm going to have one more shift washing gravel before I look seriously at extending the Filcris. I did spend fifteen minutes last night building up the levels of some of the cleared area so that the ground is closer to the finished level of the railway. There is still a fair way to go though.

Once the next length of Filcris is in I'm going to be almost up to the topsoil dump. At that stage I'm going to have to spend some time moving soil out into finished locations. This means I need to get the Filcris side extensions fitted in the station areas. I also need to press on at that point with final path construction, and more importantly the retaining walls that will hold the garden back from the new routes through it.

Plenty still to do. Grant was quite right in his earlier post there will be trains by Christmas - I'm just not saying which year! :?
"Smith! Why do you only come to work four days a week?
"'cause I can't manage on three gaffer!"

User avatar
Peter Butler
Driver
Driver
Posts: 5243
Joined: Sun Sep 09, 2012 10:33 pm
Location: West Wales

Post by Peter Butler » Tue Aug 16, 2016 9:38 pm

Well I think you're doing exceptionally well considering the space you have to work in, moving things around is inevitable and no matter how you plan it, there are always items in the way!
Also, doesn't that 'going to work' thing spoil your day?
I think the fun is in the building, but others like to see trains going round, your running will come soon enough and you can reflect on all the preparation work involved and feel proud of your achievement.
The best things in life are free.... so why am I doing this?

User avatar
Soar Valley Light
Driver
Driver
Posts: 1451
Joined: Sun Dec 08, 2013 5:18 pm
Location: North West Leicestershire

Post by Soar Valley Light » Wed Aug 17, 2016 8:00 pm

Thanks Peter,

You're absolutely right, work DOES get in the way! On the other hand it gives me chance for a breather ;)

I set too with the gravel again when I got home this afternoon, I discovered it was deeper than I thought. I cleaned some more up and tipped it on the clean pile but that's pretty full now. I decided that I could be at this washing game for weeks, all at the expense of progress. I decided to move the remainder of the heap onto the dirty stockpile - I must have doubled it's size! I'm not sure how much gravel I'm going to need but I think I've salvaged pretty much all I can, if that proves to be too much I'll have to use some for general fill somewhere along the way. Further washing will have to take place in the bottom corner of the garden amongst the fruit bushes. Moving the soil dump is the next job. I doubt I can move it all in one go - there isn't room, but I'll move as much as I can into the area above the operating pit.

Once all THAT is done I can look at some cutting and filling of the ground to form the new path to the operating pit and to build up the ground for the next section of railway.

On a more interesting (railway) note, I've started looking at my turnout requirements. Some full sized drawings will be produced at the next suitable opportunity (i.e. when it's raining or I am no longer able to stand!). It is the size and angle of these that will determine where and how the side extensons to the Filcris need to be installed for sidings and stations, they are also the most likely staring point (pun intended! :oops: ) for the permanent way construction works.

I shall keep you updated as soon as there is anything worthy of reporting.

Andrew
"Smith! Why do you only come to work four days a week?
"'cause I can't manage on three gaffer!"

User avatar
Soar Valley Light
Driver
Driver
Posts: 1451
Joined: Sun Dec 08, 2013 5:18 pm
Location: North West Leicestershire

Post by Soar Valley Light » Tue Aug 23, 2016 9:29 pm

Progress has been as slow as predicted. I'm at a point where a good deal of thinking time is required between jobs to avoid going off 'half cocked'. No matter how much careful planning goes into a project there are always parts of the job that require some 'on the feet' thinking. In my case I ususally find that this increasingly happens the further into a project I get. As the railway has grown I've been able to adapt things to fit the space to best effect, for both the railway and the garden.

Yesterday saw the surveyors out again now that gravel and some soil have given way to a clear flat area to continue the extension of the railway into. You should be able to make out the white lines on the ground in the attached photos. These are the straights, they will be joined together by circular curves. I've got some building up of ground levels to do! Despite the large stock of soild, at least 50% of which is sitting in the way of the next and final step, I'm becoming increasingly concerned that I may actually be a tad short of soil at the end of the day. I have a section of the old yard still to break out alongside the outbuildings, I'm hoping this will generate sufficient soil of an adequate quality to make up any shortfalls.

I plan to install another length of Filcris next and build up some levels around it. This should help manage the soil quantities. Moving more of the stuff is going to have to follow on fairly soon, whilst the weather is still reasonably dry. I'm going to need to build out the outer edge of the branch embankment a little bit more so this will help in the management of soil quantities. I've got some leave coming up next week so I'm crossing my fingers for good weather to be able to push things forward with a renewed burst of speed.


Looking across from the branch to the cleared area. The white lines marking the straights are just visible. (They are straight lines, honest! They just look curved where the follow the vertical changes in the ground level)

Image


A view from the remaining spoil heap back scross the newly cleared area towards the current end of the Filcris. (Immediately to the left of the dustbins). The railway builders always used to refer to the 'head of steel' when talking about the limit of construction progress, in the case of the Charnwood Forest Light it's more a case of the 'head of plastic'!


Image


Watch this space (as they papers used to say!)

Andrew
"Smith! Why do you only come to work four days a week?
"'cause I can't manage on three gaffer!"

Joe
Fireman
Fireman
Posts: 465
Joined: Sat Dec 20, 2014 6:18 pm
Location: West Midlands

Post by Joe » Tue Aug 23, 2016 9:55 pm

Thats a nice curved embankment there , will look great with suitable plants . Soil has always been a limitation for me and I found when indid find some it never lasted long but did make a big difference to a small area.
Looking forward to more progress; do you have an idea of the type of buildings you will have yet or is it to early to say ?
Cheers
Joe
Steam is highly under rated

User avatar
Soar Valley Light
Driver
Driver
Posts: 1451
Joined: Sun Dec 08, 2013 5:18 pm
Location: North West Leicestershire

Post by Soar Valley Light » Wed Aug 24, 2016 9:55 pm

Hi Joe,

The earthworks do seem like they are going to be quite a feature! I'm not planning much in the way of scenery at all to be honest. There are a couple of reasons, firstly I love the relationship between railway and the real landscape, I find buildings can disturb that balance. Secondly I have to bear in mind the aerial bombardment of footballs from next door, with the railway so much 'up in the air' any structures will be at risk. I will probably have a copuple of ground frame huts but these will be practical structures, well re-inforced to provide protection to the ground frames that will work the points from air attack.

I achieved a bit of progress on a couple of fronts today. The second side went on the new Filcris section, moving the finished 'head of plastic' on by about ten feet. Secondly I picked up some retaining wall material. Being involved with Heritage raiways sometimes provides the oportunity to convert their unwanted surplus or scrap materials into useful items for construction. There are variuous ways of striking such a trade! I was able to pick up some scrap cable troughing today to use as retaining wall material. I may face it in stone eventually but for now it allows construction to leap forwards far more quickly than conventional wall construction. I didn't press on far because I'm still debating with myself on the best line for the wall to take. I'm not sure whether to follow the railway (as best I can), the garden wall, or whether to strike out on an independent line. This work is providing extra fill to the new section of railway forming the embankment material. I really need to start and think about bringing the path up out of the hole with the next section of retaining wall, otherwise the path will lead into the cellar rather than to the kitchen door!


Image


Image

Current 'Head of Plastic'.
Image

Looks like a wet day tomorrow - that should steady progress up a bit!

Andrew
"Smith! Why do you only come to work four days a week?
"'cause I can't manage on three gaffer!"

User avatar
Soar Valley Light
Driver
Driver
Posts: 1451
Joined: Sun Dec 08, 2013 5:18 pm
Location: North West Leicestershire

Post by Soar Valley Light » Sat Aug 27, 2016 8:41 pm

It's been a hectic old week. The weather has been somewhat fickle too. However, there is big news from the Charnwood foothills. The alignment of the railway is finally cleared and set out! Realising early in the week that the only way to sensibly manage the landscaping soil quantities was to get the Filrcis supports in throughout the whole railway, I began planning the clearance of the remaining soil dump into a revised location. This train of thought was speeded on it's way by considerations of how the final path layout might work. That is a factor which also requires the completed Filcris supports to be in place.

So, after clearing the last few items of construction materials onto the site of the new shed (nicely out of the way), the shovelling began. There was some old weed seperator and some pockets of pea gravel to work out from under the soil and then the topsoil itself to shovel into a new heap on the line of the old path, right up against the earlier railway construction works. It's still like working on a postage stamp!

This allowed the surveyors to gain access this morning to set out the semi-circle of curve that forms the house end of the garden circuit. It was immediately clear that some more clearance of the old soil dump was required to make room for the railway. It also revealed how close to a fencepost the railway is going to be. When I designed it on paper I allowed an extra 200mm clearance off the wall at this point, which I knew was going to be the tightest spot on the line. I made allowance for the brick piers that extend into the garden, but I missed the fact that the full diameter of the circle coincided exactly with one of the fenceposts that stand as proud as the brick piers! My excuse is that it was under five feet of soil when the initial setting out was done and virtually inaccessible. (This was the original soil dump and predated the start of railway design work - it must be nearly four years old now!! This was confirmed by it being as solid as rock I nearly needed a bar to get through it!). It just goes to show how VITALLY important CAREFUL and ACCURATE surveying, designing and setting out is when clearances are tight. Another inch towards the wall with the alignement would have meant a physical clash and a need to undo a lot of what has been done. Lucky or what?!


Initial Breaking Through
Image


Still working on a postage stamp - you can see how the temporarily repositioned soil dump is right up against the previous railway construction.
Image


This work in turn allowed the final alignment to complete the circuit to be marked out. This included a very short section of 'on site' design to link the final four feet or so between the two ends of the circuit.

Breaking through - after final trimming of cutting sides and setting out of alignment
Image


Here is the final, semi-circular curve at the house end of the circuit. It has been set out by pegging the centre and using a string line to mark the curve. It is a pure curve - honest! It looks like a wiggley worm beacuse it goes up and down over the undulating ground.
Image

I began to construct the Filcris around the semi-circle but I'm afraid rain stopped play. It was impossible to carry on and I had to beat a very hasty retreat. (Hence no photo's of this element) It's going to need most of tomorrow for the ground to dry out enough to work on again without creating a 'hippo wallow'. The forecast is reasonable for the week though so hopes are still high for some significant forward steps.

Andrew
"Smith! Why do you only come to work four days a week?
"'cause I can't manage on three gaffer!"

User avatar
Peter Butler
Driver
Driver
Posts: 5243
Joined: Sun Sep 09, 2012 10:33 pm
Location: West Wales

Post by Peter Butler » Sat Aug 27, 2016 9:04 pm

Really coming together now Andrew, you have shown what sheer determination can do and soon you will have the finished article to prove it. Well done!
The best things in life are free.... so why am I doing this?

User avatar
ge_rik
Administrator
Administrator
Posts: 6573
Joined: Sun Oct 25, 2009 10:20 pm
Location: Cheshire
Contact:

Post by ge_rik » Sun Aug 28, 2016 6:39 pm

Fascinating watching progress. These photos will prove very nostalgic in a few years' time when you're running trains through your well established landscaped railway.

Rik
------------------------
Peckforton Light Railway - Blog Facebook Youtube

User avatar
Soar Valley Light
Driver
Driver
Posts: 1451
Joined: Sun Dec 08, 2013 5:18 pm
Location: North West Leicestershire

Post by Soar Valley Light » Sun Aug 28, 2016 9:42 pm

Thanks guys,

Words of encouragement, especially from people like yourselves who have remarkable railways of your own, is a huge boost.

As predicted I didn't achieve anything 'on the land' today, beyond taking a few measurements, and just those few steps were starting to form a mud hole. I did sieze the chance to assemble the next sections of Filcris in the building up yard (the slabs outside the kitchen door!) I build them up with a single side and the supports in this flat location, then set them in the ground to level before finally fixing the second side 'on site'. Today saw the pre-assembly of the last sections needed to form the full circuit. I have just enough matereial left to fit the second sides once the new sections are in place. There will be a few bits left over to help with siding and loop construction but I've had to order a few extra full lengths today to have enopugh to form all the planned loops and sidings.

I've done some more measuring up for turnouts. I'm going to try and settle on 1 in 6 turnouts with loose heel switches of a scale 10' length, these will have a turnout radius of 2063mm. The exception will be the turnout from the main circuit to the branch where a 1 in 7 crossing angle will give a more gentle alignment. As far as possible the turnouts will be out of straight but several are going to need curving to fit into the radii of the mainlines. That's another thing I've been calculating today. I need to draw some of these up full size now ready for construction. I've got one final bit of serious measuring to do for turnouts, the point at the terminous that will turn the loop off the single line is going to be on a 1320mm radius mainline. The turnout will be on the outside of the main and will need to keep following the main quite closely, there is no room for a swing out and back to achieve the clearance distance between loop and main, that means a shallow angle for the crossing. I will probably get the tape out again tomorrow, I won't be massively surprised if this works out as flat as 1 in 12 - which will make for one heck of a long turnout, the 1 in 6's are working out at over one foot long!

A brief note on the subject of curve radii. I've based mine on a scale 1 1/4 chain (1320mm), 1 1/2 chains (1584mm) and 1 3/4 chains (1848mm) I would have like to use 1, 2 and 3 chain radii - but that would have mean't closing the street and extending the garden!

No pictures today I'm afraid, the assembly work was an early morning job that had to make way for the production of 12lbs of blackcurrent jam before going out for Sunday lunch! More updates later in the week.

Andrew
"Smith! Why do you only come to work four days a week?
"'cause I can't manage on three gaffer!"

Big Jim
Moderator
Moderator
Posts: 2694
Joined: Sat Jul 06, 2013 5:28 pm
Location: Near Llanelli

Post by Big Jim » Sun Aug 28, 2016 9:54 pm

the assembly work was an early morning job that had to make way for the production of 12lbs of blackcurrent jam
I don't know about you but in our family it is always the men that make the Jam, we like to keep it as a male preserve :toothy8:

I'll get me coat
If at first you don't succeed, use a bigger hammer!

User avatar
IrishPeter
Driver
Driver
Posts: 1400
Joined: Wed Feb 23, 2011 3:24 am
Location: 'Boro, VA

Post by IrishPeter » Mon Aug 29, 2016 6:28 am

2 chains was more or less my default here when using flexi-track. That works out to a little under 7' in the real world. I suspect the new line will also be on the same standard as it is a standard bit of Calthropana. I have quite a bit more width to play with than you, though.

Peter in AZ
Traffic Pattern? What pattern? Spuds out; grain in, but cattle, sheep and passengers are a lot less predictable.

User avatar
Soar Valley Light
Driver
Driver
Posts: 1451
Joined: Sun Dec 08, 2013 5:18 pm
Location: North West Leicestershire

Post by Soar Valley Light » Tue Aug 30, 2016 10:15 pm

Well, well. Great progress, the Filcris foundation is now complete! :occasion5: :occasion9: :occasion7:

I went out this afternoon as soon as we got back from a lunch out. My intention was to adjust a bit of the concrete retaining wall and see how wet the ground was. I moved a bit of topsoil round the heap and filled up some of the slack areas on existing embankments. The ground was reasonably dry so I got the tools out and began installing the built up sections of Filcris. It went well but they were a long way out of the ground and getting higher as I worked forwards. The last section was in danger of being in mid air! So, the excavation work started again to produce embankment core fill material. I built up the final gap to the bottom of the runner level and then continued filling around the newly installed foundation. Once I'd got this compacted this allowed me to tweak the line of the new section and once THAT was done I could install the last short section to fill the gap. :D

Throught the construction I've set the levels as I've gone along using a 1m builders spirit level. When the two ends met I was less than half an inch out. It was a simple matter to run the difference out over the last 7m installed today. Success! A little more final adjustment and I was able to fit the second runners to finish the whole circuit. There is plenty more filling up of embankment still to do but all in all today has been a great leap forward. :blob7:

Work will continue during the week but the next steps are likely to be on groundworks, path and wall construction and possible ripping up the last bit of yard and laying the new one.

Railway wise I need to finalise a means of fixing the track to the Filcris. I'm still keen to use a geotextile over the top of the Filcris and lay the track on top of that but these are details I still need to research and take advice on. It's tempting to head out there in the morning with rails and sleepers and start the permanent way works but I feel a little bit of thinking time now will be very beneficial in the long run.

The sun this afternoon was really too bright for photographs but I took some. If they look rubbish I'll try again tomorrow.


Looking out from the back corner along the end of the 1320mm radius curve and over the final construction that linked up the circuit. The old installation work is in the sun and the new work joins it just about where the shadow starts.
Image


Looking back the other way into the end curve.
Image


And finally.... Looking across the 1320mm radius curve (from the path). You can just see the branch in the foreground. the main circuit above it is where construction started this week.
Image

A good days work! ;)

Andrew
"Smith! Why do you only come to work four days a week?
"'cause I can't manage on three gaffer!"

User avatar
LNR
Driver
Driver
Posts: 1542
Joined: Sat Feb 27, 2016 5:26 am
Location: Australia

Post by LNR » Tue Aug 30, 2016 11:59 pm

A good days work indeed! The heartiest of congratulations Andrew.
Hope that while you are thinking about the next step, you are smiling to yourself about your achievement. I sense that things may start to move a little quicker for you now. Earthworks always are the hardest bit in my estimation.
Grant.

User avatar
IanC
Trainee Driver
Trainee Driver
Posts: 798
Joined: Mon Feb 15, 2016 9:15 am
Location: Nr. Warrington, Cheshire

Post by IanC » Wed Aug 31, 2016 10:46 am

Well done Andrew.

I've no experience of building a railway outdoors so can't comment with any authority. However If I had got that far I would consider the worst part over with and be looking forward to track laying and running trains. Not long now surely?

Ian

User avatar
Soar Valley Light
Driver
Driver
Posts: 1451
Joined: Sun Dec 08, 2013 5:18 pm
Location: North West Leicestershire

Post by Soar Valley Light » Wed Aug 31, 2016 8:16 pm

You'd have thought the earthworks were over wouldn't you? Oh no! I've just come in from seven hours of sheer graft! Digging out for the paths and sizing up for the central path to service the washing line. This will be built from large concrete troughing units 450mm deep, 600mm wide and 1000mm long. It was only when I began finalising where there were going to go that I realised they were still sitting outside the railway! I can pick a lid up on my own (just) but there is no way I can get a trough unit off the ground, never mind carry it over the railway. I managed to walk them up the path rocking them on alternate corners, then a plank and some bricks allowed me to slide them over the railway and into the hole. I only have two of the four I need so far, I get the feeling the third and fourth won't be any easier!

I now have even more spoil heaps shoe horned in but at least some of the railway embankments are now sporting top soil to pretty much final profile. It's all coming together now. There are a couple more days of hard slog but that should really see things in a much cleaner and tidier state, with some prospect of seeing a finished landscape in the garden. It will 'just' need filling with the railway then!

No pics today - to tired to hold a camera tonight :?

Andrew
"Smith! Why do you only come to work four days a week?
"'cause I can't manage on three gaffer!"

User avatar
ge_rik
Administrator
Administrator
Posts: 6573
Joined: Sun Oct 25, 2009 10:20 pm
Location: Cheshire
Contact:

Post by ge_rik » Thu Sep 01, 2016 7:43 am

Congratulations Andrew!

Great to hear you've reached your first milestone (or is it second, cutting the first sod might be the first).

Won't be long now before the first train runs.

Rik
------------------------
Peckforton Light Railway - Blog Facebook Youtube

Post Reply

Who is online

Users browsing this forum: No registered users and 4 guests