Page 6 of 9
Re: Nonaim Tramway
Posted: Sun Oct 22, 2017 7:02 pm
by bazzer42
Love that shot on the bridge. Does it smell nice when trimmed being mint related?
Re: Nonaim Tramway
Posted: Mon Oct 23, 2017 12:31 pm
by Dwayne
bazzer42 wrote: ↑Sun Oct 22, 2017 7:02 pm
Love that shot on the bridge. Does it smell nice when trimmed being mint related?
No mint scent at all when trimmed. I did plant some mint at a couple of places on the layout but neither is next to the track so no need to trim.
Re: Nonaim Tramway
Posted: Mon Oct 23, 2017 5:50 pm
by Soar Valley Light
tom_tom_go wrote: ↑Sun Oct 22, 2017 7:00 pm
You could plonk a Darjeeling loco in those pictures and it would look like it was steaming away in India!
I'm not sure that's what Dwain was aiming for but you're absolutely right Tom. It's amazing how a carefully built railway with no trains can be a back drop for any number of prototypes (in any number of countries!) and even a variety of scales!
The shots of your loco look great Dwain. It's a very believable railroad in a very realistic landscape. I'm still in love with your track!
All the best,
Andrew
Re: Nonaim Tramway
Posted: Sun Nov 05, 2017 1:57 am
by Dwayne
Re: Nonaim Tramway
Posted: Sun Nov 05, 2017 6:34 am
by philipy
I love the middle shot of the three ( 3/4 from above). It reallys hows the embankment well.
Re: Nonaim Tramway
Posted: Sun Nov 05, 2017 8:32 am
by tom_tom_go
The line is looking great but is that a V-twin lump I spy in your workshop?

Re: Nonaim Tramway
Posted: Sun Nov 05, 2017 8:01 pm
by Soar Valley Light
Hi Dwayne, like the second two railway shots. They show off your earthworks and track laying to really good effect. Your little loco looks great trundling through the landscape. You do keep my inspiration fired up!
Andrew
Re: Nonaim Tramway
Posted: Mon Nov 06, 2017 1:57 am
by Dwayne
Glad ya'll enjoyed the photos. With the more pleasant weather I'm trying to do a little bit more before the weather goes south for good this year.
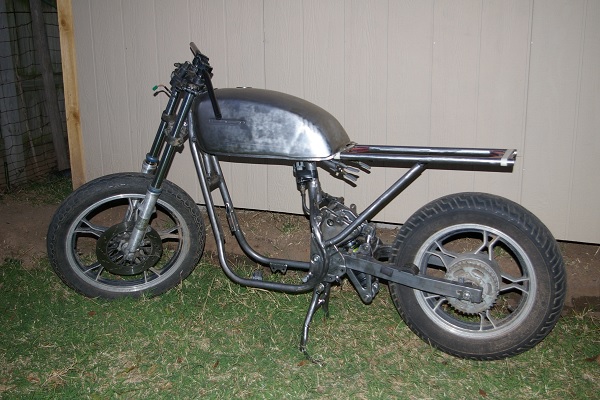
Tom... not a V-twin motor. It's a parallel twin that came out of my '83 Suzuki GR650 as the bike undergoes a cafe racer conversion (the more expensive hobby considering that I have a total of eight Suzuki bikes of which seven are projects).

- IMGP9848a.jpg (139.75 KiB) Viewed 5710 times
- IMGP1100a.jpg (102.35 KiB) Viewed 5710 times
Re: Nonaim Tramway
Posted: Fri Nov 10, 2017 12:33 pm
by Maple
The railway and the bikes look amazing!
Yes bike are more expensive, i am trying to preapre for riding next year after 2 years of road at the moment....
 20170625_212501
 by
Ben Maple, on Flickr
Its is looking better than this already
Re: Nonaim Tramway
Posted: Fri Nov 10, 2017 1:26 pm
by tom_tom_go
I use to have a Suzuki SV650 99 all street fightered up.
I don't trust other road users these days to ride anymore.
Re: Nonaim Tramway
Posted: Sat Nov 11, 2017 1:12 am
by Dwayne
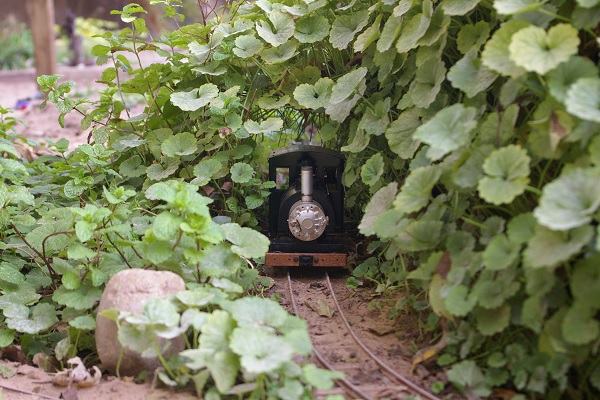
Back to the layout... the desire for a tunnel keeps popping into my head. I have the screen break "tunnel" between the town of Imagination and Figment (see photo) but am wanting something more solid for the tracks to bore through.
- IMGP1102a.jpg (115.98 KiB) Viewed 5641 times
The previous layout had a tunnel but unfortunately it's placement wasn't ideal as I was limited to the size of hill because of the tracks. I felt that hill was too small and didn't fit my concept of "plausibility".
So over the weekend I'm going to look at potential locations for it. Since there are no straight sections of mainline track it'll be a curved bore... something to take into account.
Re: Nonaim Tramway
Posted: Sun Nov 12, 2017 1:04 am
by Dwayne
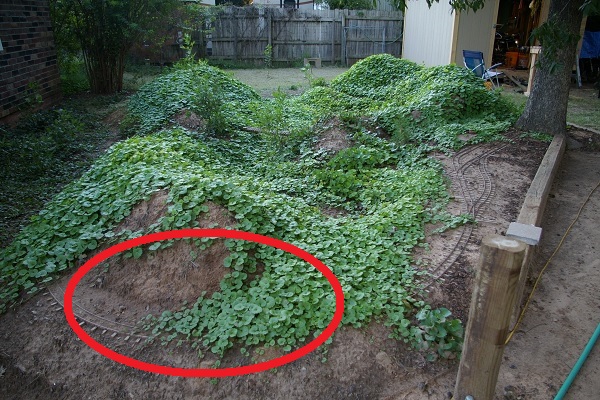
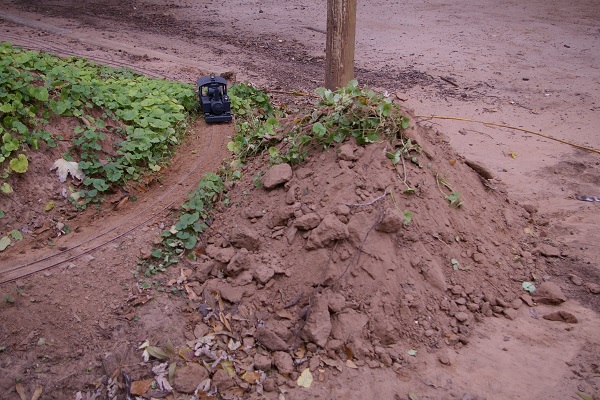
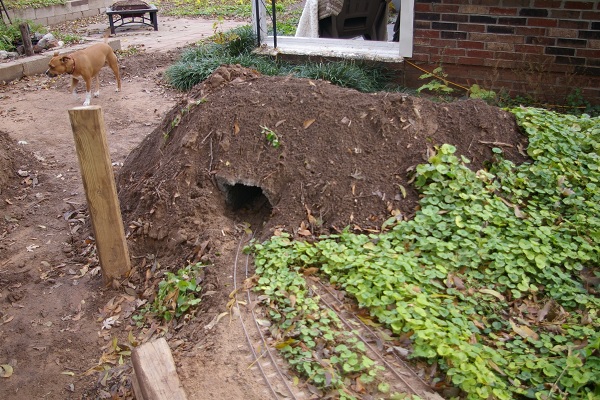
Weather went to crap overnight but regardless I got myself outdoors to the layout. Scoped out a few spots for the future tunnel and opted for the curve going around the east end of the layout. The existing hill will be built up once the tunnel is in place. So I cleared out the overgrowth of ground cover along the tracks and began piling dirt on the end. It's a start at least.
- IMGP0988b.jpg (146.71 KiB) Viewed 5614 times
- IMGP1141a.jpg (135 KiB) Viewed 5614 times
Re: Nonaim Tramway
Posted: Fri Nov 17, 2017 3:28 am
by Dwayne
I completed the tunnel bore a couple of days ago. Began shoveling dirt on top and snapped a pic looking from one side to the other. Total length is about 3 feet. Still need to construct some retaining walls along the approaches on both sides to keep the added dirt from sliding down over the tracks. Simple project that cost about $12 for three bags of concrete (each 80 lbs).
- IMGP1151a.jpg (152.27 KiB) Viewed 5551 times
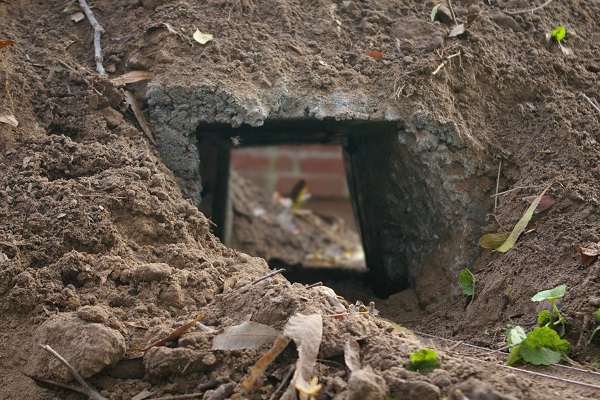
- IMGP1154a.jpg (206.75 KiB) Viewed 5551 times
Re: Nonaim Tramway
Posted: Fri Nov 17, 2017 8:19 am
by tom_tom_go
How did you shape the tunnel with the concrete?
Re: Nonaim Tramway
Posted: Fri Nov 17, 2017 12:12 pm
by Dwayne
tom_tom_go wrote: ↑Fri Nov 17, 2017 8:19 am
How did you shape the tunnel with the concrete?
I used some scrap 12"x12" pieces of sheet metal. I bent the metal in my brake press so that the vertical sides were 8" tall but not quite at a 90° angle.
The 4" sides connected at the top and were secured together with duct tape for the inner form. A length of 4" wide plank the length of the tunnel was used to add support beneath the forms held up with scrap wood blocks. This would support the weight of the concrete to be added to form the roof later.
Unbent sheet was used for the outer form and just held in place with some dirt tamped in behind to give walls about 2" thick. Concrete was mixed into a damp, crumbly consistency and troweled into the forms.
I then installed 1/2" wire mess atop the formed walls and let it set for a few hours to set. I then mixed more concrete and trowled it atop the form and mesh to create the roof giving it a slightly curved top on the outer side.
Let everything stand for another 24 hours before dismantling and removing the forms. Allowed it to set for another 24 hours for additional drying time before piling on the dirt.
Re: Nonaim Tramway
Posted: Fri Nov 17, 2017 1:45 pm
by tom_tom_go
Great work, thanks.
Re: Nonaim Tramway
Posted: Fri Nov 17, 2017 10:11 pm
by Soar Valley Light
Another great piece of work Dwayne, I love how it sits naturally in the landscape. I look froward to seeing a train passing through!
Re: Nonaim Tramway
Posted: Fri Nov 17, 2017 10:59 pm
by LNR
Can't wait to see the finishing touches to either end of the tunnel. Timber or masonry portals?
Grant.
Re: Nonaim Tramway
Posted: Sat Nov 18, 2017 1:56 am
by Dwayne
Soar Valley Light wrote: ↑Fri Nov 17, 2017 10:11 pm
Another great piece of work Dwayne, I love how it sits naturally in the landscape. I look froward to seeing a train passing through!
Thanks Andrew. With winter rapidly approaching the layout will be going dormant for a few months. Maybe next spring, eh?
LNR wrote: ↑Fri Nov 17, 2017 10:59 pm
Can't wait to see the finishing touches to either end of the tunnel. Timber or masonry portals?
Grant.
Timber portals. Much more befitting for a North American narrow gauge tram in my opinion.
Re: Nonaim Tramway
Posted: Sat Nov 25, 2017 8:08 pm
by Dwayne
Warmish day here so I spent a few hours cobbling the tunnel portal entrances. Nothing fancy nor prototypical but good enough for my standard 10 foot rule with the knowledge that in the years to come most of both will be obscured by the Creeping Charlie groundcover.
North tunnel entrance...

- IMGP1176a.jpg (112.46 KiB) Viewed 4126 times

- IMGP1177a.jpg (149.44 KiB) Viewed 4126 times
South tunnel entrance...
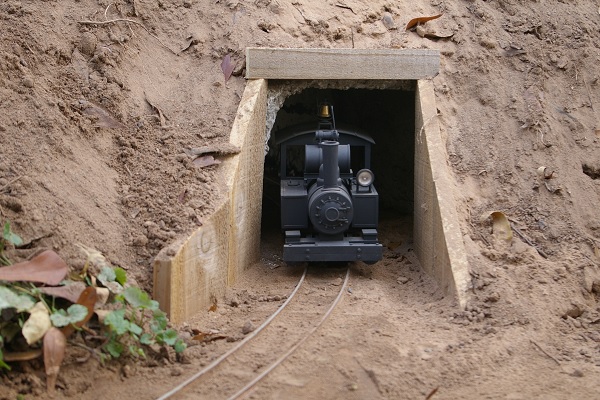
- IMGP1178a.jpg (124.68 KiB) Viewed 4126 times

- IMGP1181a.jpg (148.95 KiB) Viewed 4126 times
I also took the time to relocate a switch that I had installed this summer with the intent of maybe running an extension to the west side of my house. I decided that as appealing as it was, that side of the yard butts up against my neighbors driveway and as such they'd have a view of it and the potential gab fest. I like my neighbors but prefer to be left alone whenever I'm doing my hobbies.
So I pulled the switch from it's location, installed filler track and planted the switch on the south side of the new hill just before the tunnel. For the moment I'll locate another small mine on the short section of track (still to be built and installed) with the idea bouncing around in my skull that I might continue on with the track and eventually head towards the area where the previous layout more or less was located. We'll see.