'Lock Down Bridge' is a really impressive structure, great improvements all round.
All best wishes to your Mum!
The G&DLR begins.
-
Peter Butler

- Driver

- Posts: 5233
- Joined: Sun Sep 09, 2012 10:33 pm
- Location: West Wales
Re: The G&DLR begins.
The best things in life are free.... so why am I doing this?


Re: The G&DLR begins.
Looking good and great to see trains running.
Best wishes to your mum.
Rik
Best wishes to your mum.
Rik

Re: The G&DLR begins.
Love the bridge, did you make the side's, have you bought them  The last photo of your loco looks brilliant.
Best wish's to your mum and hoping she is doing well.
Best wish's to your mum and hoping she is doing well.
ROD
Life is so easy when I run my trains.


https://gardenrails.org/forum/viewtopic ... 41&t=11364
https://www.youtube.com/@fairywoodlightrailway
Life is so easy when I run my trains.


https://gardenrails.org/forum/viewtopic ... 41&t=11364
https://www.youtube.com/@fairywoodlightrailway
-
Sylvian Tennant
- Fireman

- Posts: 327
- Joined: Wed Aug 10, 2011 4:48 pm
- Location: Teesside
Re: The G&DLR begins.
Thank you chaps. It's been a difficult few months but we're working through it.
As for modelling matters the bridge itself was completely scratch built using scrounged PVC foamex (or something similar). The photos below show the main building processes. The rivets were just some resin jewels with gel adhesive backs I found in the local poundland - I added them with wood glue for security.


I have to admit there was some schoolboy errors with it but eventually I may address them when it comes to enhancing the line again.
As for modelling matters the bridge itself was completely scratch built using scrounged PVC foamex (or something similar). The photos below show the main building processes. The rivets were just some resin jewels with gel adhesive backs I found in the local poundland - I added them with wood glue for security.
I have to admit there was some schoolboy errors with it but eventually I may address them when it comes to enhancing the line again.
Facebook - https://www.facebook.com/Area51Models/
Instagram - https://www.instagram.com/area51greumach/
Instagram - https://www.instagram.com/area51greumach/
Re: The G&DLR begins.
Thank you.
ROD
Life is so easy when I run my trains.
https://gardenrails.org/forum/viewtopic ... 41&t=11364
https://www.youtube.com/@fairywoodlightrailway
Life is so easy when I run my trains.
https://gardenrails.org/forum/viewtopic ... 41&t=11364
https://www.youtube.com/@fairywoodlightrailway
Re: The G&DLR begins.
Looks mighty fine to me. Most of my errors are schoolboy - my wife reckons I'm a big kid so what the heck.... 
Rik
Rik
Re: The G&DLR begins.
And me Rik...I think we are all kids at heart. Oh how I wish we were young again and know what we know now........
ROD
Life is so easy when I run my trains.
https://gardenrails.org/forum/viewtopic ... 41&t=11364
https://www.youtube.com/@fairywoodlightrailway
Life is so easy when I run my trains.
https://gardenrails.org/forum/viewtopic ... 41&t=11364
https://www.youtube.com/@fairywoodlightrailway

Re: The G&DLR begins.
Like the bridge very much. I’m afraid I shall be copying it
-
Sylvian Tennant
- Fireman
- Posts: 327
- Joined: Wed Aug 10, 2011 4:48 pm
- Location: Teesside
Re: The G&DLR begins.
I'll thurd that these, days
Facebook - https://www.facebook.com/Area51Models/
Instagram - https://www.instagram.com/area51greumach/
Instagram - https://www.instagram.com/area51greumach/
-
Sylvian Tennant
- Fireman
- Posts: 327
- Joined: Wed Aug 10, 2011 4:48 pm
- Location: Teesside
Re: The G&DLR begins.
I'm afraid I'll be doing the same with your tank wagons.
Thank you very much, I love your locos and stock btw.
Facebook - https://www.facebook.com/Area51Models/
Instagram - https://www.instagram.com/area51greumach/
Instagram - https://www.instagram.com/area51greumach/
-
Sylvian Tennant
- Fireman
- Posts: 327
- Joined: Wed Aug 10, 2011 4:48 pm
- Location: Teesside
Re: The G&DLR begins.
You're very much welcome.
So, finally.... the track side of things are done.
I've added a pass strip to the LGB R1 point that was causing the most problems. This seems to have eliminated the derailments here.

In addition to that, I needed somewhere to cross over. originally I was going to dig out and restore my original crossing gates. Unfortunately I was quick to find out that Toddlers have limited sympathies for hand crafted and detailed models so I decided it was best to just make an unmates crossing which is just simply some wooden firework stakes picked up post Nov. 5th glued together and coated in Weather protective woodstain.

finally and also using some of the firework stakes and some spare bits of wood lying around I built a much needed buffer stop.


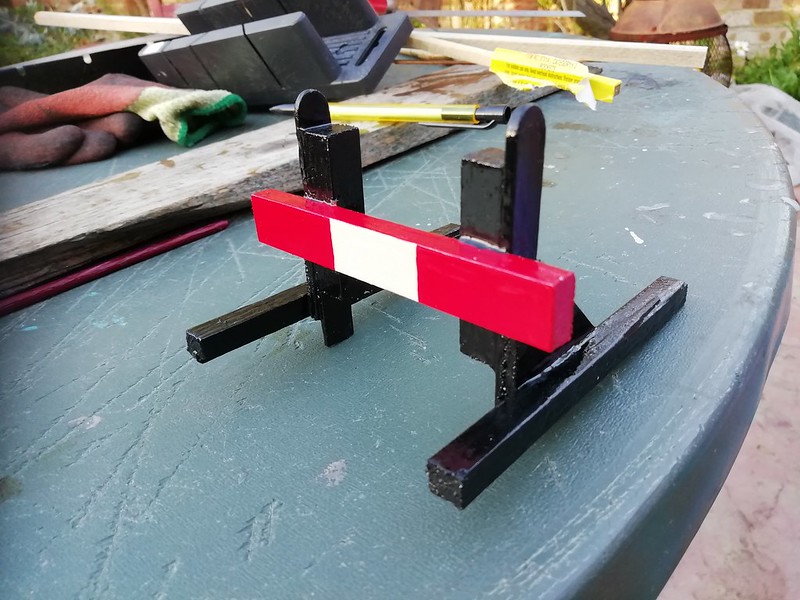
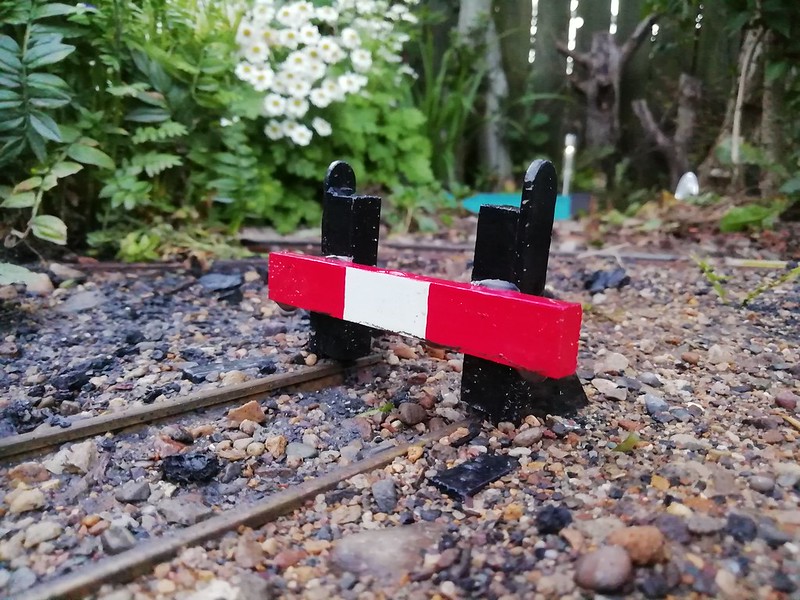
I may need to go over the steaming bay with coal and ash. I got a little over excited with my new garden hose.
So, finally.... the track side of things are done.
I've added a pass strip to the LGB R1 point that was causing the most problems. This seems to have eliminated the derailments here.
In addition to that, I needed somewhere to cross over. originally I was going to dig out and restore my original crossing gates. Unfortunately I was quick to find out that Toddlers have limited sympathies for hand crafted and detailed models so I decided it was best to just make an unmates crossing which is just simply some wooden firework stakes picked up post Nov. 5th glued together and coated in Weather protective woodstain.
finally and also using some of the firework stakes and some spare bits of wood lying around I built a much needed buffer stop.
I may need to go over the steaming bay with coal and ash. I got a little over excited with my new garden hose.
Facebook - https://www.facebook.com/Area51Models/
Instagram - https://www.instagram.com/area51greumach/
Instagram - https://www.instagram.com/area51greumach/
Re: The G&DLR begins.
Great looking buffer stop ..
Rik
Rik
Re: The G&DLR begins.
Agree..Your buffer stop is brilliant...
ROD
Life is so easy when I run my trains.
https://gardenrails.org/forum/viewtopic ... 41&t=11364
https://www.youtube.com/@fairywoodlightrailway
Life is so easy when I run my trains.
https://gardenrails.org/forum/viewtopic ... 41&t=11364
https://www.youtube.com/@fairywoodlightrailway
-
Sylvian Tennant
- Fireman
- Posts: 327
- Joined: Wed Aug 10, 2011 4:48 pm
- Location: Teesside
Re: The G&DLR begins.
Thank you gents for your kind words. The buffer stop is a little on the low side for most of my stock. Should have added another strip of wood to the top but it works fine for roundhouse locos.
Facebook - https://www.facebook.com/Area51Models/
Instagram - https://www.instagram.com/area51greumach/
Instagram - https://www.instagram.com/area51greumach/
-
Sylvian Tennant
- Fireman
- Posts: 327
- Joined: Wed Aug 10, 2011 4:48 pm
- Location: Teesside
Re: The G&DLR begins.
More work on line saw an on the whim project which I had in my mind for a little while. A coal stage, taking inspiration of the likes of Hayling Island (For the record I'm an LNER man rather than Southern but the Hayling Billy holds a particular fascination) Here is a photo run down of the whole project made up from more of the spare firework stakes I had lying around, lollipop sticks and coffee stirrers.
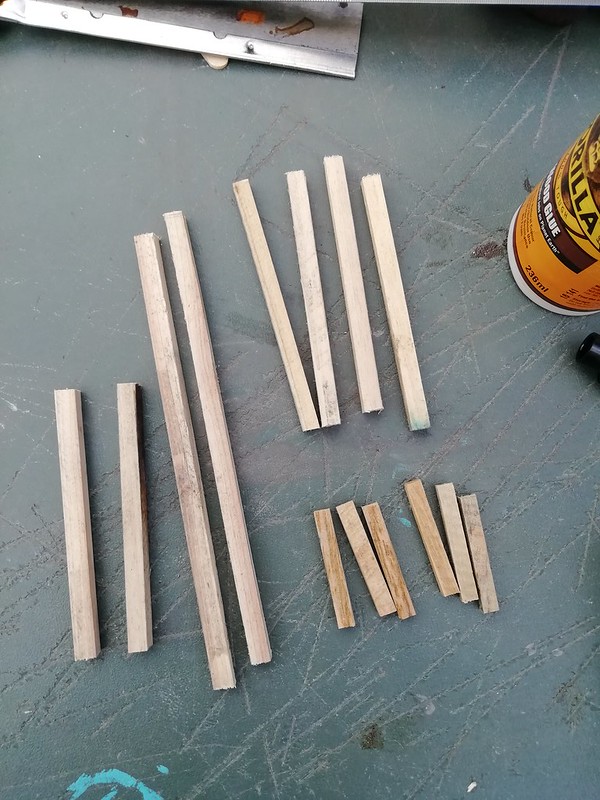


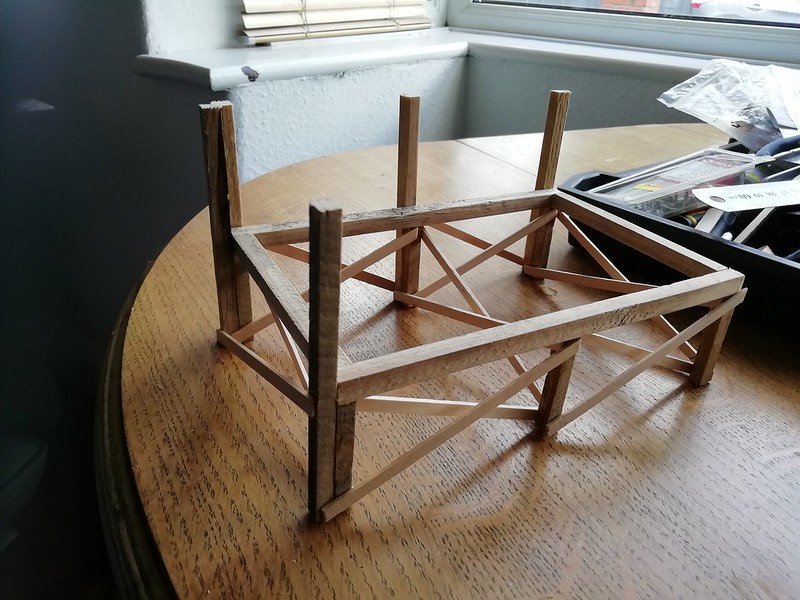

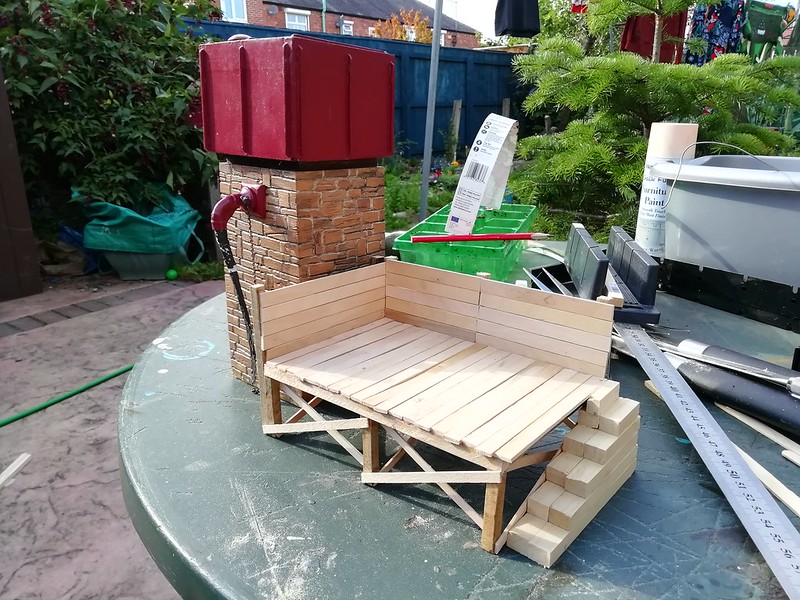

In all it cost me about £12 - mainly because I had to buy in a plank of Obechi, the lollipop sticks and a large tin of natural teak woodstain (they only had large...) Thinking about it, I had light oak woodstain which may have been a better idea as it now looks like someones artistic interpretation of Spareribs. But as you can see the rain stays off it - which is the important thing, plus it's darker in real life.
Next up the water tower. For out of curiosity what do people use for a bag for a watercrane (Im trying without success to find a long black balloon) and does anyone know where I can source a knackered old carriage for a mess hut?
Facebook - https://www.facebook.com/Area51Models/
Instagram - https://www.instagram.com/area51greumach/
Instagram - https://www.instagram.com/area51greumach/
Re: The G&DLR begins.
Great work on the coal stage, may use your idea if that's ok. Try and rub the woodstain off as much as you can, you may then put some of the lighter stuff on or it might take the sparerib look off a bit. But if you put some coal dust on it after putting some watered down PVA on first, it should turn out more to your liking.
For the bag and carriage I'am afraid I can't help you. The carriage could be found on eBay I suppose.....
For the bag and carriage I'am afraid I can't help you. The carriage could be found on eBay I suppose.....
ROD
Life is so easy when I run my trains.
https://gardenrails.org/forum/viewtopic ... 41&t=11364
https://www.youtube.com/@fairywoodlightrailway
Life is so easy when I run my trains.
https://gardenrails.org/forum/viewtopic ... 41&t=11364
https://www.youtube.com/@fairywoodlightrailway

Re: The G&DLR begins.
How about some black staining to tone down the spare rib effect? It would also fit with it's use as a coaling stage.Sylvian Tennant wrote: ↑Mon Sep 07, 2020 11:37 pm More work on line saw an on the whim project which I had in my mind for a little while. A coal stage, taking inspiration of the likes of Hayling Island (For the record I'm an LNER man rather than Southern but the Hayling Billy holds a particular fascination) Here is a photo run down of the whole project made up from more of the spare firework stakes I had lying around, lollipop sticks and coffee stirrers.
In all it cost me about £12 - mainly because I had to buy in a plank of Obechi, the lollipop sticks and a large tin of natural teak woodstain (they only had large...) Thinking about it, I had light oak woodstain which may have been a better idea as it now looks like someones artistic interpretation of Spareribs. But as you can see the rain stays off it - which is the important thing, plus it's darker in real life.
Next up the water tower. For out of curiosity what do people use for a bag for a watercrane (Im trying without success to find a long black balloon) and does anyone know where I can source a knackered old carriage for a mess hut?
i have used a strip of black heatshrink for the bag on my water tower, it looks quite effective.
- water-tower.jpg (99.73 KiB) Viewed 5573 times
Phil
Sporadic Garden Railer who's inconsistencies know no bounds
My Line - https://gardenrails.org/forum/viewtopic ... 41&t=11077
Sporadic Garden Railer who's inconsistencies know no bounds
My Line - https://gardenrails.org/forum/viewtopic ... 41&t=11077
-
Sylvian Tennant
- Fireman
- Posts: 327
- Joined: Wed Aug 10, 2011 4:48 pm
- Location: Teesside
Re: The G&DLR begins.
Thanks chaps, I think the finish could have been a lot worse. Certainly not enough to damage by stripping but We'll how it goes when elements and coal hit it.
Great idea Phil, nanaged to grt some heat shrink today. Just one question. This might sound a bit daft but did you heat it up or just attach it as you bought it.
Great idea Phil, nanaged to grt some heat shrink today. Just one question. This might sound a bit daft but did you heat it up or just attach it as you bought it.
Facebook - https://www.facebook.com/Area51Models/
Instagram - https://www.instagram.com/area51greumach/
Instagram - https://www.instagram.com/area51greumach/
-
Sylvian Tennant
- Fireman
- Posts: 327
- Joined: Wed Aug 10, 2011 4:48 pm
- Location: Teesside
Re: The G&DLR begins.
Thanks chaps, I think the finish could have been a lot worse. Certainly not enough to damage by stripping but We'll how it goes when elements and coal hit it.
Great idea Phil, managed to get some heat shrink today. Just one question. This might sound a bit daft but did you heat it up or just attach it as you bought it.
Great idea Phil, managed to get some heat shrink today. Just one question. This might sound a bit daft but did you heat it up or just attach it as you bought it.
Facebook - https://www.facebook.com/Area51Models/
Instagram - https://www.instagram.com/area51greumach/
Instagram - https://www.instagram.com/area51greumach/
Who is online
Users browsing this forum: No registered users and 7 guests