
Rik, I'd gladly do a swap today.
35deg. with promise of very heavy rains later and over the next couple of days, and summer starts tomorrow.
Someone once said "you can't legislate the seasons"
Grant.
The Leawarra Nayook Railway
Re: The Leawarra Nayook Railway
Tom Tom said
Firstly I don't profess to be any expert, and I'm going to say things that will shock the purists, but hopefully might dispel some of the tensions that a newcomer might suffer when considering painting and weathering a loco. First some basics.
Point 1. I spray most things on a piece of wood clamped in the vice with a 12" disc of 1/4"ply screwed on one end as a turntable. It has 2x 3" nails in the side to hold my airbrush. the bench is covered in sawdust, steel dust and all the junk from my model making. I spray high gloss (generally on cars) matts and semi gloss in these conditions. This is not a recommendation as to how to do it, more indicating that a newby should not be put off for a lack of somewhere to spray a model.
Point 2. This one is a little hard to explain, but any spray gun puts out a pattern consisting of a wet central pattern of full colour surrounded by a larger area of paint that although colouring the surface has not wet out. The following might explain.
It is the dense centre section that the next pass of the gun must come up to, and overlap slightly. failing to do this results in a pinholed finish that gets imbedded with dirt and looks blotchy. Taking ones head slightly to the side will generally show this fully wetted area and where the next pass will be.
Point 3. When spraying with any sort of equipment, the gun charged with paint MUST be started OFF the job. You pull the trigger just off the job and commence your sweep, and continue until just off the job at the other end. This allows the gun to establish its pattern fully before coming onto the job and allows a clean unaltered paint flow until off the job at the other end. This is not a waste of paint, but a basic spraying practice that will become second nature with practice.
That's some very basic points over with, apologies to those with more experience, to be continued>
Grant.
Thanks for the reminder Tom, I was planning on setting this all down, then transcribing it to here. That didn't work, so I'm just going to waffle on (as usual), probably over a few posts.Another reminder Grant about that painting guide of your live steam locos...
Firstly I don't profess to be any expert, and I'm going to say things that will shock the purists, but hopefully might dispel some of the tensions that a newcomer might suffer when considering painting and weathering a loco. First some basics.
Point 1. I spray most things on a piece of wood clamped in the vice with a 12" disc of 1/4"ply screwed on one end as a turntable. It has 2x 3" nails in the side to hold my airbrush. the bench is covered in sawdust, steel dust and all the junk from my model making. I spray high gloss (generally on cars) matts and semi gloss in these conditions. This is not a recommendation as to how to do it, more indicating that a newby should not be put off for a lack of somewhere to spray a model.
Point 2. This one is a little hard to explain, but any spray gun puts out a pattern consisting of a wet central pattern of full colour surrounded by a larger area of paint that although colouring the surface has not wet out. The following might explain.
- Untitled.png (15.66 KiB) Viewed 4374 times
Point 3. When spraying with any sort of equipment, the gun charged with paint MUST be started OFF the job. You pull the trigger just off the job and commence your sweep, and continue until just off the job at the other end. This allows the gun to establish its pattern fully before coming onto the job and allows a clean unaltered paint flow until off the job at the other end. This is not a waste of paint, but a basic spraying practice that will become second nature with practice.
That's some very basic points over with, apologies to those with more experience, to be continued>
Grant.

Re: The Leawarra Nayook Railway
That’s a real shame Grant, no chance of getting another one to grow there again.LNR wrote: ↑Wed Nov 29, 2017 12:14 pm Rod said,Rod, the tunnel mouth is actually immediately to the left of the last pic.( shadow of it bottom left) It used to be covered by a large Possum Banksia bush, but we lost that last autumn.can’t you let the bush’s grow up and around the track and have like a living tunnel,
Grant.
ROD
Life is so easy when I run my trains.


https://gardenrails.org/forum/viewtopic ... 41&t=11364
https://www.youtube.com/@fairywoodlightrailway
Life is so easy when I run my trains.


https://gardenrails.org/forum/viewtopic ... 41&t=11364
https://www.youtube.com/@fairywoodlightrailway
Re: The Leawarra Nayook Railway
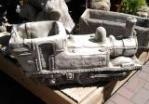
Looking for a change from boats and clearing up the line after winter, got the S&T branch out of their shed to do some maintenance. Removed the floor of the box to have access to the locking room underneath, dusted, oiled and checked linkages, replaced floor then oiled quadrant plates of the levers. Then into the yard to check, grease, and oil the rodding guides and bell cranks. Adjusted one cable to no.3 roads dwarf to get it back on its horizontal stop.
Rodding and other gear is looking like its been there a few years now, not so clean.
Grant.
- Signal Rodding.JPG (141.5 KiB) Viewed 4318 times
Grant.


Re: The Leawarra Nayook Railway
Yes, It does look extremely prototypical now, lovely. Needs a second look to realise its a model.
Envy you the weather to be able to get out and do it, I have a complete station and some line side fencing waiting to be installed!
Philip
-
tom_tom_go

- Driver

- Posts: 4824
- Joined: Wed Feb 23, 2011 3:08 am
- Location: Kent, UK
- Contact:
Re: The Leawarra Nayook Railway
That looks so real...
ROD
Life is so easy when I run my trains.
https://gardenrails.org/forum/viewtopic ... 41&t=11364
https://www.youtube.com/@fairywoodlightrailway
Life is so easy when I run my trains.
https://gardenrails.org/forum/viewtopic ... 41&t=11364
https://www.youtube.com/@fairywoodlightrailway
-
Peter Butler

- Driver
- Posts: 5234
- Joined: Sun Sep 09, 2012 10:33 pm
- Location: West Wales
Re: The Leawarra Nayook Railway
Most impressive, little things mean a lot!
The best things in life are free.... so why am I doing this?
Re: The Leawarra Nayook Railway
Grant, I am very impressed by the detail and realism that you have achieved here. A question I have, are the bell crank mounting plates fixed to your sub base or are they in some way attached to the track?
I ask because I am proposing a rodded operation of points to my line's extension and I have been thinking that if the crank plates are attached to the sub base, I believe that any movement of the track (eg temperature) is going to result in a partial movement of the points.
Maybe I'm just being over cautious but would appreciate your views.
Phil
Re: The Leawarra Nayook Railway
Hi Phil,
Yes the base plates are fixed to the sub base, but as the two in the pic. are controlling dwarf ground signals it isn't a problem. However due to the heat of our summers I have found that as in real practice the cables do expand and for that reason I've incorporated short springs (visible on the right hand bell crank). These allow me to over pull the lever if necessary, and that combined with the McKenzie Holland feature of three notches on the quadrant plates for the reverse position, gives me much come and go.
Grant.
PS The lever on the ground frame for the main line signal requires all three notches in summer, only one in winter, but the distance is about 3.5 mtrs.
-
steamer68
- Trainee Fireman

- Posts: 208
- Joined: Tue Nov 28, 2017 11:33 am
- Location: Bishop Auckland, UK
Re: The Leawarra Nayook Railway
Great job on the rodding gear the weathered an worn look is so realistic. 
Regards
Kevin
Kevin
-
Soar Valley Light

- Driver
- Posts: 1451
- Joined: Sun Dec 08, 2013 5:18 pm
- Location: North West Leicestershire
Re: The Leawarra Nayook Railway
I couldn't have put it better! Fantastic job Grant.
All the best,
Andrew
"Smith! Why do you only come to work four days a week?
"'cause I can't manage on three gaffer!"
"'cause I can't manage on three gaffer!"
-
IrishPeter
- Driver
- Posts: 1400
- Joined: Wed Feb 23, 2011 3:24 am
- Location: 'Boro, VA
Re: The Leawarra Nayook Railway
As a point rodding geek, I have to say that I agree. 
Peter in Va
Peter in Va
Traffic Pattern? What pattern? Spuds out; grain in, but cattle, sheep and passengers are a lot less predictable.
Re: The Leawarra Nayook Railway
Thank you to everyone for your comments, they are appreciated.
Hoping to get back to running some trains and get some decent pics.
As is probably obvious I use steel as opposed to brass for most outdoor stuff, and always give it a liberal coat of killed spirits of salts (hydrochloric acid) to promote rust. I can get steel items coated in rust after 3 nights out, especially in winter with the colder temps. Instant weathering.
Grant.
Re: The Leawarra Nayook Railway
Unfortunately I can achieve exactly the same effect by simply handling things. For some reason I've always had extremely corrosive sweat. When I was a kid I handled something of my father's that I wasn't supposed to touch and he knew I had because a few days later my fingerprints were rusted onto the steel surface!
Philip
Re: The Leawarra Nayook Railway
Well I did get to boil some water today, so some more pics. of the same scenes you've surely seen before.
Raising steam in the workshops.
Passengers boarding and staff looking impatient.
Rounding the curve before plunging into the tunnel
Things are looking greener after winter, won't stay that way for long.
Warringine Creek from the other side.
Bridge over the Warringine valley
Level Crossing into Nayook.
To end up in the Crib Room at Nayook.
Grant.
- PC110003.JPG (88.16 KiB) Viewed 5330 times
- PC110009.JPG (87.72 KiB) Viewed 5330 times
- PC110014.jpg (113.15 KiB) Viewed 5330 times
- Scene 4.JPG (117.78 KiB) Viewed 5330 times
- PC110017.JPG (193.33 KiB) Viewed 5330 times
- PC110025.JPG (160.96 KiB) Viewed 5330 times
- PC110020.JPG (112.14 KiB) Viewed 5330 times
- Crib Room Nayook 1.JPG (82.6 KiB) Viewed 5330 times
Grant.
Re: The Leawarra Nayook Railway
Later that day.
Dan has walked up from the mill for his bread, (don't think he pays for it, well he does provide the flour!)
Loading cattle for the up trip.
Heading home.
Back at Leawarra, urging embarking passengers to hurry as the cattle must be unloaded and watered.
Passengers do take precedence, but livestock comes a close second under the rules.
Grant.
- PC110008.JPG (86.58 KiB) Viewed 5328 times
- PC110003.JPG (149.25 KiB) Viewed 5328 times
- PC110004.JPG (146.01 KiB) Viewed 5328 times
- PC110006a.JPG (137.1 KiB) Viewed 5328 times
- PC110007a.JPG (72.7 KiB) Viewed 5328 times
Passengers do take precedence, but livestock comes a close second under the rules.
Grant.
Re: The Leawarra Nayook Railway
Wow Grant, what a brilliant line you have :thumb right: :thumb right:, I must say your attention for detail is second to none...I love the Crib Shed, in fact I love all of your line, it’s Fantastic...
Last edited by FWLR on Mon Dec 11, 2017 6:55 am, edited 1 time in total.
ROD
Life is so easy when I run my trains.
https://gardenrails.org/forum/viewtopic ... 41&t=11364
https://www.youtube.com/@fairywoodlightrailway
Life is so easy when I run my trains.
https://gardenrails.org/forum/viewtopic ... 41&t=11364
https://www.youtube.com/@fairywoodlightrailway
-
tom_tom_go
- Driver
- Posts: 4824
- Joined: Wed Feb 23, 2011 3:08 am
- Location: Kent, UK
- Contact:
Who is online
Users browsing this forum: No registered users and 10 guests