Vale of Ddualt light railway

A place for the discussion of garden railways and any garden style/scale portable and/or indoor layouts
Joe
Fireman
Fireman
Posts: 465
Joined: Sat Dec 20, 2014 6:18 pm
Location: West Midlands

Vale of Ddualt light railway

Post by Joe » Thu Dec 03, 2015 5:27 pm

As i have now decided on a name for my railway i decided to start a new topic following on from previous discussions, http://gardenrails.myfreeforum.org/ftop ... -asc-0.php
Recent work has been the erection of a swing bridge to connect the lower station (which is raised) with the proposed route following the left edge of the fence and gradually reducing in height untill almost at ground level where the line will reach Ddualt station.
Image

And heres a track plan which may help visualise it:

Image

The top loop is now built and work has begun on the spiral to connect the right hand side viaduct with the lower loop and eventually the whole complete circuit.
Steam is highly under rated

jim@NAL
Driver
Driver
Posts: 1115
Joined: Sun Sep 23, 2012 11:01 am
Location: haverhill suffok

Post by jim@NAL » Thu Dec 03, 2015 11:08 pm

looking good keep us all updated

User avatar
Andrew
Moderator
Moderator
Posts: 3275
Joined: Tue Jul 03, 2012 1:33 pm
Location: Bristol, UK
Contact:

Post by Andrew » Fri Dec 04, 2015 9:12 am

That's very impressive! I'm amazed how quickly your complex scheme is coming together - looking forward to further progress reports!

Andrew

Maple
Trainee Fireman
Trainee Fireman
Posts: 175
Joined: Sat Jun 29, 2013 3:17 pm
Location: Bournemouth

Post by Maple » Fri Dec 04, 2015 2:58 pm

love the plan and looking great, keep up the good work and keep the photos coming
'Professional Bodge artist '

User avatar
Soar Valley Light
Driver
Driver
Posts: 1451
Joined: Sun Dec 08, 2013 5:18 pm
Location: North West Leicestershire

Post by Soar Valley Light » Fri Dec 04, 2015 8:40 pm

Joe, that's really great work in such a short space of time. You are clearly making the best of the space you have and to a very good standard of construction too by the looks it. You are certainly putting me to shame! keep up the good work and keep us posted.

Andrew
"Smith! Why do you only come to work four days a week?
"'cause I can't manage on three gaffer!"

Joe
Fireman
Fireman
Posts: 465
Joined: Sat Dec 20, 2014 6:18 pm
Location: West Midlands

Post by Joe » Fri Dec 04, 2015 8:52 pm

Thanks for the comments folks , I can't take all the credit though as a very kind friend built the swing bridge for me . The issue now is with all this track bed being built I now need to connect up the different parts and buy lots and lots of track :)
Steam is highly under rated

Joe
Fireman
Fireman
Posts: 465
Joined: Sat Dec 20, 2014 6:18 pm
Location: West Midlands

Post by Joe » Fri Dec 11, 2015 3:36 pm

Hi all, work has progressed a little with the second table (where the station will be) being roof felted and the tunnel through the tree being fitted as well as a support post for the swing bridge. The aim now is to make a triangular wood section for near the tunnel for a curve to join the tunnel with the station. Then i can focus with building the trackbed along the other fence (some of the holes needed for the posts have already been built). I realise at the moment it doesn't look much however once buildings have been added i think it will look a lot more realistic and i plan to build an embankment up to meet the track for the descending grade on the track along the left fence.
Image


Image
Steam is highly under rated

Joe
Fireman
Fireman
Posts: 465
Joined: Sat Dec 20, 2014 6:18 pm
Location: West Midlands

Post by Joe » Sun Jan 17, 2016 12:13 pm

Hi all, over the last few days work has progressed on the spiral. Ive used strips of plywood with posts postcreted into the ground as support and then attached planks on top. Despite a few strips snapping when being bent to shape once complete the spiral is now a very solid structure and is ready for waterproofing and track laying. The bottom curve of the spiral to join up with the existing bottom loop will have to be made in a slightly different way as the curve is to tight to bend the plywood to.
The next aim is to start on scenery around the spiral once tracklaying is finished.

Image

Image

Image

Image
Steam is highly under rated

User avatar
Andrew
Moderator
Moderator
Posts: 3275
Joined: Tue Jul 03, 2012 1:33 pm
Location: Bristol, UK
Contact:

Post by Andrew » Sun Jan 17, 2016 12:42 pm

Fantastic work, I'm very impressed!

Andrew.

User avatar
Lonsdaler
Driver
Driver
Posts: 1229
Joined: Tue May 20, 2014 9:50 am
Location: North Yorkshire

Post by Lonsdaler » Sun Jan 17, 2016 3:04 pm

Joe:115652 wrote: The bottom curve of the spiral to join up with the existing bottom loop will have to be made in a slightly different way as the curve is to tight to bend the plywood to.
The next aim is to start on scenery around the spiral once tracklaying is finished.
Have you checked out Filcris? No problem with snapping, or deterioration due to rot. http://www.filcris.co.uk/products/garde ... y-products Although more expensive than ply or other timber, when you take into account the weather proofing you don't have to do, the price is much more similar.
Phil

Sporadic Garden Railer who's inconsistencies know no bounds

My Line - https://gardenrails.org/forum/viewtopic ... 41&t=11077

User avatar
Soar Valley Light
Driver
Driver
Posts: 1451
Joined: Sun Dec 08, 2013 5:18 pm
Location: North West Leicestershire

Post by Soar Valley Light » Sun Jan 17, 2016 7:19 pm

Excellent work Joe, you're turning out some really impressive railway. I notice you've had the common sense to put some 'separator' fabric on the floor to stop the ground 'puddling up'. Very wise at this time of year.

Phil,

I couldn't agree more about the durability and quality of Filcris products, but no matter which way you stack the costs they remain eye-wateringly expensive. I'm planning to use similar materials available on line. They aren't as convenient, I'm going to have to make do with the cross sections available rather than the ones Filcris have carefully designed to be the most useful. The compromise does mean that I can continue with plastic construction though, rather than less durable wood or labour intensive brick or blockwork.

This is a great hobby but it can really hit the bank balance if you don't watch out! :shock:
"Smith! Why do you only come to work four days a week?
"'cause I can't manage on three gaffer!"

User avatar
Annie
Fireman
Fireman
Posts: 471
Joined: Tue Aug 28, 2012 4:45 pm
Location: New Zealand

Post by Annie » Sun Jan 17, 2016 10:36 pm

That swing bridge is a clever idea and your friend did a great job of building it too. I can see it being a good way to solve some of the problems with trying to fit a larger scale railway into a more confined space. There's a particular area I have in mind with my own proposed layout where the same kind of thing will be needed 'off stage' to represent the rest of the Kotanga Tramway to the west of the town.
What has Reality done for you lately?

User avatar
Soar Valley Light
Driver
Driver
Posts: 1451
Joined: Sun Dec 08, 2013 5:18 pm
Location: North West Leicestershire

Post by Soar Valley Light » Mon Jan 18, 2016 9:47 pm

Soar Valley Light:115663 wrote: I couldn't agree more about the durability and quality of Filcris products, but no matter which way you stack the costs they remain eye-wateringly expensive.
Well, well, well. This just goes to prove the importance of costing things out and of measuring apples against apples (as opposed to oranges). In my previous post I claimed to have found materials similar to Filcris at a much better rate. I have already purchased some Filcris material to commence construction of my terminal station but baulked at the cost of further purchases; that's what sent me searching for alternatives. However, I sat down tonight to cost out the price per meter rate of both types. I have to tell you that Filcris came out very competitively, price differences were pennies and in some cases Filcris were the cheaper. This information needs to be considered with the fact that the alternative sections were of less convenient sizes for garden railway construction than the bespoke Filcris products.

The truth remains that I have found extruded plastic sections at a lower price than either of the two I've compared tonight, but they appear from the photos available to be of far less consistent surface finish , less convenient section sizes (and profiles) and generally bright white.

So I owe Filcris an apology and need to do some very hard thinking about what form of material to pursue for the main construction phase of the Charnwood Light Railway. I still think plastic is the most flexible (in every sense) and durable option especially when buried but cost must be considered too.

Andrew
"Smith! Why do you only come to work four days a week?
"'cause I can't manage on three gaffer!"

User avatar
TonyW
Driver
Driver
Posts: 1357
Joined: Fri May 16, 2008 9:25 am
Location: North Wales
Contact:

Post by TonyW » Mon Jan 18, 2016 11:08 pm

I used Filcris for the decking on my viaduct. They were extremely helpful and cut the sections to my dimensions, ready to fit. Delivery was by courier.
Image
Tony Willmore
Rhos Helyg Locomotive Works: http://www.rhoshelyg.me.uk
Facebook: https://www.facebook.com/RhosHelygLocoWorks

User avatar
Soar Valley Light
Driver
Driver
Posts: 1451
Joined: Sun Dec 08, 2013 5:18 pm
Location: North West Leicestershire

Post by Soar Valley Light » Tue Jan 19, 2016 7:03 pm

Hi Tony,

I agree with you wholeheartedly. The small amount of material I bought from them last year involved a lot of umming and ahhhhing on my part. It also involved a lot of chopping and changing of the order and some very complicated cutting instructions. Despite all this they provided exactly what I wanted and very quickly at that!

When you take account of the helpful advice and technical support the balance of value for money tips very much in their favour.

Very nice bridge by the way, I like it!

All the best,

Andrew
"Smith! Why do you only come to work four days a week?
"'cause I can't manage on three gaffer!"

User avatar
TonyW
Driver
Driver
Posts: 1357
Joined: Fri May 16, 2008 9:25 am
Location: North Wales
Contact:

Post by TonyW » Tue Jan 19, 2016 7:41 pm

Soar Valley Light:115701 wrote:Very nice bridge by the way, I like it!
Thanks Andrew, there is 38 feet of it...

Image
Tony Willmore
Rhos Helyg Locomotive Works: http://www.rhoshelyg.me.uk
Facebook: https://www.facebook.com/RhosHelygLocoWorks

stoker
Cleaner
Cleaner
Posts: 53
Joined: Sun Dec 20, 2015 8:39 pm
Location: North Norfolk

Post by stoker » Tue Jan 19, 2016 8:21 pm

TonyW:115704 wrote:
Soar Valley Light:115701 wrote:Very nice bridge by the way, I like it!
Thanks Andrew, there is 38 feet of it...

Image
that is rather impressive!

:D

any further details of your line elsewhere,please?
youth is wasted on the young...

User avatar
Soar Valley Light
Driver
Driver
Posts: 1451
Joined: Sun Dec 08, 2013 5:18 pm
Location: North West Leicestershire

Post by Soar Valley Light » Wed Jan 20, 2016 7:55 pm

Holy mother of Michael and all the saints preserve us Tony! That's absolutely astonishing, I had no idea. It wouldn't even fit in my garden but it looks so impressive in yours. Thanks for showing us the 'bigger picture'. :lol:

Andrew
"Smith! Why do you only come to work four days a week?
"'cause I can't manage on three gaffer!"

User avatar
TonyW
Driver
Driver
Posts: 1357
Joined: Fri May 16, 2008 9:25 am
Location: North Wales
Contact:

Post by TonyW » Wed Jan 20, 2016 8:02 pm

It was actually one of the easiest bits of my line to build. I did consider an embankment but it would have needed tons of material, and a lake would have formed on the uphill side every time it rained. The middle pillar (where the two beams meet) has some serious foundation to stop it moving. The beams slope down 1/4 inch to the middle to allow for drainage.

The bridge consists of two steel I-beams laid on their sides. Pressure-treated 2x4 timber is bolted on to the beam webs, Filcris is screwed down on the timber, track screwed down on the Filcris.

I see on another thread that others are having problems with expansion/contraction of Filcris, but although the gaps between the boards open and close with the weather I've not actually had any problems.

Oh, and the NG15 was actually pulling that lot. About 100 axles.
Image
Tony Willmore
Rhos Helyg Locomotive Works: http://www.rhoshelyg.me.uk
Facebook: https://www.facebook.com/RhosHelygLocoWorks

User avatar
pandsrowe
Trainee Fireman
Trainee Fireman
Posts: 246
Joined: Sat Dec 20, 2014 12:15 pm
Location: West Norfolk, UK

Post by pandsrowe » Thu Jan 21, 2016 10:25 am

I find it interesting to see that others have suffered with problems associated with expansion/contraction using recycled plastic on their lines, I thought it was perhaps only me. However after first coming across this problem a couple of years ago I have found a way around it.
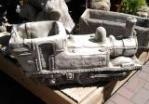
The first part of my plastic supported track was laid using 3 metre lengths of plastic plank, where the expansion / contraction issue was really quite severe but this was solved by simply leaving much larger expansion gaps in the track (approximately 4mm). The next part of my line was constructed by cutting the top board into slices purely to allow the curves to be generated, but this had the effect of considerably reducing the expansion / contraction problem with the added bonus of allowing rainwater to run off more easily.
Image
As time and enthusiasm permits I will do the same with the 3 metre lengths of boarding to make it look the same and prevent the pooling of rainwater which eventually allows verdigris to form and look unsightly.
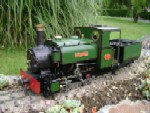
Whilst I have to agree that Filcris is not the cheapest way of constucting a raised track, if properly arranged it does mean that there is zero maintenance and as I get older is something that I really value. Also as the garden grows around it, I think it blends in quite well.
Phil

Post Reply

Who is online

Users browsing this forum: No registered users and 15 guests