

Peter,
I wondered about that. I know the sockets are available as pcb soldered mounting, but don't think I've ever seen one as an in-line version? However if they are, then the cover would again probably be sizeable, to allow for them rough handled being plugged and unplugged by 'the man in the street'.
The plug version is available in 'skeleton' form on e-bay and it might be possible to fabricate a smaller housing since we don't really need the precision necessary for data transfer.
http://www.ebay.co.uk/itm/Rewireable-Mi ... 1c371ee04e
How to scratch-build a 4 wheel wagon

-
Peter Butler

- Driver

- Posts: 5232
- Joined: Sun Sep 09, 2012 10:33 pm
- Location: West Wales
Thanks William, the way I operate is to think beforehand of what I want to achieve, discarding the things not suitable on the way! Once the plan of action is formed in my head I go for it with determination.
Because I work in my 'Engine Shed' (everyone should have shed!) I can concentrate on the project without any disturbance and spend hours there inspired by my layout and the sound of classical music for company. All very satisfying when the construction comes together as planned.
Because I work in my 'Engine Shed' (everyone should have shed!) I can concentrate on the project without any disturbance and spend hours there inspired by my layout and the sound of classical music for company. All very satisfying when the construction comes together as planned.
The best things in life are free.... so why am I doing this?
-
Peter Butler
- Driver
- Posts: 5232
- Joined: Sun Sep 09, 2012 10:33 pm
- Location: West Wales
I just couldn't wait so embarked on the connection system with what I had available..... and it works!!!!!
I have used 2.1 power jack and socket. The main concern was the size, however, because the connection is positive and simple to plug and unplug without resorting to leverage and the possibility of pulling the wires out of the socket, I devised a cunning plan.
The cable is permanently connected to the loco with the plug attached to the other end. It is just long enough to reach the power wagon allowing them the ability to take curves. Because the plug is about 40mm long it had to be concealed within the body of the truck. In order to achieve this I found a plastic tube exactly the right internal diameter to allow the plug to be pushed through it. The socket was bonded into the end of the tube so the plug is guided through the tube into it.

The tube is then cut to a suitable length so that only the flexible part of the cable outlet is visible giving enough to grip for removal.

A hole is cut in the buffer beam to the same internal diameter and the tube stuck firmly behind it and to the underside of the truck.


When connected it is not too obvious but the main thing is that it works well and achieves my objective of having all my locos able to be powered by one simple system. At least it will when I order more plugs!


In the absence of the speed controller I have connected directly to the battery and tested the system.... wonderful!
I have used 2.1 power jack and socket. The main concern was the size, however, because the connection is positive and simple to plug and unplug without resorting to leverage and the possibility of pulling the wires out of the socket, I devised a cunning plan.
The cable is permanently connected to the loco with the plug attached to the other end. It is just long enough to reach the power wagon allowing them the ability to take curves. Because the plug is about 40mm long it had to be concealed within the body of the truck. In order to achieve this I found a plastic tube exactly the right internal diameter to allow the plug to be pushed through it. The socket was bonded into the end of the tube so the plug is guided through the tube into it.
The tube is then cut to a suitable length so that only the flexible part of the cable outlet is visible giving enough to grip for removal.
A hole is cut in the buffer beam to the same internal diameter and the tube stuck firmly behind it and to the underside of the truck.
When connected it is not too obvious but the main thing is that it works well and achieves my objective of having all my locos able to be powered by one simple system. At least it will when I order more plugs!
In the absence of the speed controller I have connected directly to the battery and tested the system.... wonderful!
The best things in life are free.... so why am I doing this?

I use the arrangement shown in the photo below on my railcars for lighting trailers, or for connecting them in multiple unit as the occasion demands.ge_rik:112219 wrote: I too would be interested to hear suggestions about plugs and sockets between stock.
They are based on IC socket strips, which plug into themselves and can be cut to length for the desired no of connections. The side the wire is soldered to decides if it is a plug or a socket. The shrink tube over the connection is more for appearance than anything else.
Current rating of the strips is 1A from memory, which is adequate for low power models like railcars and small diseasels. Anything big enough to require more current should have space for onboard batteries in any case.
I also use these sockets behind a couple of small holes drilled in the rear wall of the trailers, to hide the tail light wiring. The leads of the LED in the tail light are just poked through the hole straight into the socket.
I buy mine locally from Jaycar, but something similar will be available from other suppliers. http://www.jaycar.com.au/PRODUCTS/Activ ... y/p/PI6470
I also have some smaller ones that I use in HO for DCC connections between loco and tender that came from Farnells (now Element 14). I haven't tried it, but these are probably small enough to use as semi-scale jumper cables with the sockets mounted on the ends of vehicles and disguised with a polystyrene cover.

In this photo the lighting bus connection is the two pin plug with a spot of red paint on it to get the connection the right way around.
The MU plug is the three pin one, which is wired so that it can't be connected the wrong way around. The centre pin is positive and the two outer ones are negative, with a loop connecting them together.
The railcar in the photo has the MU socket permanently connected to the speed control, in parallel with the motor. The other railcar has a DPDT switch in it's motor leads, that connects the motor to either the MU socket, or the onboard speed controller, so the MU power can't feed back into the speed controller.
I rarely use the MU connection, but it kept me occupied for an afternoon working out how to make it reasonably failsafe......
Regards,
Graeme
Thanks Graeme, beautifully simple.GTB:112247 wrote:
They are based on IC socket strips, which plug into themselves and can be cut to length for the desired no of connections.
I buy mine locally from Jaycar, but something similar will be available from other suppliers. http://www.jaycar.com.au/PRODUCTS/Activ ... y/p/PI6470
They are available via e-bay, and for those in the UK, Maplins do them at £1-44 a strip.
http://www.maplin.co.uk/p/modular-conne ... trip-dc17t
Philip
Nice little wagon. Does having the battery that high up make it unstable ?
Dan,
James: "Dan, can you use your hearing and tell me if that trains coming ?"
DLR
www.freewebs.com/dlrail
James: "Dan, can you use your hearing and tell me if that trains coming ?"
DLR
www.freewebs.com/dlrail
-
Peter Butler
- Driver
- Posts: 5232
- Joined: Sun Sep 09, 2012 10:33 pm
- Location: West Wales
-
Peter Butler
- Driver
- Posts: 5232
- Joined: Sun Sep 09, 2012 10:33 pm
- Location: West Wales
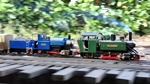
Having tested the system minus a speed controller I tried all of my 'Emetts' in turn and have found that the 9.6v from eight rechargeable batteries is satisfactory with the 12v motors in the locomotives.
All of the locos perform well going forward, none will be used in reverse as the couplings and buffers are not designed for that.
As described earlier I decided to use a barrel as a rotary switch and it looks just right!
 [/url
[/url
]
[url=./myff/1905824/IMG_3027.JPG]
I think this completes the truck.... now, what next?
All of the locos perform well going forward, none will be used in reverse as the couplings and buffers are not designed for that.
As described earlier I decided to use a barrel as a rotary switch and it looks just right!
[/url]
[url=./myff/1905824/IMG_3027.JPG]
I think this completes the truck.... now, what next?
The best things in life are free.... so why am I doing this?
Who is online
Users browsing this forum: No registered users and 5 guests