NWNG Cleminson

Discussion of Rolling Stock related topics should go here
User avatar
River Lin
Fireman
Fireman
Posts: 410
Joined: Wed Dec 11, 2013 8:40 pm
Location: Leicester

Post by River Lin » Sun Apr 10, 2016 6:01 pm

Hi all.
Spent time today gluing the roof spars onto the underside of the roof.
I have explained how i do this in a previous thread but in short i use the horizontal pipe slots that are machined into the jaws of my Workmate work bench to hold and curve the roof board while i glue on the spars.
I slide in the roof and slowly close the jaws, letting the roof curve gently downwards. I use the card roof template mentioned previously to get the curve i need to the roof. It is then a simple job to glue each spar onto the lines previously drawn onto the roof board.

4 things to remember-

1. Ensure the two end spars are positioned just inside the two end lines otherwise the roof might not fit on the coach.
2. Line up the centreline on each spar with that on the roof, for the same reason.
3. Use enough glue, especially at the ends of each spar to ensure the roof keeps its correct curve when the pressure of the workmate is released.
4. Leave the glue long enough to set and cure throughly, i suggest overnight.(not that i have ever had a roof try to flatten out again due to my impatience. Oh no.)


Image

Can't wait till tomorrow to try it. Egg on my face if it doesn't fit. :oops:
David T.

User avatar
LNR
Driver
Driver
Posts: 1542
Joined: Sat Feb 27, 2016 5:26 am
Location: Australia

Post by LNR » Mon Apr 11, 2016 4:12 am

Good to see someone using enough beams to maintain a constant camber through out the roof, rather than at the ends and the middle.
Also more beams/glue = less load on each beam to hold the camber.
Grant.

User avatar
River Lin
Fireman
Fireman
Posts: 410
Joined: Wed Dec 11, 2013 8:40 pm
Location: Leicester

Post by River Lin » Mon Apr 11, 2016 10:07 am

Hi Grant.
Yep that's my reasoning. When I get the time later I'll post a photo of how it looks now after 24 hours of glue hardening.
David.
David T.

User avatar
River Lin
Fireman
Fireman
Posts: 410
Joined: Wed Dec 11, 2013 8:40 pm
Location: Leicester

Post by River Lin » Mon Apr 11, 2016 5:19 pm

Hi all.

Image

Roof fits. Now to cover it with ' canvas' before painting.
Photo below shows why i like to fit plenty of roof spars. I am pleased with the way the roof edge seems flat and fits nicely against the cant rail.


David.
Image
David T.

User avatar
Andrew
Moderator
Moderator
Posts: 3262
Joined: Tue Jul 03, 2012 1:33 pm
Location: Bristol, UK
Contact:

Post by Andrew » Tue Apr 12, 2016 9:44 pm

That's looking really good, and you're right, the roof does fit very nicely indeed. Some of my earlier carriages could really do with their roofs taking off and lots of trusses adding - some roofs aren't terribly flush with the cant rail, and others have a noticeable dip in the middle...

Coincidentally, this evening I almost finished my WHR Summer Car, cutting the glazing and sliding it into place - tomorrow night I need to do the roof, never a prospect I relish... Recognising the need for more support mid roof I'd cut 6 trusses (I added them to the design for the laser cut stuff I did recently) but then found I'd miscalculated the depth so had to double them up to give only three - I think it'll work, but we'll see...

Anyway, your Cleminson's coming together beautifully, I look forward to seeing photos of it in action...

All the best,

Andrew.

User avatar
River Lin
Fireman
Fireman
Posts: 410
Joined: Wed Dec 11, 2013 8:40 pm
Location: Leicester

Post by River Lin » Wed Apr 13, 2016 11:33 am

Love to see your summer car Andrew. Home built I presume :-)
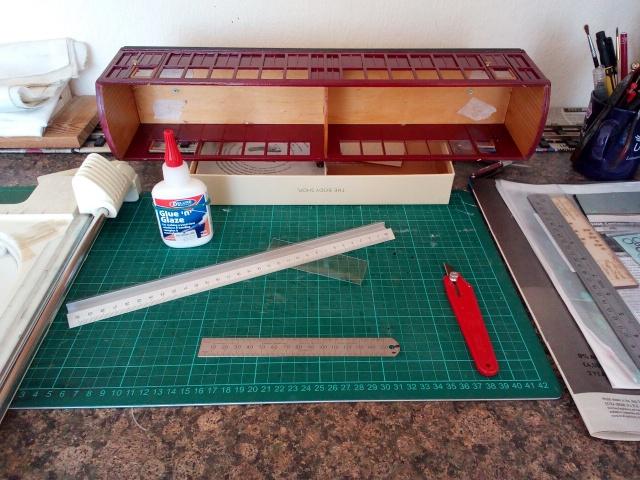
By coincidence I have started glazing this morning. I cut a long strip the correct height then cut off to width allowing about a mm extra using an old paper trimmer. It is then just a matter of trimming to width with a sharp knife.

Image

I use Glue'n'Glaze from The Signal Box in Anstey to attach my window panes. It dries virtually invisible and does not fog the plastic like some glues do. Incidentally I save plastic lids from Christmas gift sets to use as glazing as it is usually crystal clear whereas some specific glazing sheets I have bought in the past are softer and have a slight milkiness to them if you know what I mean.
D.
David T.

User avatar
Andrew
Moderator
Moderator
Posts: 3262
Joined: Tue Jul 03, 2012 1:33 pm
Location: Bristol, UK
Contact:

Post by Andrew » Wed Apr 13, 2016 5:59 pm

Yes, the Summer Car's a scratchbuild - I'm just about to tackle the roof now, photos tomorrow I hope.

I might have to try some of your Glue and Glaze, sounds useful. I currently use a Wilco general adhesive that goes stringy but then peels off, not bad but yours might be better... No glue in the current carriage, the design lent itself to leaving slots in the sides for glazing to slide into...

Cheers,

Andrew.

User avatar
River Lin
Fireman
Fireman
Posts: 410
Joined: Wed Dec 11, 2013 8:40 pm
Location: Leicester

Post by River Lin » Fri May 06, 2016 8:12 pm

Hi all.
Latest update. Only 9 days left until it's commission date on the Disney Bridge Railway a week on Sunday.

Image
Windows in. Individual panes in their own rebates.
Slaters chopper couplings fitted to match my other stock (height adjusted).
Roof covering added and painted cream.
Seating made. Pine bench seats to fit longitudanaly around the two areas.
Seating brackets fitted around the compartments.

To do.
Fitting seating.
NORTH WALES NARROW GAUGE name boards.
Paint touch ups.
Brake hoses fitted if they arrive in time.
Not sure about door steps. They were added later in life.
Final fettling.

Final update hopefully during next week.
Davit
David T.

User avatar
Soar Valley Light
Driver
Driver
Posts: 1451
Joined: Sun Dec 08, 2013 5:18 pm
Location: North West Leicestershire

Post by Soar Valley Light » Fri May 06, 2016 9:56 pm

Hi David,

What magnificent work! I look forward to the update and some more pictures.

Andrew
"Smith! Why do you only come to work four days a week?
"'cause I can't manage on three gaffer!"

User avatar
LNR
Driver
Driver
Posts: 1542
Joined: Sat Feb 27, 2016 5:26 am
Location: Australia

Post by LNR » Sat May 07, 2016 12:29 am

Beautiful work David, the opening doors should make for some lovely platform photos with a door open and a passenger or two milling about.
Grant.

User avatar
ge_rik
Administrator
Administrator
Posts: 6554
Joined: Sun Oct 25, 2009 10:20 pm
Location: Cheshire
Contact:

Post by ge_rik » Sat May 07, 2016 4:09 am

Cracking good work David. You've got loads more patience (and dexterity) than me fitting all those individual panes - but the finish looks well worth the effort. Great tip about using Glue n Glaze btw. It's time I replaced some of the glazing in my coaches - must get some.

Rik
------------------------
Peckforton Light Railway - Blog Facebook Youtube

User avatar
River Lin
Fireman
Fireman
Posts: 410
Joined: Wed Dec 11, 2013 8:40 pm
Location: Leicester

Post by River Lin » Sat May 07, 2016 3:55 pm

Hi ge_rik, Andrew and others.
I got my bottle of Glue-n-Glaze from The signal Box in Anstey Leics.
If you google it, his online business is mainly DVDs but he has a shop selling much n- and 00 gauge stock but also some 16mm. mainly Accucraft i think, and much modeling material and kits. He is an association member and so if you can buy from him i am sure he would appreciate it.
The shop is well worth a visit i feel but parking is a problem in the narrow streets round about. I am lucky as i live only 15 minutes walk away.
No. 74 buses from Leicester every 15 minutes.

David.
David T.

User avatar
Soar Valley Light
Driver
Driver
Posts: 1451
Joined: Sun Dec 08, 2013 5:18 pm
Location: North West Leicestershire

Post by Soar Valley Light » Sat May 07, 2016 7:12 pm

Hi David,

I thought I lived close but you've beaten me hands down. I live 15 minutes drive away!

Please keep the update pictures coming, I'm really looking forward to seeing the finished article.

Andrew
"Smith! Why do you only come to work four days a week?
"'cause I can't manage on three gaffer!"

User avatar
River Lin
Fireman
Fireman
Posts: 410
Joined: Wed Dec 11, 2013 8:40 pm
Location: Leicester

Post by River Lin » Mon May 09, 2016 5:50 pm

Hi all.
Update over the weekend.

Nearly there.

Image

Image

The poster is a reproduction of the only NWNG poster I could find, in the book ' MORE ABOUT THE WELSH HIGHLAND RAILWAY. The poster is dated 1896 and advertises tickets from Dinas to ( Snowdon) station.
"Conveyances to Beddgelert meet all trains at Snowdon Station and passengers should secure Cheap Return Coach tickets at that station. fare 1/3d.

David
David T.

User avatar
Soar Valley Light
Driver
Driver
Posts: 1451
Joined: Sun Dec 08, 2013 5:18 pm
Location: North West Leicestershire

Post by Soar Valley Light » Mon May 09, 2016 10:10 pm

It just keeps on getting better David! The internal detail is superb, those bench seats are remarkable.... well done.
"Smith! Why do you only come to work four days a week?
"'cause I can't manage on three gaffer!"

User avatar
Peter Butler
Driver
Driver
Posts: 5234
Joined: Sun Sep 09, 2012 10:33 pm
Location: West Wales

Post by Peter Butler » Tue May 10, 2016 11:16 am

Hi David, sincere apologies for not commenting on your carriage build but I have been awestruck throughout its construction method and your patience and determination to get it right. It is a remarkable piece of work which you can be proud of... I wouldn't have attempted this myself as I prefer to work in Plasticard and that might be a task too far for a vehicle that size. Congratulations.
The best things in life are free.... so why am I doing this?

User avatar
River Lin
Fireman
Fireman
Posts: 410
Joined: Wed Dec 11, 2013 8:40 pm
Location: Leicester

Post by River Lin » Tue May 10, 2016 4:26 pm

Thank you both for those kind words. It has taken a long time though. Looking back I seem to have started it early last summer.
One problem I have come across is that with the roof not being glued on, the body is quite flexible being made primarily of 3mm square timber and glazing matertial above the waistline and only supported at the ends and the central partition. I have to be careful how I pick it up and not squeeze it. The best way is one handed in the middle or two handed at the very ends.
It has been an enjoyable project and I can't wait to try the coach on a garden line next Sunday, with my other homebuilt NWNG/WHR stock, as I don't have one of my own. Hopefully the weather will pick up again.
Pictures will follow.
David.
David T.

User avatar
Andrew
Moderator
Moderator
Posts: 3262
Joined: Tue Jul 03, 2012 1:33 pm
Location: Bristol, UK
Contact:

Post by Andrew » Tue May 10, 2016 8:13 pm

River Lin:117948 wrote: It has been an enjoyable project and I can't wait to try the coach on a garden line next Sunday, with my other homebuilt NWNG/WHR stock, as I don't have one of my own. Hopefully the weather will pick up again.
Pictures will follow.
Yes please! I'm sure they'll be a sight to behold, it's a lovely carriage.

Enjoy your maiden run!

Andrew.

PS Next time you're at The Signal Box do let the owner know that his old "Russell" is still going strong and being very much enjoyed! I bought it from him at Peterborough about 5 years ago...

User avatar
River Lin
Fireman
Fireman
Posts: 410
Joined: Wed Dec 11, 2013 8:40 pm
Location: Leicester

Post by River Lin » Wed May 11, 2016 10:37 pm

Will do Andrew.

David.
David T.

User avatar
IrishPeter
Driver
Driver
Posts: 1400
Joined: Wed Feb 23, 2011 3:24 am
Location: 'Boro, VA

Post by IrishPeter » Thu May 12, 2016 6:14 am

What a lovely wee beastie that carriage has turned into!

Peter in AZ
Traffic Pattern? What pattern? Spuds out; grain in, but cattle, sheep and passengers are a lot less predictable.

Post Reply

Who is online

Users browsing this forum: No registered users and 4 guests