New wagons for the Charlton Line

Discussion of Rolling Stock related topics should go here
User avatar
ikcdab
Trainee Fireman
Trainee Fireman
Posts: 108
Joined: Fri Sep 13, 2013 9:34 am
Location: taunton

New wagons for the Charlton Line

Post by ikcdab » Mon Apr 27, 2015 5:18 pm

The chief engineer was browsing and saw this picture:

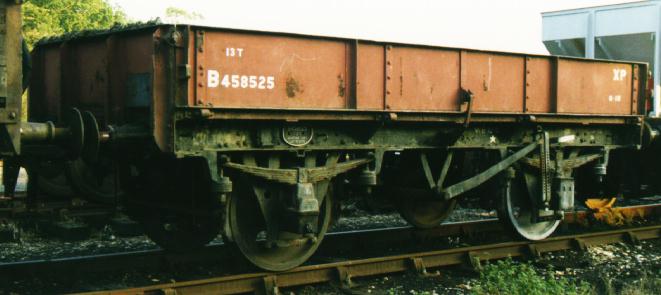
http://www.bluebell-railway.co.uk/blueb ... 458525.jpg

He was quite taken by these are immediately requested three narrow gauge versions to be made up from scrap steel (aka plasticard) from around the yard.

So this is the story...
a quick back of envelope doodling showed that wagons 90mm wide by 190 long with sides about 15mm high was possible. A new blade was asttached to the knife and away we went:


Here are the sides, floor, ends and strip for the edges of the sides cut out.
Image

I scribed the floor for a wood effect using an old wood bit from my brace. This actually removes the plastic from the 'crack' rather than cutting it open like a knife and gives a much better effect:


Image

after a couple of morning's work and a great deal of messing about with tiny bits of plasticard and cambrian rivet heads i now have a kit of parts for three open wagons. Cost to date £0.


Image

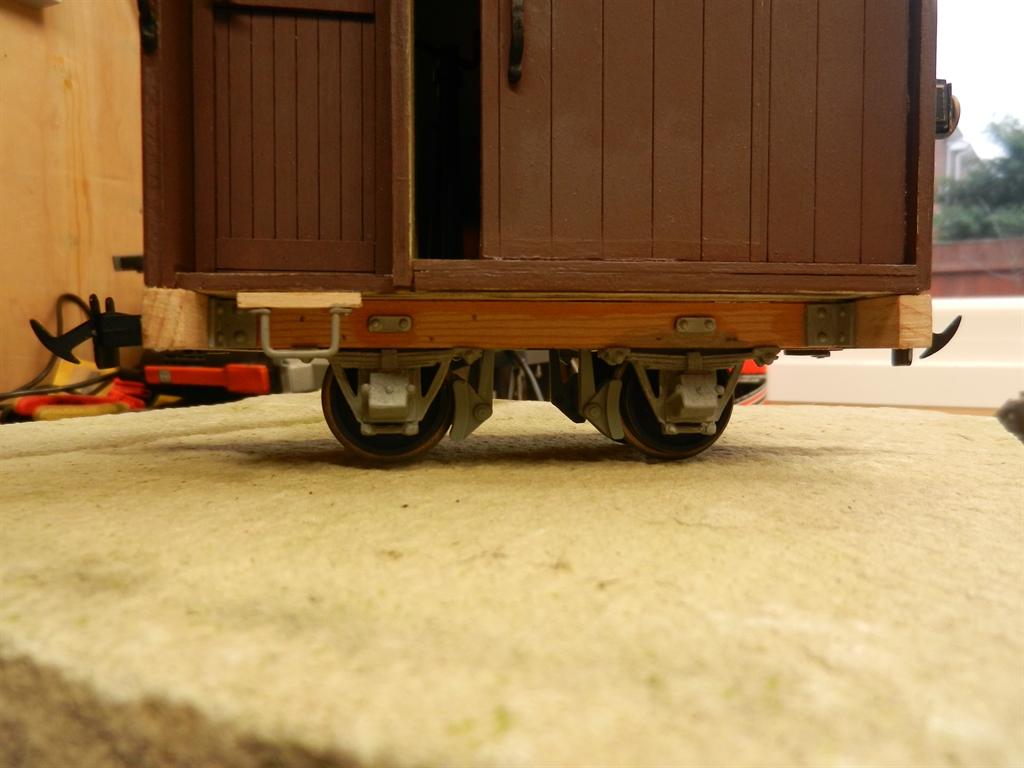
we then couldnt resist propping the bits up to see what they might look like:


Image

At this stage the wallet had to be opened. Axleboxes and couplings ordered. I really now need to cut the solebars, but i cant do that until i have the axleboxes so i know how deep to make the solebars. I have amused myself today trying to make the door catches without much success. I have therefore just ordered some 1.6mm splitpins which i hope will do the job.

until the next update!

User avatar
philipy
Moderator
Moderator
Posts: 5079
Joined: Sun Jan 30, 2011 3:00 pm
Location: South Northants

Post by philipy » Mon Apr 27, 2015 6:58 pm

That is looking really good so far, looking forward to the updates.
Philip

bazzer42
Driver
Driver
Posts: 1215
Joined: Sun Nov 25, 2012 1:37 pm
Location: Forest of Dean

Post by bazzer42 » Fri May 01, 2015 5:56 pm

Nice looking wagons. Can't wait to see the finished article.

User avatar
ikcdab
Trainee Fireman
Trainee Fireman
Posts: 108
Joined: Fri Sep 13, 2013 9:34 am
Location: taunton

Post by ikcdab » Fri May 01, 2015 7:37 pm

Some more progress. I have assembled the basic 'kit' for the first wagon.
Its somewhat of a game getting the solebars the right height such that when combined with axleboxes and wheels the coupler is at 25mm. Having made up some solebars, i found that i had two sorts of axlebox and a set of wheels 1mm smaller that the others - so i had to add some packing to the solebars.

Image


Image

Im off to the Bristol exhibition tomorrow so no further progress - bvut i do need to stock up on plasticard and mek....

Next steps is to get the other two wagons to a similar point. Then:
1. rivet detail on chassis
2. brake gear
3. door catches and door bangs
4. painting and finishing...

Any advice on easy to make home made brake gear gratefully received!

User avatar
ge_rik
Administrator
Administrator
Posts: 6558
Joined: Sun Oct 25, 2009 10:20 pm
Location: Cheshire
Contact:

Post by ge_rik » Fri May 01, 2015 8:40 pm

They look brilliant. What's the source of your axle boxes?

Rik
------------------------
Peckforton Light Railway - Blog Facebook Youtube

User avatar
ikcdab
Trainee Fireman
Trainee Fireman
Posts: 108
Joined: Fri Sep 13, 2013 9:34 am
Location: taunton

Post by ikcdab » Fri May 01, 2015 8:44 pm

They are IP Eng small axleboxes (for two wagons) and the third will have Brandbright ones.

I have thought long and hard about coupling heights and fixed on 25mm as this matched some Brandbright wagons i have. However, with 25mm wheels, this means i can only use small axleboxes to get near the correct height.

User avatar
Andrew
Moderator
Moderator
Posts: 3265
Joined: Tue Jul 03, 2012 1:33 pm
Location: Bristol, UK
Contact:

Post by Andrew » Sat May 02, 2015 11:22 am

Those are fantastic, nice work! Are you going paint them in grotty bauxite livery like the Bluebell one?

No idea about making brake gear, although it's something I need to get my head round at some point... For me I think it'll be a case of doing as little as I can get away with that gives the right impression and fills the gap between the wheels. At the moment even my brake vans don't have brakes...

Looking forward to the next round of pictures,

Andrew.

User avatar
tom_tom_go
Driver
Driver
Posts: 4824
Joined: Wed Feb 23, 2011 3:08 am
Location: Kent, UK
Contact:

Post by tom_tom_go » Wed May 06, 2015 1:12 pm

Cambrian models do some nice brake bits:

Image

It's an old pic but once painted they look great.

User avatar
ikcdab
Trainee Fireman
Trainee Fireman
Posts: 108
Joined: Fri Sep 13, 2013 9:34 am
Location: taunton

Post by ikcdab » Fri May 15, 2015 9:53 pm

Theres been a bit of a pause in activity, but today further progress was made. The second and third wagon bodies have been assembled and chassis main members made up and fixed on. Today I have made a start on brakegear. V hangers have been fabricated out of plasticard strip and brake blocks made up.
Tomorrow? well i might have to cut the lawns, but after that i intend to fix the axleboxes and wheels in place and make up more of th ebrake gear.

Here are the three wagons. Remarkably difficult to photograph three wagons together:
Image


Image

Here are the V hangers being made up. Each 'leg' is laminated from two thicknesses of 0.8mm plasticard. I made up a little card template to make sure each one is the same angle.


Image

User avatar
Peter Butler
Driver
Driver
Posts: 5236
Joined: Sun Sep 09, 2012 10:33 pm
Location: West Wales

Post by Peter Butler » Fri May 15, 2015 10:31 pm

Nice work! fine set of wagons there, beautifully made... isn't Plasticard wonderful?
The best things in life are free.... so why am I doing this?

User avatar
ikcdab
Trainee Fireman
Trainee Fireman
Posts: 108
Joined: Fri Sep 13, 2013 9:34 am
Location: taunton

Post by ikcdab » Fri May 15, 2015 10:37 pm

Yes, i absolutely love plasticard. Something about the clear, unblemished white expanse of it. I stocked up at the Bristol Exhibition earlier this month.

And it impresses my wife when I say, look what i have made out of that flat white sheet. Trouble is she then thinks I can do things like fix kitchens etc!

I showed these to a friend of mine this week. His reaction was, which kits are those!

User avatar
philipy
Moderator
Moderator
Posts: 5079
Joined: Sun Jan 30, 2011 3:00 pm
Location: South Northants

Post by philipy » Sat May 16, 2015 7:05 am

ikcdab:110855 wrote: I showed these to a friend of mine this week. His reaction was, which kits are those!
That is a wonderful reaction when it comes, I know, but fully justified in this case. I just hope the plasticard brake gear is robust enough for garden use.
Philip

User avatar
ikcdab
Trainee Fireman
Trainee Fireman
Posts: 108
Joined: Fri Sep 13, 2013 9:34 am
Location: taunton

Post by ikcdab » Sat May 16, 2015 8:57 am

That's a good point. The cross bar (is that the right name) and the activating cranks and rods will be brass. The only plastic bits are the v hangers, brake blocks and hangers.

bazzer42
Driver
Driver
Posts: 1215
Joined: Sun Nov 25, 2012 1:37 pm
Location: Forest of Dean

Post by bazzer42 » Sat May 16, 2015 9:32 am

They do look blooming good. I've yet to start wagon building and still not sure whether I'm a wood, plasticard or resin casting man. It will probably be a combo of everything. The Vee hanger idea and template is now logged in my "must crib that idea later" file. Unfortunately that is stored in my head, fortunately there is a search option.

User avatar
ikcdab
Trainee Fireman
Trainee Fireman
Posts: 108
Joined: Fri Sep 13, 2013 9:34 am
Location: taunton

Post by ikcdab » Sat May 16, 2015 9:50 am

Have a go! It really isn't that difficult. Bear in mind that the protoytpes were all pretty simple things. With the plasticard, take it in stages, build it up slowly. There are two really important things (in my mind) for plasticard modelling:
1. accurate marking and cutting. I use good quality steel rules and a vernier gauge for all measuring. For cutting out i use snap off blade knives (both the big stanley type and the smaller one) and frequently change blades - if cutting 2mm plastic, a blade will frequently only last a couple of long cuts before i snap off. I use double sided tape to stick small bits of fine glass paper (about 240 grit - i need to check) to bits of ply for sanding down to the exact size and squaring off cut edges.

2. solvent - mek or (my favourite) plasticweld. here you MUST keep you fingers away from the joints or you end up with fingerpeints everywhere. I use tweezers and various very small pliers and pointed things to hold softened plastic while it dries. I also now spend time making small simple  jigs etc to get things right (such as the V hanger jig)

3. and a third thing. Amazingly, i only learnt this one after 30 years of plasticard modelling - don't be afraid to start again if a part is wrong. In the past i would soldier on and end up spoiling the model. Now i happily (?) throw a bit away and remake it if it isn't exactly right.

its really easy to download a couple of pictures of wagons for inspiration (such as I did here with the standard gauge medfits), work out some basic dimensions and start cutting! I am a massive massive fan of mass production so it is easy to do two or three wagons at a go - making all the parts at once. You could do more, but the numbers start adding up. For example, with three wagons i have to make 12 brake shoes. I can tackle that but i would be put off and wouldn't do it if i had to make many more. The worst thing on these wagons was having to make 24 door hinges - but again i took it in stages, put the radio on, and all of a sudden the job was done.

If anyones interested, ill post some pictures of the workbench and my simple tools later - though please say if it all sounds too much like teaching granny to suck eggs!

Have a go!

User avatar
philipy
Moderator
Moderator
Posts: 5079
Joined: Sun Jan 30, 2011 3:00 pm
Location: South Northants

Post by philipy » Sat May 16, 2015 12:25 pm

Yes, please, def lets see the piccys please!
There is always something to learn from the way others do things, fr'instance, I must admit that it had never occurred to me to stick bits of wet'ndry to ply, and I've been using plasticard for 40-odd years!

Personally I like scalpels rather snap blades. I keep 2 or 3 different blade shapes in stock and throw them away as soon as they lose their edge/point, but that's again probably because its the way I've always done it.
Agree with you on plasticweld though.
Philip

User avatar
ge_rik
Administrator
Administrator
Posts: 6558
Joined: Sun Oct 25, 2009 10:20 pm
Location: Cheshire
Contact:

Post by ge_rik » Sat May 16, 2015 1:42 pm

ikcdab:110871 wrote: If anyones interested, ill post some pictures of the workbench and my simple tools later - though please say if it all sounds too much like teaching granny to suck eggs!
Yes please. I'm always willing to learn from others. I like seeing how others achieve their results - especially when their output looks better than mine.

Rik
PS - I'm not a granny and I've never seen the attraction of sucking eggs ......  :lol:   ;)
------------------------
Peckforton Light Railway - Blog Facebook Youtube

User avatar
GTB
Driver
Driver
Posts: 1559
Joined: Sat Mar 05, 2011 2:46 pm
Location: Australia

Post by GTB » Sat May 16, 2015 3:44 pm

I use MEK most of the time for polystyrene as it's fast, but for laminating I prefer to use d-Limonene, as it evaporates more slowly and gives a stronger joint. I also keep a bottle of Tetrahydrofuran for joining ABS, as MEK doesn't form strong bonds when used on ABS. Here in Oz the last two are available in model shops under the names Micro Weld and Tetra, but I've no idea about UK suppliers.

I used to use Xacto modelling knives for polystyrene, but many years ago changed to scalpels. Being very sharp, they don't need as much pressure and the cut is smoother. I've never liked utilty knives, especially the snap off kind, as I find the blades wobble around.

An Olfa P cutter (or it's Tamiya clone) is my choice for scribing, as it removes a shaving to form the groove, instead of pushing the plastic up into ridges like a knife will.

I make my own sanding blocks in various sizes, but I use offcuts of thick polystyrene and glue another piece on the back to use as a handle. I prefer to use aluminium oxide paper with zinc stearate which is a white colour and doesn't load up when sanding plastics. 240 grit for general use and 600 grit for polishing out scratches and file marks. This type of paper also comes in self adhesive form, which is less fiddly than using double sided tape.

I also like to batch build. In HO I usually built in batches up to ten, but like you, I've found three is the practical limit in garden scale.

Regards,
Graeme

User avatar
ikcdab
Trainee Fireman
Trainee Fireman
Posts: 108
Joined: Fri Sep 13, 2013 9:34 am
Location: taunton

Post by ikcdab » Sun Jun 07, 2015 7:41 pm

So some more progress has been made - brake gear made and fitted, door catches fitted. It will be seen in the future if the plastic brake gear stands up to the job! All thats left to do is painting....
Image
This shows the brake gear complete.


Image
And heres one wagon the right way up...


Image
And heres all three together. The traffic dept are very pleased- cant wait to get them out and working....

User avatar
ikcdab
Trainee Fireman
Trainee Fireman
Posts: 108
Joined: Fri Sep 13, 2013 9:34 am
Location: taunton

Post by ikcdab » Thu Nov 24, 2016 1:20 pm

After many months of waiting, the finished wagons have now appeared. The chief engineer is pleased, but rather surprised that his new wagons look a bit weathered. He said, "This may be all very well for you model types, but when i pay for new wagons i expect them clean and shiny".
Anyway, he cant have been too disappointed as the long hoped for wagons were immediately pressed into service.
Image
Image
Image
Image

Post Reply

Who is online

Users browsing this forum: No registered users and 12 guests