Lazy Sunday Afternoon.

Discussion of Rolling Stock related topics should go here
User avatar
River Lin
Fireman
Fireman
Posts: 410
Joined: Wed Dec 11, 2013 8:40 pm
Location: Leicester

Lazy Sunday Afternoon.

Post by River Lin » Sun Jul 20, 2014 11:11 pm

Hi all. Just put this post in the guards van topic but not really guards van now. So I have copied it here.
The first ever run out of my homebuilt WHR Pickering brake and Buffet coach at a Northamptonshire association group meet this afternoon in Brixworth. Pulled as promised by an Accucraft Baldwin (not mine I'm afraid) with the Gladstone coach bringing up the rear. If it had been a cut downRussell instead of a Baldwin it could have been a good representation of the last train to run on the WHR in August 1936 though 590 (the Baldwin) was also hauling trains during the last week.
D.
Image
David T.

kandnwlr
Trainee Driver
Trainee Driver
Posts: 998
Joined: Fri Dec 02, 2011 3:14 pm
Location: Alsace, France

Post by kandnwlr » Mon Jul 21, 2014 6:14 am

Nice looking train. Good to see that someone was out steaming yesterday :D

MANICK
Cleaner
Cleaner
Posts: 11
Joined: Fri Jul 18, 2014 7:55 am
Location: Europe

Post by MANICK » Mon Jul 21, 2014 8:07 am

Looks really good !

User avatar
River Lin
Fireman
Fireman
Posts: 410
Joined: Wed Dec 11, 2013 8:40 pm
Location: Leicester

Post by River Lin » Tue Oct 14, 2014 9:12 pm

Hi all.
Ok, so I said I would have a break this winter after scratch building my WHR Pickering brake and buffet car but then I found this -http://www.festipedia.org.uk/wiki/Carriage_Mystery
The only four known photos.

Well after a little more research it was time to get out my pencil and paper and draw out the possible coach no. 3 at 16mm to the foot based on estimated measurements.
It was obviously, to me, a bogie quarryman's coach possibly to replace the original NWNG 4 wheelers numbered 3, 4, and 5. It had 7 doors along each side but the arrangement of windows meant it must have been open with no partititions. How the seats were arranged is not known.

The first job was to cut the two sides from 0.8mm ply with window recesses cut with a sharp knife and scribe the 3in planking. They were then turned over and 3mm internal framing added leaving the windows 2mm larger than the ply to give a recess for the glazing to be added later. 3mm balsa panelling was then added between the framing.

Progress so far-

Image

Although I scribed the external planking as with the buffet coach I wanted to make the doors separate from the body so after I had cut out the windows, I actually cut out all 14 doors, planed and sanded the edges to decrease the size slightly and then put them back in place held with masking tape. They are now permenantly back in place, glued to the internal framing and panelling.
I will keep you posted on future progress.
David T.

User avatar
River Lin
Fireman
Fireman
Posts: 410
Joined: Wed Dec 11, 2013 8:40 pm
Location: Leicester

Post by River Lin » Wed Oct 22, 2014 12:50 pm

Hi all.
Sides glued and floor glued in onto previously fitted battens along the bottom edge of sides and ends.
Pilot holes have also been drilled into floor for the bogie screws.
Tip.
If possible, always have the bogie centres the same distance from the ends of the coaches on all stock. This is particularly important when you have to reverse into a steam up area for example as the buffers may lock when negotiating curves if the overhang on coaches varies and one buffer swings out further than its neighbour.
David
.
Image
David T.

User avatar
MDLR
Driver
Driver
Posts: 4027
Joined: Thu Jan 15, 2009 10:38 pm
Location: Near Ripley, Derbyshire, UK
Contact:

Post by MDLR » Wed Oct 22, 2014 1:21 pm

River Lin:105002 wrote:.........as the buffers may lock when negotiating curves if the overhang on coaches varies and one buffer swings out further than its neighbour.
*Innocent Smile* Might I enquire how you know this (or is the answer self-evident??)
Brian L Dominic
Managing Director
Flagg Fluorspar Co
www.mdlr.co.uk/ff.html

User avatar
River Lin
Fireman
Fireman
Posts: 410
Joined: Wed Dec 11, 2013 8:40 pm
Location: Leicester

Post by River Lin » Wed Oct 22, 2014 4:23 pm

Hi Brian.
I say may lock as my reasoning is that more coach overhang may occur if a bogie is nearer the centre of the coach. Therefore if two coaches are being pushed around a sharpish curve, one with a greater overhang than the other, one buffer will swing out further to the side and therefore slip off the other. When the line straightens out again, the greater overhang buffer will slot in behind the second, push it to the side and possibly derail that coach. I have had it happen on a certain garden line and assumed that this may have been the reason. What are your thoughts?
David.
David T.

User avatar
MDLR
Driver
Driver
Posts: 4027
Joined: Thu Jan 15, 2009 10:38 pm
Location: Near Ripley, Derbyshire, UK
Contact:

Post by MDLR » Wed Oct 22, 2014 8:36 pm

River Lin:105013 wrote:What are your thoughts?
My thought was that you had found out through bitter experience!
Brian L Dominic
Managing Director
Flagg Fluorspar Co
www.mdlr.co.uk/ff.html

User avatar
Andrew
Moderator
Moderator
Posts: 3276
Joined: Tue Jul 03, 2012 1:33 pm
Location: Bristol, UK
Contact:

Post by Andrew » Wed Oct 22, 2014 9:32 pm

A very nice model of an interesting prototype - I've never seen one in 16mm.

I have the buffer-locking problem if I propel trains of bogie carriages round the sharper (3'6") curves on my line - I just thought it was a curves/overhang thing, it hadn't occurred to me that it might be differences in overhang causing (or adding to) the problem. We need a 16mm scale version of that old railway testing facility at Derby, where folk in white coats could solve all these problems for us. Actually, my wife suggests something similar involving men in white coats if I get too upset about such things...

Do let us know how you get on with the rest of the carriage,

Andrew.

User avatar
MDLR
Driver
Driver
Posts: 4027
Joined: Thu Jan 15, 2009 10:38 pm
Location: Near Ripley, Derbyshire, UK
Contact:

Post by MDLR » Wed Oct 22, 2014 10:42 pm

Would one answer be to put the buffer on the end of a long bar pivoted on the bogie pivot? You might need to put a wire support on the end of the carriage body to deal with any droop, but my Darj coaches work well with a smaller version.
Brian L Dominic
Managing Director
Flagg Fluorspar Co
www.mdlr.co.uk/ff.html

User avatar
River Lin
Fireman
Fireman
Posts: 410
Joined: Wed Dec 11, 2013 8:40 pm
Location: Leicester

Post by River Lin » Wed Oct 22, 2014 10:49 pm

Hi Brian and Andrew - yes I am speaking from experience. It can be embarrassing blocking up a running line or set of points while I try to sort out derailed stock and of course the coupling chain makes it impossible to just pull the carriages apart to sort the problem out. I wonder if users of chopper couplings that move from side to side have the same problems, as the coupling can follow the curve, as opposed to a solid buffer that overhangs with the coach.

I'll keep you posted on progress with the coach. Next job will be the roof. I like to have removable roofs which means I need plenty of cross braces to keep the curve constant. A couple of years ago I had a good think around the problem of curving the roof while gluing on the braces. I came up with a method of holding the curve hands free while gluing on the braces. All I need is my black and decker workmate. Anyone quess how I hold the curve? I'll post a photo tomorrow. :D
David T.

User avatar
River Lin
Fireman
Fireman
Posts: 410
Joined: Wed Dec 11, 2013 8:40 pm
Location: Leicester

Post by River Lin » Wed Oct 22, 2014 11:00 pm

Hi Brian.
Re. Your last post. That sounds a solution that would certainly help. I do seem to have solved my own problem as now i mainly only run my homebuilt WHR stock which as I said has (my) standard bogie placements.
David T.

User avatar
Gralyn
Fireman
Fireman
Posts: 293
Joined: Thu Aug 07, 2014 12:29 pm
Location: Stockport, United Kingdom
Contact:

Post by Gralyn » Thu Oct 23, 2014 11:26 am

River Lin:105033 wrote:Hi Brian and Andrew - yes I am speaking from experience. It can be embarrassing blocking up a running line or set of points while I try to sort out derailed stock and of course the coupling chain makes it impossible to just pull the carriages apart to sort the problem out. I wonder if users of chopper couplings that move from side to side have the same problems, as the coupling can follow the curve, as opposed to a solid buffer that overhangs with the coach.

I'll keep you posted on progress with the coach. Next job will be the roof. I like to have removable roofs which means I need plenty of cross braces to keep the curve constant. A couple of years ago I had a good think around the problem of curving the roof while gluing on the braces. I came up with a method of holding the curve hands free while gluing on the braces. All I need is my black and decker workmate. Anyone quess how I hold the curve?  I'll post a photo tomorrow. :D

I look forward to the photos. I Have two coaches that require finishing and it is how to fit the roof so that it can be removed that is delaying further work on them.
Regards Graham.

User avatar
River Lin
Fireman
Fireman
Posts: 410
Joined: Wed Dec 11, 2013 8:40 pm
Location: Leicester

Post by River Lin » Thu Oct 23, 2014 9:13 pm

Hi all.
Question from yesterday, how do I hold the curve on a wooden bogie coach removeable roof while gluing in the roof spars?
Answer - I use the pipe holding slots along the inside of the jaws of my workmate bench. Set the jaws roughly in position, slide in the roof and turn the handles to slowly close the jaws forcing the roof into a downwards curve. Have a card template ready (draw around the curved coach end) to set the exact curve required. Check all along the roof and even measure the distance between the jaws all along to ensure the jaws are equidistant apart.

Image
Last edited by River Lin on Mon Oct 27, 2014 1:04 pm, edited 1 time in total.
David T.

User avatar
River Lin
Fireman
Fireman
Posts: 410
Joined: Wed Dec 11, 2013 8:40 pm
Location: Leicester

Post by River Lin » Thu Oct 23, 2014 10:57 pm

OK so this is how I make my removeable roof. I am sure there are other methods but after doing a few this way, i find it worksfor me. Please feel free to chip in with any tips or suggestions.
Firstly here is a completed example from my WHR Buffet coach.

Image

So to start I cut a piece of ply, in this case 0.8mm thick, to the length and width I need. I add 4mm to the length to allow 2mm overhang at each end of the coach and 4mm to the width to allow for an overhang at the sides. As ply has an odd number of layers, make sure it is cut with the grain going along the length of the coach as it will bend easier like this. I know 0.8mm seems a funny thickness but this is the ply thickness my model shop sells. I use it a lot as it cuts OK with a sharp knife - no sawing needed. Remember the width of the ply is not the width of the coach as it has to bend over the curve of the coach end. Make a paper template to test the size if you like.
Finally draw a pencil line exactly down the centre of the roof underside. This is important as it will allow us to line up the roof spars exactly.
Now put this to one side.

To be continued.

Image
Last edited by River Lin on Mon Oct 27, 2014 1:05 pm, edited 1 time in total.
David T.

User avatar
River Lin
Fireman
Fireman
Posts: 410
Joined: Wed Dec 11, 2013 8:40 pm
Location: Leicester

Post by River Lin » Fri Oct 24, 2014 12:09 am

Now for the roof spars.
You now need a piece of 3mm ply for the spars the same width as the inside of the coach. You can cut a piece especially for this but I have the piece left that I cut the coach ends from. This means it is exactly the correct width already. If you look at the photo below, you can still see the marks I used to score the planking width onto the coach ends.

Image

In the same way as you did previously, mark a pencil line exactly down the centre of this piece of ply so that the centre of each spar can line up with the centre line of the roof when gluing them on.
You now need that card template mentioned previously, marked and cut from the coach end curve. Again draw a line exactly down the centre of it.
Now decide how many spars you need. I try to have a spar between each window and 1 at each end which means I need 14 in total.
Put your number of marks along the centre line on the wood at 10mm intervals plus 4 or 5 extra to allow for mistakes and, lining up the centre line on the card with that on the wood, draw as many curved lines on the wood as you need plus the extras.
Finally, I have marked for holes in the centre of each spar for me to fit coach lighting wiring at a later date. These I will drill before cutting out each spar. See my buffet coach roof.

To be continued.
Last edited by River Lin on Mon Oct 27, 2014 1:07 pm, edited 1 time in total.
David T.

User avatar
River Lin
Fireman
Fireman
Posts: 410
Joined: Wed Dec 11, 2013 8:40 pm
Location: Leicester

Post by River Lin » Sun Oct 26, 2014 4:52 pm

Now for cutting the roof spars.
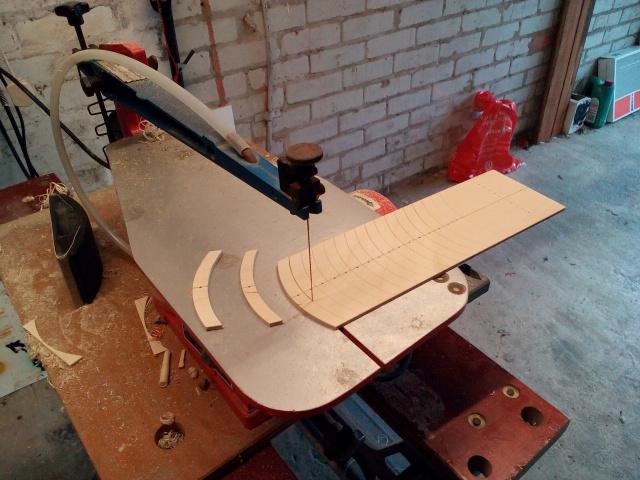
In all my coach building activities, this is the only time I use a machine, in this case borrowed from a fellow modeller. Have tried using a handheld coping saw but I was not happy with the ply splitting due to the relatively large blade teeth I wanted a better finish.
So I set up the borrowed motorised fret saw and carefully cut out the spars. I like to sand the curves before cutting each one as I find the large piece easier to hold. So the order is cut off the end waste, sand number 1. Cut number 1, sand the curve of number 2. Cut out number 2, sand number 3. Etc.


Image

I now have cut all of the spars plus spares and drilled the holes for lighting wiring. Now to give them all a good going over with fine glasspaper. I am also going to Sand the top surface of the roof as it is easier while flat.


Image
Last edited by River Lin on Mon Oct 27, 2014 1:10 pm, edited 2 times in total.
David T.

User avatar
River Lin
Fireman
Fireman
Posts: 410
Joined: Wed Dec 11, 2013 8:40 pm
Location: Leicester

Post by River Lin » Sun Oct 26, 2014 6:20 pm

Roof spars now sanded. Marked the underside of the roof with positioning lines for the spars. The lines that have to be marked most accurately are the ones at either end. I marked these from the coach itself and when I glue the two end spars on I will ensure that I am just insibe the lines. I can always glue a paper packing piece onto the outside of the end spars if the fit is too loose but if I glue the end braces too far apart ................
I have marked for the other spars between each window cutout.


Image
Last edited by River Lin on Mon Oct 27, 2014 6:19 pm, edited 1 time in total.
David T.

User avatar
River Lin
Fireman
Fireman
Posts: 410
Joined: Wed Dec 11, 2013 8:40 pm
Location: Leicester

Post by River Lin » Mon Oct 27, 2014 6:17 pm

The coach roof was now set up in the jaws as described previously and the curve set with the card template. I set 14 of my ply spars in position to check for a good fit, leaving aside the not needed extras.
Starting from one end, i applied wood glue to each spa and placed in it position ensuring that the centre line on each spar lined up with the centre line on the coach roof. Also it was important that the two end spars were glued inside their lines to allow a fit within the coach ends.

Image
Just completed the gluing. Now to leave it alone for 24 hours. Pity this is not a job I can move into the warm overnight.
David T.

User avatar
laalratty
Retired Director
Retired Director
Posts: 3887
Joined: Wed Jan 16, 2008 5:35 pm
Location: Morecambe

Post by laalratty » Mon Oct 27, 2014 8:29 pm

Thanks for taking the time to go through all this. I did something similar with one of my early scratchbuilding efforts, but not to anything like the same sort of precision and it rather showed.
"What the hell is that?"
"It's a model icebreaker sir."
"It's a bit big isn't it?"
"It's a full scale model sir....."

Post Reply

Who is online

Users browsing this forum: No registered users and 4 guests