Lazy Sunday Afternoon.

Discussion of Rolling Stock related topics should go here
User avatar
River Lin
Fireman
Fireman
Posts: 410
Joined: Wed Dec 11, 2013 8:40 pm
Location: Leicester

Post by River Lin » Fri Oct 24, 2014 12:09 am

Now for the roof spars.
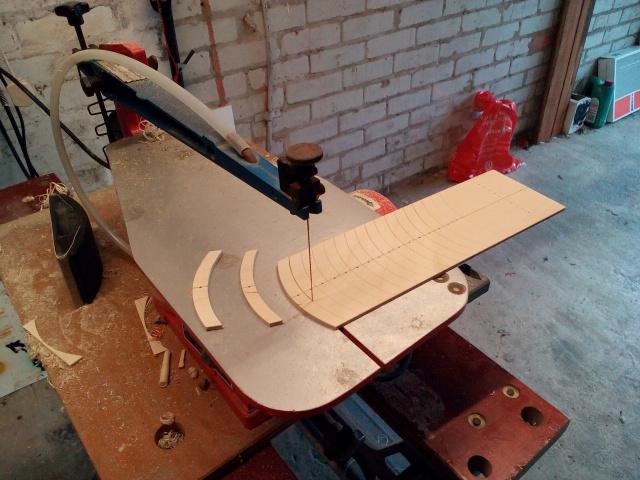
You now need a piece of 3mm ply for the spars the same width as the inside of the coach. You can cut a piece especially for this but I have the piece left that I cut the coach ends from. This means it is exactly the correct width already. If you look at the photo below, you can still see the marks I used to score the planking width onto the coach ends.

Image

In the same way as you did previously, mark a pencil line exactly down the centre of this piece of ply so that the centre of each spar can line up with the centre line of the roof when gluing them on.
You now need that card template mentioned previously, marked and cut from the coach end curve. Again draw a line exactly down the centre of it.
Now decide how many spars you need. I try to have a spar between each window and 1 at each end which means I need 14 in total.
Put your number of marks along the centre line on the wood at 10mm intervals plus 4 or 5 extra to allow for mistakes and, lining up the centre line on the card with that on the wood, draw as many curved lines on the wood as you need plus the extras.
Finally, I have marked for holes in the centre of each spar for me to fit coach lighting wiring at a later date. These I will drill before cutting out each spar. See my buffet coach roof.

To be continued.
Last edited by River Lin on Mon Oct 27, 2014 1:07 pm, edited 1 time in total.
David T.

User avatar
River Lin
Fireman
Fireman
Posts: 410
Joined: Wed Dec 11, 2013 8:40 pm
Location: Leicester

Post by River Lin » Sun Oct 26, 2014 4:52 pm

Now for cutting the roof spars.
In all my coach building activities, this is the only time I use a machine, in this case borrowed from a fellow modeller. Have tried using a handheld coping saw but I was not happy with the ply splitting due to the relatively large blade teeth I wanted a better finish.
So I set up the borrowed motorised fret saw and carefully cut out the spars. I like to sand the curves before cutting each one as I find the large piece easier to hold. So the order is cut off the end waste, sand number 1. Cut number 1, sand the curve of number 2. Cut out number 2, sand number 3. Etc.


Image

I now have cut all of the spars plus spares and drilled the holes for lighting wiring. Now to give them all a good going over with fine glasspaper. I am also going to Sand the top surface of the roof as it is easier while flat.


Image
Last edited by River Lin on Mon Oct 27, 2014 1:10 pm, edited 2 times in total.
David T.

User avatar
River Lin
Fireman
Fireman
Posts: 410
Joined: Wed Dec 11, 2013 8:40 pm
Location: Leicester

Post by River Lin » Sun Oct 26, 2014 6:20 pm

Roof spars now sanded. Marked the underside of the roof with positioning lines for the spars. The lines that have to be marked most accurately are the ones at either end. I marked these from the coach itself and when I glue the two end spars on I will ensure that I am just insibe the lines. I can always glue a paper packing piece onto the outside of the end spars if the fit is too loose but if I glue the end braces too far apart ................
I have marked for the other spars between each window cutout.


Image
Last edited by River Lin on Mon Oct 27, 2014 6:19 pm, edited 1 time in total.
David T.

User avatar
River Lin
Fireman
Fireman
Posts: 410
Joined: Wed Dec 11, 2013 8:40 pm
Location: Leicester

Post by River Lin » Mon Oct 27, 2014 6:17 pm

The coach roof was now set up in the jaws as described previously and the curve set with the card template. I set 14 of my ply spars in position to check for a good fit, leaving aside the not needed extras.
Starting from one end, i applied wood glue to each spa and placed in it position ensuring that the centre line on each spar lined up with the centre line on the coach roof. Also it was important that the two end spars were glued inside their lines to allow a fit within the coach ends.

Image
Just completed the gluing. Now to leave it alone for 24 hours. Pity this is not a job I can move into the warm overnight.
David T.

User avatar
laalratty
Retired Director
Retired Director
Posts: 3887
Joined: Wed Jan 16, 2008 5:35 pm
Location: Morecambe

Post by laalratty » Mon Oct 27, 2014 8:29 pm

Thanks for taking the time to go through all this. I did something similar with one of my early scratchbuilding efforts, but not to anything like the same sort of precision and it rather showed.
"What the hell is that?"
"It's a model icebreaker sir."
"It's a bit big isn't it?"
"It's a full scale model sir....."

User avatar
Gremlin
Trainee Driver
Trainee Driver
Posts: 695
Joined: Sun Feb 08, 2009 2:46 pm
Location: Kent

Post by Gremlin » Mon Oct 27, 2014 11:56 pm

that was a good read, I need to scratch build some coaches and some good tips picked up here :D

User avatar
River Lin
Fireman
Fireman
Posts: 410
Joined: Wed Dec 11, 2013 8:40 pm
Location: Leicester

Post by River Lin » Tue Oct 28, 2014 8:43 am

Finished and ready for painting :-)
Just let the glue cure a little more in the sunshine.

Image
David T.

User avatar
River Lin
Fireman
Fireman
Posts: 410
Joined: Wed Dec 11, 2013 8:40 pm
Location: Leicester

Post by River Lin » Mon Nov 03, 2014 7:01 pm

Hi all.
Spray painted undercoats and topcoats last Wednesday to allow them to dry and cure before the weekend - no touching.
Spent a couple of days cutting and fitting glazing to make the coach watertight. Fitted a pair of IP bigies and buffers to make the coach shell usuable and drove over to North Wales on Saturday with the coach and my WHR stock to have a run on the Wigfa railway. Thank you Dave for making us so welcome.
Dropped a few spare batteries in the empty coach to add a little weight and she/he behaved beautifully.

Image

Managed to find a little time this afternoon to start cutting strips for droplights and found some mahogany for seating. Should make a good contrast with the pine panels inside.
David T.

Post Reply

Who is online

Users browsing this forum: No registered users and 11 guests