This type of wagon is American in origin, but similar locally built designs were used in Aust., mostly on civil engineering projects.
I found some of these Bachmann made examples a while ago in a hobby shop where I grew up in Central Victoria. They'd been there for some time I think, looking at the price tags, although they are the current version. They then proceeded to sit around in a corner of my train room for a year or two while I thought about it. We can't rush these things.
Early this year the weather was too hot to work outside, or in the workshop, so I finally pulled these models out to work on, as that could be done inside the house.
The first photo shows a Bachmann model straight out of the box. They were made in a choice of all over black, or red-brown with a black underframe, most of mine were the all black version.
- Side-tipper-1.jpg (149.82 KiB) Viewed 4922 times
Apart from changing the colour scheme of the model, the oversize knuckle couplers had to go. The models are designed to work like the real ones and can dump a loose load, but that wasn't needed either. The first step was to dismantle the model so the centre sill could be modified to take pin and link couplers. There are LGB pin and link couplers available that screw on in place of the knuckles, but they cost a significant fraction of the wagon price, so some generic ones were ordered from Ebay. The next photo shows a model reduced to it's components.
- Side-tipper-2.jpg (98.74 KiB) Viewed 4922 times
Various extraneous bits of metal were milled off the die cast centre sill and an adaptor made up from polystyrene sheet, so the pin and link coupler could be mounted using the old coupler mounting screw.
The side frames are also die cast and are held in place on the headstocks with tiny pins, which are the devil to remove and exceedingly easy to lose. However this allows the wheel sets to be removed from the underframes, which was necessary to reprofile the flanges so they would go through my turnouts.
The next photo shows an underframe reassembled with new couplers and modified wheels. At this point the under frames are ready for painting.
- Side-tipper-3.jpg (98.95 KiB) Viewed 4922 times
With so many parts used to assemble the bodies, these were all painted separately and left for a few days before being reassembled. The next photo shows a painted, lettered and fully assembled wagon. The chains from the body to the underframe are clipped in place to lock the body. If left loose the body wobbles around when the wagon is moving.
- Side-tipper-5.jpg (126.88 KiB) Viewed 4922 times
At this point the weather started to cool off and I was able to get outside and start erecting the new track extension. The wagons then sat on the shelf in their nice new very shiny paint until I could get back to them. The paint used was Humbrol pale grey gloss #40, which reminded me why I've largely given up using Humbrol paints. I had a couple of tins of this paint, which from the label design have been sitting in the drawer for about 30 years. They were still liquid, mixed up nicely when stirred and sprayed smoothly with good coverage and opacity, just like Humbrol always used to do in the past..
There wasn't enough paint to completely finish all the wagons so reluctantly I bought a new tin of Humbrol #40 and used it to paint the insides of the wagons. Chalk and cheese, as I suspected would be the case. The new paint was labeled as made in the UK and has the most recent label design, but it was already starting to gel in the tin, was a slightly different shade of grey, sprayed erratically and you could just about read a newspaper through a single coat of paint it was that transparent.
It took one coat of the old paint to cover the black on the outside of the wagon body and three coats of whatever Humbrol put in the new tin to cover the insides of the wagons. All of which confirmed what I thought, Humbrol now makes lousy paint and I'll be sticking with Revell from now on.
Anyway, with the tram loco out of the paint shop, the wagons were next up and were given a coat of Revell clear matt to finish them off. I can't be bothered weathering them at the moment, so they have now been released for traffic. The next photo shows a wagon in matt light grey, outside on the track for the first time.
- Side-tipper-7.jpg (141.23 KiB) Viewed 4922 times
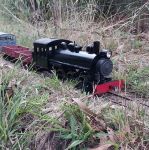
The last photo shows the full rake sitting in the yard behind behind my model of Haydn's tram loco.
This loco started life as a Baldwin steam tram with the Bendigo Tramways in the 1890s, was rebuilt for timber tram use with the Haydn Brothers at Barwon Downs in the Otways before WW1 and was eventually bought by the State Rivers and Water Supply Commission (SR&WSC) for use on dam building and irrigation projects. There is a photo of the little loco with a rake of these side dump wagons on the Hume Weir project in the 1930s, by which time it had been fitted with a conventional, but ugly, cab.
- Side-tipper-8.jpg (212.26 KiB) Viewed 4922 times
Regards,
Graeme