Page 1 of 11
NWNG Railways No.1
Posted: Mon Apr 17, 2017 1:40 pm
by River Lin
Hi all.
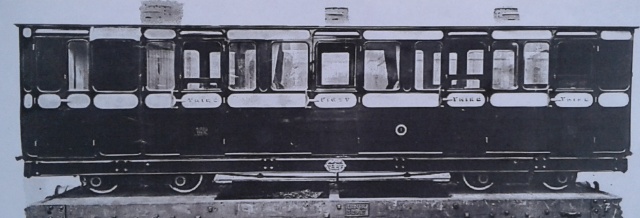
With Peterborough and its MOTY out of the way it is time to think about my next project. NWNG of course but what to go with my other coaching stock. One i have never seen in model form and very rare in photographs is No.1. One of the first two delivered to the fledging railway in 1874 before any locos had been delivered or buildings to store them in. They were designed by Spooner and only a blurry and indistinct plan is lodged in Caernarfon.

- IMG_20170417_133048.jpg (95.77 KiB) Viewed 8507 times
Makers photograph
- IMG_20170329_154602.jpg (57.29 KiB) Viewed 8507 times
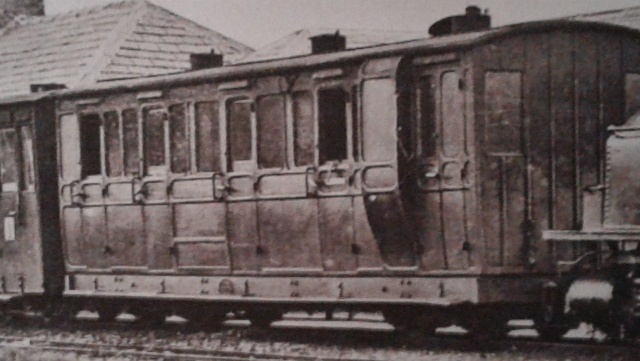
One of the very few photos of the coach in service.
- IMG_20170329_154727.jpg (85.09 KiB) Viewed 8507 times
I have produced my own production drawing and have made a start on cutting ply. More of which later.
David.
Re: NWNG Railways No.1
Posted: Mon Apr 17, 2017 3:16 pm
by River Lin
The first job was to scan the Caernarfon drawing onto MS Publisher page. Then crop the scan to the exact edges of the coach.
Resize the scan to 402mm (25' 2" full size converted to 16mm to the foot) and set Publisher to print the scan onto a poster. This then prints out on 3 pieces of A4, automatically adding an overlap to allow for gluing together.
Ms Word also has these scanning functions
From this full size scan i was then able to produce my own working drawing on my Rotring drawing board (just fits) from my collage days in the early 70s.

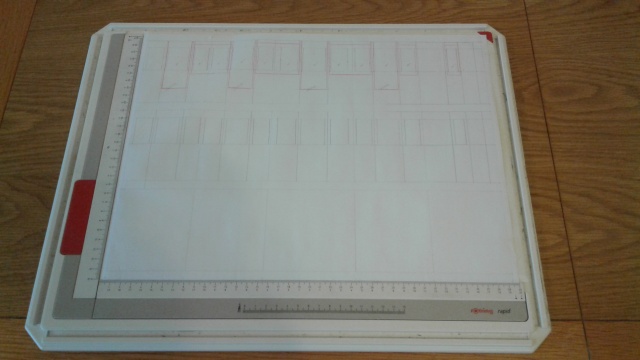
- IMG_20170417_125639.jpg (54.66 KiB) Viewed 8496 times
D.
Re: NWNG Railways No.1
Posted: Mon Apr 17, 2017 3:47 pm
by River Lin
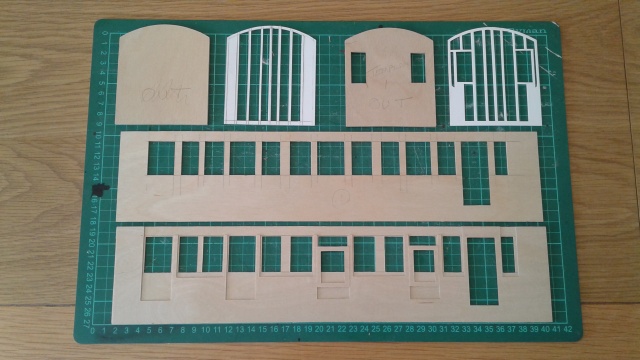
I then was able to transfer this drawing onto 3 pieces of 0.8mm ply to make one side of the coach. I have decided to make the sides as a 3 layer sandwich with the middle layer cut to allow for inserting and holding the glazing.
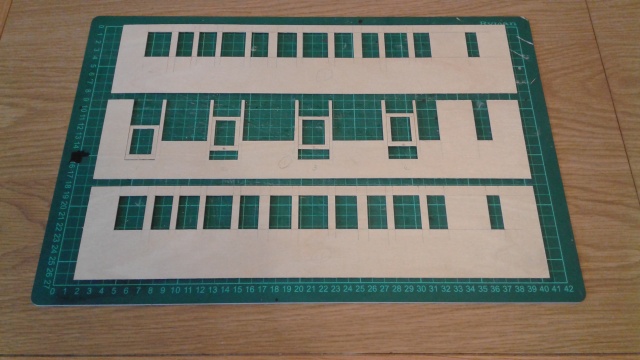
- IMG_20170417_125554.jpg (80.53 KiB) Viewed 8491 times
I have also cut out seperate droplights to slide up and down in runners in the central layer. Hopefully to allow for opening windows in the completed coach. All this cutting out has obviously to be copied for the second side. Use a sharp blade and replace frequently.
I have yet to cut out the openings for the ducket in the guards compartment.
D.
Re: NWNG Railways No.1
Posted: Mon Apr 17, 2017 8:52 pm
by Soar Valley Light
Great progress David and quick too. I'm fascinated to see how you have produced the working drawings. I look forward to watching the progress.
Andrew
Re: NWNG Railways No.1
Posted: Tue Apr 18, 2017 12:50 am
by LNR
I really like the fact that the windows will actually open, though I think I can imagine how much extra work will be involved. You must be a very patient man. Do I take it that you are cutting these out by hand?
Grant.
Re: NWNG Railways No.1
Posted: Tue Apr 18, 2017 7:59 am
by ge_rik
Wow!! Looks good already. You must have a really steady hand.
Rik
Re: NWNG Railways No.1
Posted: Tue Apr 18, 2017 8:51 am
by River Lin
Hi all.
Yes you do have to be patient and take the cutting slowly but we all make mistakes. Wood glue is good stuff

.
Almost all of my work is done on a piece of kitchen worktop using mostly hand tools. The only time a machine comes in to play is when i use a cheap scroll saw to cut curved roof spars in 3mm ply.. with my nwng pickering brake coach i did try to use this scroll saw to cut the window openings but i found difficulty in cutting straight lines and could not get neat edges to the cut lines so went back to the knife and ruler method in thin ply.
I'll hopefully show more progress later today.
D.
Re: NWNG Railways No.1
Posted: Tue Apr 18, 2017 9:38 am
by LNR
It's very good to see hand skills still alive and well. So would the ply your using be around 1mm thick for each lamination?
Grant.
Re: NWNG Railways No.1
Posted: Tue Apr 18, 2017 9:58 am
by River Lin
Hi Grant.
The ply i use is 3 ply with a total thickness of 0.8mm which i presume is made especially for modellers and is relatively easy to cut. In practice it is nearer to 0.95mm. This means that when i glue three layers together to make the 'sandwich' it makes about just under 3mm in total. Plenty strong enough for my needs.
David.
Re: NWNG Railways No.1
Posted: Tue Apr 18, 2017 10:54 pm
by River Lin
Hi all. Latest update.
- IMG_20170418_100714.jpg (84.26 KiB) Viewed 8417 times
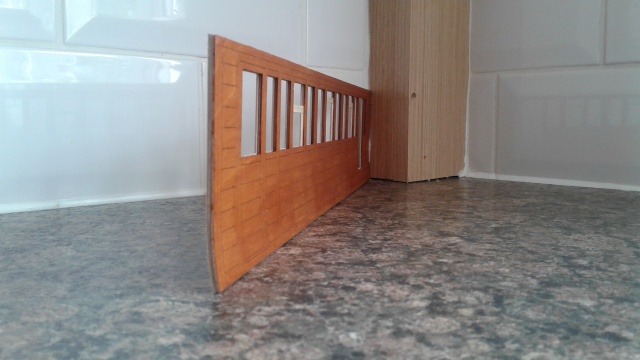
Dut to the central glazing layers of ply having rather delicate parts i decided to get them glued to the front layers of the sides. (One side shown). As this coach has tumblehome sides i left the lower 15mm of the sides without glue so that i can insert glue with a fine brush and form the tumblehome curve along the lower edge at a later date. Please be aware i have not done this before so we will have to see how this goes.
I have laid a couple of the sliding droplights in position to give an idea of how they should work.
Above this side is the coach inside veneer that will have all of the internal detail scribed onto it and varnished before gluing in.
I have laminated the two ends using 3 layers of ply as before. One is plain and the one for the guards compartment end has two window openings cut into it with the central ply layer having larger window cutouts to take glazing that can slide in from the top.
I have cut the beading for the two coach ends from a sheet of plastikard. I had to work this out myself from the photograph as it is not shown on the plan. The side areas of the beading have not been completly cut yet as these will need to be profiled as the tumblehome when i have worked it out.
Progress might be a little slower now after the holiday weekend but i will keep you posted as it progresses.
David.
Re: NWNG Railways No.1
Posted: Wed May 31, 2017 2:32 pm
by Steamcoaster
How inspiring. I'm moving into scratch builing and looking to do a Pickering brake. I like the construction technique.
How is it going?
Re: NWNG Railways No.1
Posted: Thu Jun 01, 2017 1:15 am
by River Lin
Hi.
Bad back brought construction to a halt lately but am scribing the panelling on the inside coach layer this week. Will post a pic in a couple of days. D.
Re: NWNG Railways No.1
Posted: Tue Jun 06, 2017 2:25 am
by Steamcoaster
Would you be able to scan in the drawings to use?
It's a lot no way to Caernarfon.
Cheers
Re: NWNG Railways No.1
Posted: Sun Jun 11, 2017 1:29 pm
by River Lin
Hi Steamcoaster. Sorry don't know your name.
As a Welsh Highland Railway society member and modeller I must point you in the direction of the 'Welsh Highland Heritage Group'. They are a fantastic resource for all things old WHR and NWNG railway.
Google-
Welsh Highland Heritage Group.
From the menu choose 'Journal'
Find number 62
On page 10 you will find the drawing I am using.
Hope this helps.
David.
Re: NWNG Railways No.1
Posted: Wed Jun 14, 2017 1:16 am
by Steamcoaster
I should rejoin. I'm Rupert Lodge. You probably know my dad.
Re: NWNG Railways No.1
Posted: Thu Jun 22, 2017 7:34 pm
by River Lin
Hi all. Latest update.
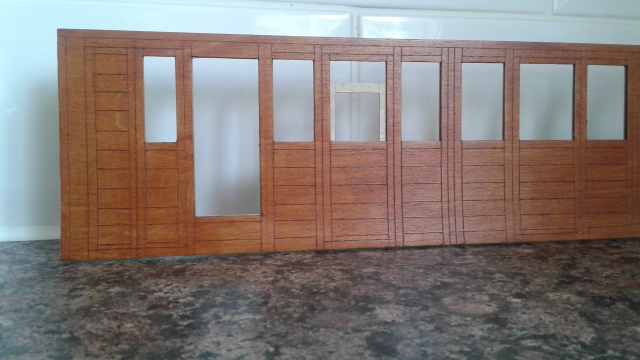
Coach inside panels scribed and two coats of teak stain added. I like to brush the stain well into the surface to force plenty into the scribed lines. This makes for a good dark line. Before i use the stain i brush the lines with a tooth brush to remove every bit of dust to allow maximum space for the stain.
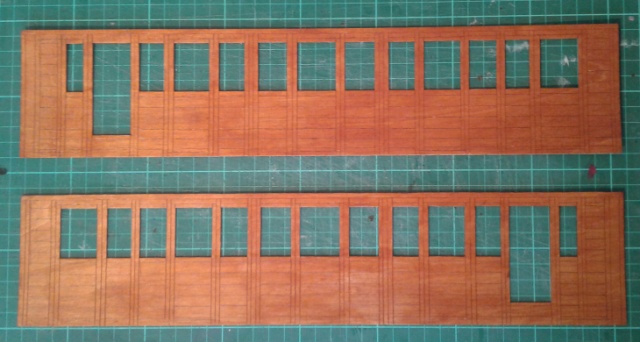
- IMG_20170622_192258.jpg (78.44 KiB) Viewed 4364 times
I am now working on the tumblehome to the sides. I will show my results over the weekend.
David.
Re: NWNG Railways No.1
Posted: Fri Jun 23, 2017 12:19 am
by LNR
I've always thought coaches with tumblehome stand alone in the beauty stakes, shall be interested to see how you go about holding the tumblehome.
Are you going to laminate the sides and over curve them slightly? I imagine seating and bulkheads might play a part too!
Grant.
Re: NWNG Railways No.1
Posted: Sat Jun 24, 2017 8:45 pm
by River Lin
Latest update from yesterday.
I felt it time to attempt the tumblehome. In a previous post i mentioned that when i glued the middle layer to the outside layer i left the lower 15mm unglued. Now it was time to open these two layers a little with the end of a metal rule and push glue between with a fine artists paintbrush. This side was then cramped down on to the surface of my workbench with a piece of 3mm ply under the lower edge to form a curved edge hoping that this laminated curve would stay permanent once the glue had dried.
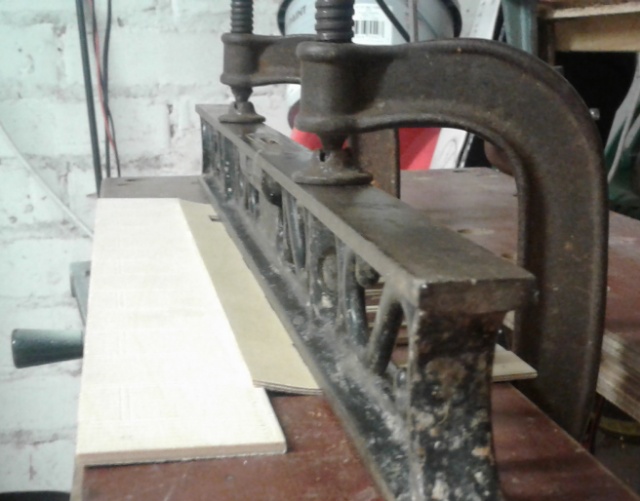
- IMG_20170622_192230.jpg (83.14 KiB) Viewed 4320 times
Moving on to this morning i glued the stained inside panel to last nights work to form the third layer of the lamination using edible weights and bulldog clips to hold the panel to the tumblehome curve while the glue set.
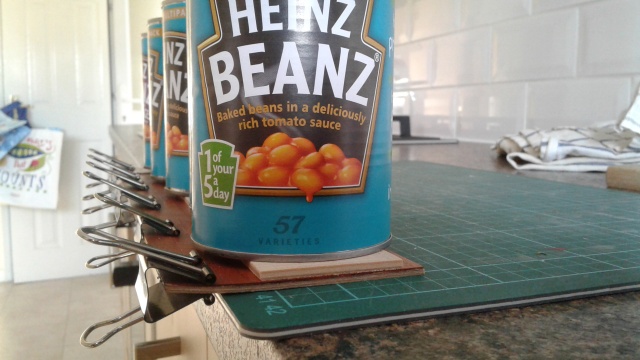
- IMG_20170624_202701.jpg (83.69 KiB) Viewed 4320 times
Now dry i am very pleased with the result, bearing in mind i had not attempted a tumblehome before. Due to a slight spring in the plywood i have a bottom edge that is about 2.5 mill curved inwards from the vertical which looks a good representation of the real thing shown in photos and the plan.
- IMG_20170624_201953.jpg (64.96 KiB) Viewed 4320 times
I also slipped in one of the droplights from the top and it held itself in position well with just a little friction, though they are still untreated wood.
- IMG_20170624_202039.jpg (78.69 KiB) Viewed 4320 times
I think my next job is to work on the coach ends including copying the tumblehome curve onto them and finishing their beading.
David.
Re: NWNG Railways No.1
Posted: Sat Jun 24, 2017 9:14 pm
by Peter Butler
Now that I like...... just trying to think of a way to make the process work using plasticard.
Re: NWNG Railways No.1
Posted: Sat Jun 24, 2017 11:01 pm
by River Lin
Hi.
I would have thought it would work. As long as the solvent adhesive between the layers of plasticard stays liquid long enough to allow you to form and cramp the curve before curing you should end up with success. The layers need to slide over one another as the curve is formed.
David