NWNG Railways No.1

Discussion of Rolling Stock related topics should go here
User avatar
River Lin
Fireman
Fireman
Posts: 410
Joined: Wed Dec 11, 2013 8:40 pm
Location: Leicester

Re: NWNG Railways No.1

Post by River Lin » Wed Jul 05, 2017 8:24 pm

Hi all.
Glued duckets prior to cleaning.
I am pleased with the outcome. The laminated body of the ducket gives a good rigidity even though the plasticard was initially guite thin. With the body pieces set to shape it was fairly easy to use them as a template to mark, cut and sand the sides prior to gluing in position.
IMG_20170705_201003.jpg
IMG_20170705_201003.jpg (531.45 KiB) Viewed 4878 times
David.
David T.

User avatar
River Lin
Fireman
Fireman
Posts: 410
Joined: Wed Dec 11, 2013 8:40 pm
Location: Leicester

Re: NWNG Railways No.1

Post by River Lin » Sat Jul 08, 2017 8:20 pm

Hi all.
This is a landmark stage i like to get to. Four sides glued and floor in. Now to work on -
Internal fitting out.
External beading.
Underframe including wheels and couplings.
Removeable roof including lighting.
Sounds a lot of work but i will cut and fit the internal compartment partitions first to increase the rigidity of the structure.
IMG_20170708_200915.jpg
IMG_20170708_200915.jpg (96.47 KiB) Viewed 4848 times
Enjoy your weekend all. I'm looking forward to a steamup in Buckinghamshire tomorrow with my Lady Ann and some of my other WHR/NWNG stock.
David.
David T.

User avatar
LNR
Driver
Driver
Posts: 1542
Joined: Sat Feb 27, 2016 5:26 am
Location: Australia

Re: NWNG Railways No.1

Post by LNR » Sun Jul 09, 2017 12:54 am

Just love that tumblehome!
Grant.

User avatar
pandsrowe
Trainee Fireman
Trainee Fireman
Posts: 246
Joined: Sat Dec 20, 2014 12:15 pm
Location: West Norfolk, UK

Re: NWNG Railways No.1

Post by pandsrowe » Sun Jul 09, 2017 8:27 am

I always thought that the majority of kit manufacturers had the right idea with their simple slab sides, easy to produce and easy to build. Now seeing your build l have completely revised my opinion.
Tumblehomes are a definite must.
Phil

User avatar
River Lin
Fireman
Fireman
Posts: 410
Joined: Wed Dec 11, 2013 8:40 pm
Location: Leicester

Re: NWNG Railways No.1

Post by River Lin » Mon Jul 10, 2017 10:20 pm

Hi all.
I have cut the partitions to width but while thinking about the height i looked back at my paperwork to see that the coach had 3 roof oil lamps. It seems that the central 1st. Class compartment had a lamp of its own but the two compartments either side of this one shared a lamp between each pair. This must mean that the partitions between them must have been shorter than full height to allow for this.
Because of this i am now working on the roof so that when the lighting is in place i know how much below full height to make the partitions.
IMG_20170710_213008.jpg
IMG_20170710_213008.jpg (102.4 KiB) Viewed 4808 times
The photo shows the frame i am making for the roof including a few of the extra spars that i will fit to add strength. I am making these large enough to allow for an 8mm space between the coach roof and the internal ceiling panelling to allow the lighting components to fit between.
David T.

User avatar
River Lin
Fireman
Fireman
Posts: 410
Joined: Wed Dec 11, 2013 8:40 pm
Location: Leicester

Re: NWNG Railways No.1

Post by River Lin » Wed Jul 12, 2017 8:10 pm

Hi all.
After cutting a roof from 1mm ply and allowing a 5mm overhang i am ready to construct the roof. I won't go into too much detail on this as i have posted on a previous thread my method for doing this.
Basically i use the horizontal pipe grooves on my Black and Decker Workmate to bend the roof downwards, using the curved end pieces as templates, until the curve is correct. I can then glue the roof frame in place after having marked a centre line on the curved end pieces and the roof to allow me to position the frame centrally. I use woodworkers pva for gluing as i need a good strong permanent fix.
IMG_20170712_172616.jpg
IMG_20170712_172616.jpg (74.53 KiB) Viewed 4704 times
Once the frame has started to grip i can then glue in the extra spars to give extra strength along the length of the roof.
I then leave the whole unit for 24 hours to dry before releasing the pressure.
IMG_20170712_172708.jpg
IMG_20170712_172708.jpg (75.99 KiB) Viewed 4704 times
I was able to leave the unit in the vice until about 3 this afternoon before releasing the pressure, crossing my fingers and trying on the coach.
IMG_20170712_184808.jpg
IMG_20170712_184808.jpg (94.03 KiB) Viewed 4704 times
YES!!!! Result.
Now i need a trip to the model shop for another sheet of ply to make the internal coach ceiling before fitting the lighting. I can then go back to cutting the partitions to height.

David.
David T.

User avatar
pandsrowe
Trainee Fireman
Trainee Fireman
Posts: 246
Joined: Sat Dec 20, 2014 12:15 pm
Location: West Norfolk, UK

Re: NWNG Railways No.1

Post by pandsrowe » Thu Jul 13, 2017 8:01 am

David,
I do like your technique for getting the curve on you roof panels, it looks to be very controllable. Do you find that there is any relaxation in the curve when you remove the assembly from the work mate?
In the past I have usually wrapped my roof panels around a suitable curved object e.g. drainpipe and then soaked in hot water and then allowed to dry naturally. Although this does work it is rather a hit and miss process to ensure that you end up with the correct curve.
Phil

User avatar
LNR
Driver
Driver
Posts: 1542
Joined: Sat Feb 27, 2016 5:26 am
Location: Australia

Re: NWNG Railways No.1

Post by LNR » Thu Jul 13, 2017 9:10 am

That coach is looking better and better.
Grant.

User avatar
River Lin
Fireman
Fireman
Posts: 410
Joined: Wed Dec 11, 2013 8:40 pm
Location: Leicester

Re: NWNG Railways No.1

Post by River Lin » Thu Jul 13, 2017 9:34 am

Hi all.
Thanks Grant.
Phil. It all stays pretty solid. The two side rails under the roof and the extra spars help to hold the shape by adding stiffness and i don't skimp on type of glue used. A good quality wood glue is important that dries solid and i always leave it a good 24 hours before releasing the pressure. This roof was left for 28 hours.
David T.

Maple
Trainee Fireman
Trainee Fireman
Posts: 175
Joined: Sat Jun 29, 2013 3:17 pm
Location: Bournemouth

Re: NWNG Railways No.1

Post by Maple » Fri Jul 14, 2017 1:13 pm

amazing work, very jealous.

i am sure it will be a show winner when done :)
'Professional Bodge artist '

User avatar
ge_rik
Administrator
Administrator
Posts: 6554
Joined: Sun Oct 25, 2009 10:20 pm
Location: Cheshire
Contact:

Re: NWNG Railways No.1

Post by ge_rik » Fri Jul 14, 2017 6:42 pm

Beautifully done

Rik
------------------------
Peckforton Light Railway - Blog Facebook Youtube

User avatar
River Lin
Fireman
Fireman
Posts: 410
Joined: Wed Dec 11, 2013 8:40 pm
Location: Leicester

Re: NWNG Railways No.1

Post by River Lin » Sat Jul 15, 2017 7:06 pm

Hi all.
As said previously i need to sort out the lighting in the roof so that i can then get the compartment partitions to an acceptable height. So this is what i have been up to over the last few days.
Firstly get the items together for this part of the project.
IMG_20170714_183836.jpg
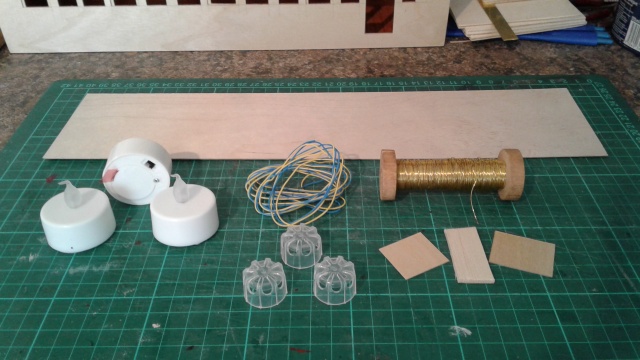
IMG_20170714_183836.jpg (89.67 KiB) Viewed 4504 times
3 battery tealights (3 for 1 pound from local pound shop) to give me 3 flickering orange leds, a button battery with 2 spare and a small sliding switch with 2 spare.
A small amount of wire for connecting the leds etc.
Small pieces of wood to make a thin battery box.
Thin brass (or copper) wire for making the connections in the battery box.
3 lamp globes (plastic tops from fruit shoot bottles).
Piece of thin ply cut to size for the internal roof panel.

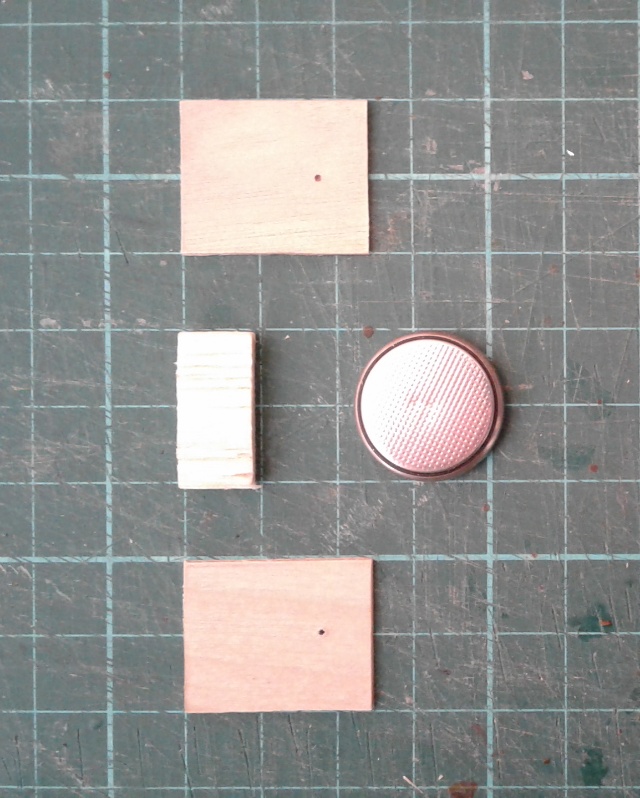
The battery box is made of a small piece of balsa the thickness of the battery (3mm) and two larger pieces of thin ply for the sides. There is a small hole in each of the sides through which the thin brass wire is threaded to make contact with the sides of the battery. The three pieces of wood are then glued together allowing the battery to be slid in. I also wrapped a piece of masking tape around the box to help hold the battery in place. The battery can be replaced using a pair of pliers. A photo may help to explain all this.
IMG_20170715_183545.jpg
IMG_20170715_183545.jpg (164.83 KiB) Viewed 4504 times
IMG_20170715_183619.jpg
IMG_20170715_183619.jpg (139.71 KiB) Viewed 4504 times
David T.

User avatar
River Lin
Fireman
Fireman
Posts: 410
Joined: Wed Dec 11, 2013 8:40 pm
Location: Leicester

Re: NWNG Railways No.1

Post by River Lin » Sat Jul 15, 2017 7:31 pm

Hi all
I have now glued the leds into the roof using a hot glue gun and wired them in parallel. The battery box is now in place and held in place with a sticky pad. I have soldered the switch into the circuit on longer wires coiled round as it is to be glued to the internal roof panel which may have to be removed occasionally to replace the battery.
IMG_20170715_183656.jpg
IMG_20170715_183656.jpg (96.53 KiB) Viewed 4504 times
I have also marked and drilled holes in the internal roof panel to take the lamp globes. This panel has now to be scribed and screwed with an upwards curve onto the frame of the roof.
This is the roof of my buffet coach and shows the effect i am aiming for. You can see the switch on the left hand side.
IMG_20170715_112522.jpg
IMG_20170715_112522.jpg (83.23 KiB) Viewed 4504 times
Attachments
IMG_20170715_183739.jpg
IMG_20170715_183739.jpg (107.5 KiB) Viewed 4504 times
David T.

User avatar
River Lin
Fireman
Fireman
Posts: 410
Joined: Wed Dec 11, 2013 8:40 pm
Location: Leicester

Re: NWNG Railways No.1

Post by River Lin » Mon Jul 17, 2017 5:14 pm

Hi all.
Spent the last couple of days finishing the roof. I have scribed boards onto the ceiling panel and cut a small slot for the switch to be operated through. I then coloured the panel with mahogany stain and marked and drilled for 8 6mm brass woodscrews. I then had to glue 8 wooden pads onto the underside of the roof for these screws to screw into. The switch was then epoxyed to the roof panel before screwing the panel to the roof frame. I used epoxy resin glue (araldite rapid) because it doesn't creep into the switch and jam the mechanism like a liquid glue would. You can just see the switch on the right hand side.
IMG_20170717_164741.jpg
IMG_20170717_164741.jpg (69.75 KiB) Viewed 4464 times
I couldn't resist this shot through one of the guards compartment windows.
IMG_20170717_164703.jpg
IMG_20170717_164703.jpg (87.36 KiB) Viewed 4464 times
I can now concentrate again on the compartment partitions.

David.
David T.

User avatar
Peter Butler
Driver
Driver
Posts: 5234
Joined: Sun Sep 09, 2012 10:33 pm
Location: West Wales

Re: NWNG Railways No.1

Post by Peter Butler » Mon Jul 17, 2017 10:31 pm

Speechless..... there's a first!
The best things in life are free.... so why am I doing this?

User avatar
LNR
Driver
Driver
Posts: 1542
Joined: Sat Feb 27, 2016 5:26 am
Location: Australia

Re: NWNG Railways No.1

Post by LNR » Tue Jul 18, 2017 3:42 am

Looks very comfortable already, even without seats!
Grant.

User avatar
SimonWood
Trainee Driver
Trainee Driver
Posts: 656
Joined: Tue Apr 07, 2015 9:46 pm
Location: West Wales
Contact:

Re: NWNG Railways No.1

Post by SimonWood » Tue Jul 18, 2017 9:40 am

That internal shot is just astonishing.

User avatar
markoteal
Trainee Driver
Trainee Driver
Posts: 763
Joined: Mon Apr 18, 2016 6:23 pm
Location: Yorkshire

Re: NWNG Railways No.1

Post by markoteal » Tue Jul 18, 2017 12:25 pm

I had to look a few times to check it wasn't a real 1:1 shot - the other coach in the background does make it very realistic as well as the quality of the fit out.
Where did I put that uncoupler?

bazzer42
Driver
Driver
Posts: 1215
Joined: Sun Nov 25, 2012 1:37 pm
Location: Forest of Dean

Re: NWNG Railways No.1

Post by bazzer42 » Tue Jul 18, 2017 7:17 pm

Have to agree with everyone else, that internal shot is as close as it gets.

User avatar
River Lin
Fireman
Fireman
Posts: 410
Joined: Wed Dec 11, 2013 8:40 pm
Location: Leicester

Re: NWNG Railways No.1

Post by River Lin » Thu Jul 20, 2017 8:50 pm

Hi all. Latest update.
Partitions now cut to size, scribed boarding and stained with teak stain. The two centre partitions for the 1st class compartment are full height while the two outer ones that are positioned under the two outer lights are cut to allow the two compartments either side of the 1st class to each share a light.
IMG_20170720_203115.jpg
IMG_20170720_203115.jpg (111.17 KiB) Viewed 4159 times
Now is time to make a start on the beading. I may do a few trial pieces because although i have put beading on some of my coaches before, never with curved corners (and almost every corner is an internal curve).
I'll keep you updated.
David.
David T.

Post Reply

Who is online

Users browsing this forum: No registered users and 10 guests