TVT Water Gin

Discussion of Rolling Stock related topics should go here
Post Reply
User avatar
GTB
Driver
Driver
Posts: 1559
Joined: Sat Mar 05, 2011 2:46 pm
Location: Australia

TVT Water Gin

Post by GTB » Fri Mar 18, 2016 12:22 pm

Probably not something you'd see very often in the land of liquid sunshine I guess, but common on Aust. railways, especially those running in inland areas.

This one is based on a South Australian Railways design used on their ng lines and similar ones were used on other state ng systems. The water tanks used on the VR ng lines were a temporary arrangement using a tank from a bg wagon fitted into a ng open wagon with the doors removed.

I had been thinking for some time about building a tank wagon, but an oil tank seemed unlikely in the area served by the TVT in the modelled timeframe. I didn't want a bogie water tank, but the SAR design caught my eye recently in a book I was reading and it looked like a good project to keep me occupied during the recent hot spell.

The TVT is located in an area of Victoria that isn't particularly drought prone, so the TVT wouldn't have had a need for many water tanks. I decided I would only make one, instead of my usual batch build.

Like the SAR version, this one is fitted to a wooden under frame and is only 1200 gallon capacity, so within the 5 ton load limit of the under frame. VR water tanks were 2000 gallons and needed a bogie under frame when used on the ng.

The model is built on my standard 4 wheel under frame and the tank was built from polystyrene sheet to simulate the riveted mild steel tank. The rivets were punched into 20 thou. sheet, which was then laminated onto 60 thous. sheet to form a strong braced box shape that wouldn't warp over time, or collapse when picked up by the ham-handed.

The timber baulks under the tank were probably used on the prototype to raise the bottom of the tank above the bottom of a loco tender, so that when the wagon was being used as an auxiliary tender, all the water would be available. The increased tank height also brings the water filler up to the same height as the water filler on a tender.

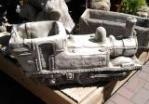
This photo shows the model before painting, showing the mixture of materials used. I didn't take any progress photos, as there were no techniques used that haven't been shown before. As always, it is difficult to take a good photo of white polystyrene.

Image

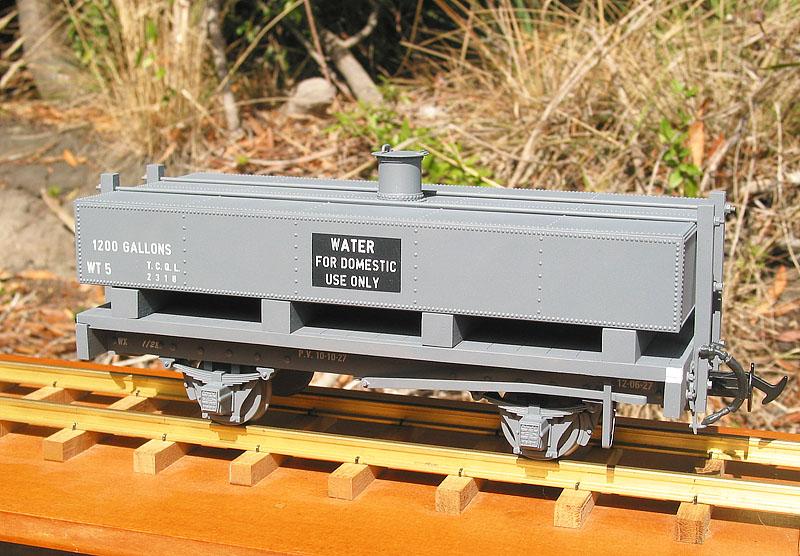
This pic shows the finished model, taken this afternoon in a sunny period between rain showers. The signage suggests this wagon would normally be used for transporting potable water to work sites and to manned stations during dry spells, rather than as an auxiliary tender.

Image

TVT Story

Although the TVT route follows river valleys and the rivers are permanent, there is still a need to transport clean water to temporary work camps and for supplying water during extended dry spells to locations that rely on rainwater tanks for their water.

These water gins spend most of their time sitting around in sidings at the workshops until needed. The design was based on the small ng tanks used by the SAR so that some redundant ballast truck chassis could be used. Using the VR design would have tied up bogie chassis that could be better used for paying traffic.

Regards,
Graeme

User avatar
ge_rik
Administrator
Administrator
Posts: 6556
Joined: Sun Oct 25, 2009 10:20 pm
Location: Cheshire
Contact:

Post by ge_rik » Fri Mar 18, 2016 1:58 pm

Hi Graeme
Lovely looking model. That rivet detailing looks spot-on. A lot more consistent than my embossed riveting - you must let us into the secret.

How did you do the white lettering BTW?

Rik
------------------------
Peckforton Light Railway - Blog Facebook Youtube

User avatar
LNR
Driver
Driver
Posts: 1542
Joined: Sat Feb 27, 2016 5:26 am
Location: Australia

Post by LNR » Fri Mar 18, 2016 10:44 pm

You must have a fairly long goods consist that needs testing by now.
So when the rain and the heat abate?

User avatar
GTB
Driver
Driver
Posts: 1559
Joined: Sat Mar 05, 2011 2:46 pm
Location: Australia

Post by GTB » Sat Mar 19, 2016 2:01 pm

ge_rik:116844 wrote: That rivet detailing looks spot-on. A lot more consistent than my embossed riveting - you must let us into the secret.
No secret, I use a punch and die set to form the rivet head. A matching punch and die set is the only way to get a decent embossed rivet in plastic and metal sheet in my opinion.

They are available commercially, but I make my own. for polystyrene work, brass is fine, although I usually use mild steel, as I end up with a lot of suitable size off-cuts when making axles.

For waterproof seams with their closely spaced rivets, I use Grant's method of sliding the workpiece along a fence clamped to the worktable and pushing the last rivet up against the die to set the spacing for the next one.

There's a photo of my much modified NWSL rivet press in the recent post on the TVT steel bogie wagons which I use for polystyrene work inside. It has a leadscrew that I use when I need widely spaced rivets. In that case the workpiece is taped to the worktable and the leadscrew moves the worktable past the die.

For loco work in metal I made up a similar worktable that I use in the mill drill, but Grant has a simpler setup using his bench drill that works just as well. I tend to do things the hard way.........
ge_rik:116844 wrote: How did you do the white lettering BTW?
I print my own waterslide decals using an ALPS printer. Now long obsolete and the manufacturer has recently stopped making ribbons, but I have enough stashed to see me out.

The stencil lettering is done with a truetype font named 'Carknocker', not quite right for VR stencils, but near enough on a freelance railway.

Regards,
Graeme

User avatar
GTB
Driver
Driver
Posts: 1559
Joined: Sat Mar 05, 2011 2:46 pm
Location: Australia

Post by GTB » Sat Mar 19, 2016 2:11 pm

LNR:116853 wrote:You must have a fairly long goods consist that needs testing by now.
So when the rain and the heat abate?
Was thinking the same thing the other day. I've never given the black Baldwin a load test on a goods train.

Sounds like a plan.

Graeme

User avatar
Keith S
Driver
Driver
Posts: 1627
Joined: Thu Feb 24, 2011 11:44 pm
Location: Canada

Post by Keith S » Sat Mar 19, 2016 3:35 pm

It is desirable that you should capture a video record of this test, so that we might enjoy watching it as well!

User avatar
Andrew
Moderator
Moderator
Posts: 3265
Joined: Tue Jul 03, 2012 1:33 pm
Location: Bristol, UK
Contact:

Post by Andrew » Sat Mar 19, 2016 8:19 pm

Keith S:116861 wrote:It is desirable that you should capture a video record of this test, so that we might enjoy watching it as well!
Yes please! That tank wagon's a beauty...

Andrew.

User avatar
LNR
Driver
Driver
Posts: 1542
Joined: Sat Feb 27, 2016 5:26 am
Location: Australia

Post by LNR » Sun Mar 20, 2016 1:50 am

Don't know if this is the right place for this, but as Graeme mentioned riveting and the question of how to is raised many times, I thought I would explain my method. You will note the very expensive and engineering like equipment I have built!
Firstly riveting requires bringing a tool and die together in the right place and this is easily achieved in a bench drill. Mine is old and quite substantial, but I would think most should be capable of the job using brass. My set up is seen below.
Image
The timber is bolted to the table, and a fence provides guidance. The fence can be short to get into a tight corner, or spaced some distance to put rivets in the centre of a panel.
Next is some close ups of the die and how it sits in a slot cut in the timber. It is just mild steel, you could harden it but not really worth while. Easier to just make another. The working face sits about 1/16th. clear of the timber surface and the distance to the edges from the die hole determines rivet spacing.
Image

Image
The punch is made from the shank of a broken end mill, a drill shank would probably work although they tend to be a little softer. Ground to the shape you see and with enough relief to get up close to the fence guide when required. Varied punch and die sizes are held for different jobs.
Image
A point here that Graeme raised, a water tank in order to be waterproof requires rivet pitch in the order of 1-1/4" to 1-1/2" depending on plate thickness. Cab and other plating generally has pitches somewhere about 4"-6" and showing this difference on a model adds that extra touch. The final product is seen below, note different spacing of tank baffles and cab rivets, compared with the main tank structure.
Image
Some times it's a shame to paint things!
Grant.

User avatar
pandsrowe
Trainee Fireman
Trainee Fireman
Posts: 246
Joined: Sat Dec 20, 2014 12:15 pm
Location: West Norfolk, UK

Post by pandsrowe » Sun Mar 20, 2016 10:43 am

I just love the look of all that riveting on your loco body, a real work of art.
Two questions though, what did you use to form the hollow in the female part of the die and how did you keep the spacing around the curved part of the water tanks at the bottom?
Really something for a mere mortal like me to aspire to.
Phil

User avatar
LNR
Driver
Driver
Posts: 1542
Joined: Sat Feb 27, 2016 5:26 am
Location: Australia

Post by LNR » Sun Mar 20, 2016 11:10 am

Thank you Phil.
  The hole is simply done with the appropriate sized drill, diameter of the rivet die plus thickness of metal times two plus a smidgeon (ancient engineering term). Your really only using the top corner of the hole to restrict and form a crisp outline of the rivet head, and of course keeping the depth consistent. It actually pays to run some scrap through the die first to just polish any sharpness off the top edges of the hole. The one shown has done many rivets which is why it probably no longer looks like a drilled hole.
  Regarding the rivets at the bottom, I clamped a piece of round bar that matched the radius, to the edge of the timber and very carefully swung the entire piece using the bar as the pivot. It seems there is always a place that needs rivets but is difficult to get a fixed setup into, so it must be versatile to cope.
PS I think I've hijacked this thread, my apologies, I'm new here.

Post Reply

Who is online

Users browsing this forum: No registered users and 7 guests