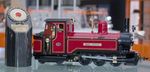
How could I resist? The price was right and it was obviously made from a reasonable kit. However..... once I started to look at it with a view to bring it up to scratch I discovered how much work was involved.
It is a plywood kit with laser cut matchboard sides. I think the manufacturers missed an opportunity when they made the sides showing vertical planks but horizontal woodgrain from the plywood material used. That was only the first issue with the kit. The major problem was that it had been put together by a partially sighted gorilla, after a night out with the boys, in the dark, wearing oven gloves, using several types of adhesives (except the correct ones) and finished by immersing in a bucket of gloss paint and smoothed with a toilet brush. Still, it was worth rescuing rather than see it go to landfill! Now, I don't do kits as I scratch-build everything, so this is a new area for me. I began by thinking a light sanding and repaint would solve all of its problems, however, this soon became a major rebuild project as bits of it gradually became detached resulting in it returning to a kit of parts. It was at this stage I discovered the inner card sheets with cut out windows so that the hideous mess of double sided tape holding the glazing in place was hidden beneath. The two arched supports for the roof were set between these sheets without taking into account the additional thickness of the sides which now bowed out alarmingly. When the whitemetal axleboxes fell off it was discovered that three of four brass bearings were missing.
The steel wheels and axles are OK!


This is how the underside of the floor had been painted...

So reconstruction has begun and the four sides and base are currently setting using PVA and being held together with clamps. The paint has been sanded and all of the laser lines have been re-cut with a Stanley knife blade to remove the gunge. The window frames have been painted before setting back into the sides, when they too have been repainted.
The balcony railings are missing so I need to make new ones.
As work progresses I will show more...