
That does look good!
Rik
Stuart's occasional loco thread - Boot Lane Works 'Lilibet'

-
Old Man Aaron

- Trainee Driver

- Posts: 807
- Joined: Wed Oct 19, 2016 11:08 am
- Location: Sunshine Coast QLD, Australia
Re: Stuart's occasional loco thread - Brush Battery Electric Loco
Seen a few of these in the 16mm farcebook group, yours is the best I think.
Regards,
Aaron - Scum Class Works
Aaron - Scum Class Works

Re: Stuart's occasional loco thread - Brush Battery Electric Loco
Thanks all. After fafing about with the DeWinton for so long I just wanted to build this one as intended and get it done!
Re: Stuart's occasional loco thread - Boot Lane Works 'Lilibet'
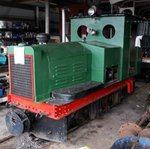
Modelling mojo has been distinctly lacking recently so I haven't done much more to the tramcar. In an effort to kick start things I have broken my rule (finish something before you start something else) and made a start on the first loco in the kit pile - a Boot Lane Works 'Lilibet' https://bootlane.org.uk/shop/kits/locos/lilibet. I have been building lots of Victorian stock and really need a Victorian steam loco to pull them! The kit is described a generic Victorian steam loco, but to my eye it is closest to the Saundersfoot Railway Manning Wardle 'Rosalind' so I am intending to make a few tweaks to make it look more like the early Manning Wardle locos beloved of the Colonel Stephens empire and other British light railways.
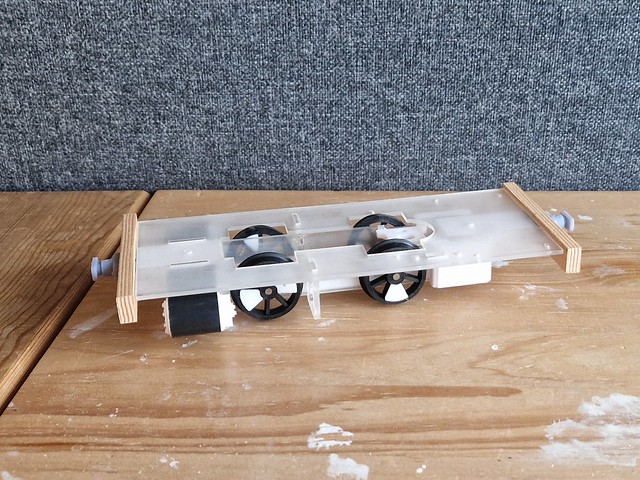
So far I have built the basic frame unit. After spending far too much time sanding the 3D printed parts of the De Winton I have wrapped the cylinders in thin styrene and will do the same with the major body parts:

Boot Lane Works Lilibet by Stuart, on Flickr
I have discarded the supplied plate buffer beams in favour of the wooden buffer beams that these locos used to hide behind. I had a cunning plan to have swappable buffer beams for centre or side buffers using neodymium magnets set into the frame stretchers; unfortunately this has not been successful for a few reasons.
Boot Lane Works Lilibet by Stuart, on Flickr
So far I have built the basic frame unit. After spending far too much time sanding the 3D printed parts of the De Winton I have wrapped the cylinders in thin styrene and will do the same with the major body parts:
Boot Lane Works Lilibet by Stuart, on Flickr
I have discarded the supplied plate buffer beams in favour of the wooden buffer beams that these locos used to hide behind. I had a cunning plan to have swappable buffer beams for centre or side buffers using neodymium magnets set into the frame stretchers; unfortunately this has not been successful for a few reasons.
Boot Lane Works Lilibet by Stuart, on Flickr
Last edited by StuartJ on Tue Jan 16, 2024 9:24 am, edited 1 time in total.

-
Peter Butler

- Driver

- Posts: 5233
- Joined: Sun Sep 09, 2012 10:33 pm
- Location: West Wales
Re: Stuart's occasional loco thread - Boot Lane Works 'Lilibet'
Following this with interest.... I have a couple of Boot Lane locos and experienced the same issues with surface preparation. However, they do make up into very nice models. Lining problem surfaces with styrene is the best solution (where possible) and gives a much better finish with far less trouble.
I live in West Wales, not far from Saundersfoot. I know the railway tunnels well and it is no wonder the 4ft gauge locos (Rosalind and Bull Dog) were so low as there is barely enough headroom to walk through them. I'm sure the walkway surface has been raised slightly, but it must have been hazardous for the drivers of the time.
I live in West Wales, not far from Saundersfoot. I know the railway tunnels well and it is no wonder the 4ft gauge locos (Rosalind and Bull Dog) were so low as there is barely enough headroom to walk through them. I'm sure the walkway surface has been raised slightly, but it must have been hazardous for the drivers of the time.
The best things in life are free.... so why am I doing this?
Re: Stuart's occasional loco thread - Boot Lane Works 'Lilibet'
For anyone building the Saundersfoot loco's this site is a mine (!) of detail about the line, not to mention pictures of the loco's,and the town with now-and-then photo's and maps.Peter Butler wrote: ↑Tue Jan 09, 2024 3:18 pm
I live in West Wales, not far from Saundersfoot. I know the railway tunnels well and it is no wonder the 4ft gauge locos (Rosalind and Bull Dog) were so low as there is barely enough headroom to walk through them. I'm sure the walkway surface has been raised slightly, but it must have been hazardous for the drivers of the time.
https://rogerfarnworth.com/tag/saundersfoot-railway/
We spent a very pleasant day walking through the tunnels and back, last summer.
Philip
Re: Stuart's occasional loco thread - Boot Lane Works 'Lilibet'
Slowly slowly catchy monkey ......
Not sure where that saying comes from but thought it apt.
Love to see a loco build no matter how long it takes. How's the de Winston doing BTW?
Rik
Not sure where that saying comes from but thought it apt.
Love to see a loco build no matter how long it takes. How's the de Winston doing BTW?
Rik
Re: Stuart's occasional loco thread - Boot Lane Works 'Lilibet'
I went there shortly after I came back from Australia in 2016. It makes a very pleasant walk:philipy wrote: ↑Tue Jan 09, 2024 5:48 pmFor anyone building the Saundersfoot loco's this site is a mine (!) of detail about the line, not to mention pictures of the loco's,and the town with now-and-then photo's and maps.Peter Butler wrote: ↑Tue Jan 09, 2024 3:18 pm
I live in West Wales, not far from Saundersfoot. I know the railway tunnels well and it is no wonder the 4ft gauge locos (Rosalind and Bull Dog) were so low as there is barely enough headroom to walk through them. I'm sure the walkway surface has been raised slightly, but it must have been hazardous for the drivers of the time.
https://rogerfarnworth.com/tag/saundersfoot-railway/
We spent a very pleasant day walking through the tunnels and back, last summer.

Saundersfoot Railway by Stuart, on Flickr

Saundersfoot Railway by Stuart, on Flickr

Saundersfoot Railway by Stuart, on Flickr
Re: Stuart's occasional loco thread - Boot Lane Works 'Lilibet'
Not good unfortunately. I was very disappinted with the engineering side of it, mainly the gearbox which I found impossible to assemble without either glueing it all solid or having the bearings come loose and letting the gears out of mesh. In fact, when I finally finished it and tried to run it, the gears chewed up and it was reduced to a shelf queen. Not happy! I have a replacement Dean Models gearbox to install instead but that will require dismantling and also enlarging the bearings/flycranks etc. for a larger driving axle (1/8" vs. 3mm). I might have a go at it after this loco.
Re: Stuart's occasional loco thread - Boot Lane Works 'Lilibet'
That's bad news. I know a couple of people who have constructed the Slaters de Winton and have been very pleased, though they are also quite tricky to build.StuartJ wrote: ↑Wed Jan 10, 2024 9:30 amNot good unfortunately. I was very disappinted with the engineering side of it, mainly the gearbox which I found impossible to assemble without either glueing it all solid or having the bearings come loose and letting the gears out of mesh. In fact, when I finally finished it and tried to run it, the gears chewed up and it was reduced to a shelf queen. Not happy! I have a replacement Dean Models gearbox to install instead but that will require dismantling and also enlarging the bearings/flycranks etc. for a larger driving axle (1/8" vs. 3mm). I might have a go at it after this loco.
Rik
-
-steves-

- Administrator

- Posts: 2421
- Joined: Thu Jul 28, 2011 1:50 pm
- Location: Cambridge & Peterborough
Re: Stuart's occasional loco thread - Boot Lane Works 'Lilibet'
Do you have any close up shots of the gearbox etc. I have a number of self made 3D printed gearboxes that might fit your needs. I did one gearbox for a friend so they could use metal gears in their loco, which is wasn't designed for and even made them bushes to change the gears from 1/8th to 3mm to fit his axle.StuartJ wrote: ↑Wed Jan 10, 2024 9:30 amNot good unfortunately. I was very disappinted with the engineering side of it, mainly the gearbox which I found impossible to assemble without either glueing it all solid or having the bearings come loose and letting the gears out of mesh. In fact, when I finally finished it and tried to run it, the gears chewed up and it was reduced to a shelf queen. Not happy! I have a replacement Dean Models gearbox to install instead but that will require dismantling and also enlarging the bearings/flycranks etc. for a larger driving axle (1/8" vs. 3mm). I might have a go at it after this loco.
The buck stops here .......
Ditton Meadow Light Railway (DMLR)
Member of Peterborough and District Association
http://peterborough.16mm.org.uk/
Ditton Meadow Light Railway (DMLR)
Member of Peterborough and District Association
http://peterborough.16mm.org.uk/
Re: Stuart's occasional loco thread - Boot Lane Works 'Lilibet'
Hi Steve-steves- wrote: ↑Wed Jan 10, 2024 10:20 am Do you have any close up shots of the gearbox etc. I have a number of self made 3D printed gearboxes that might fit your needs. I did one gearbox for a friend so they could use metal gears in their loco, which is wasn't designed for and even made them bushes to change the gears from 1/8th to 3mm to fit his axle.
See the first photo in this thread for the original gearbox (minus the bearings). I have a replacement from Dean Goods https://deangoods.co.uk/16lococha.html with nice metal gears and some 1/8" axles and bearings for the frames. The wheels should press onto the new axle, so I *think* that it should be a case of gently filing out the frames to take the new bearings, and also gently filing the out the flycranks to match. The difference is so small (3mm vs. 3.175mm) I should be able to do it without altering any of the geometry.
The hardest part is summoning up the gumption to pull the loco apart!
-
-steves-
- Administrator
- Posts: 2421
- Joined: Thu Jul 28, 2011 1:50 pm
- Location: Cambridge & Peterborough
Re: Stuart's occasional loco thread - Boot Lane Works 'Lilibet'
Firstly, I love those photos, how on earth did you get the new so close to the original shot?StuartJ wrote: ↑Wed Jan 10, 2024 2:17 pmHi Steve-steves- wrote: ↑Wed Jan 10, 2024 10:20 am Do you have any close up shots of the gearbox etc. I have a number of self made 3D printed gearboxes that might fit your needs. I did one gearbox for a friend so they could use metal gears in their loco, which is wasn't designed for and even made them bushes to change the gears from 1/8th to 3mm to fit his axle.
See the first photo in this thread for the original gearbox (minus the bearings). I have a replacement from Dean Goods https://deangoods.co.uk/16lococha.html with nice metal gears and some 1/8" axles and bearings for the frames. The wheels should press onto the new axle, so I *think* that it should be a case of gently filing out the frames to take the new bearings, and also gently filing the out the flycranks to match. The difference is so small (3mm vs. 3.175mm) I should be able to do it without altering any of the geometry.
The hardest part is summoning up the gumption to pull the loco apart!
Secondly, having been working with gearboxes a number of times, I would suggest the use and a hand drill of 1/8th and just let it go through once rather than a file. A file can and will make for wobbly wheels and cranks. Same with the bearing holes, find the correct size you need and hand drill them out, I think some people call them a pin vice drill. Do not use an electric drill, it will melt it and bad things happen. All I did for the gear to fit the 3mm axle, was to get a small section of round brass, drill a 3mm hole in it on the lathe and then turn it down until it fitted inside the gear. I think drilled a small hole for the grub screw to go through to ensure it all locked into position. If you don't have access to a lathe, then obviously it makes it far more difficult.
You can see the bushes in this picture, one is in the gear the other is laying next to it, this is the gearbox I made to go with it. It doesn't show the axle bushes as they are just 3mm brass rod cut to size. If I had known, I could have made these for you too and posted them off, it would have saved a fair bit of fettling. Never mind, you seem to have it all in hand now
I didn't make the gears BTW, they are from Roxey I believe.
- IMG20240110153236.jpg (90.29 KiB) Viewed 1032 times
The buck stops here .......
Ditton Meadow Light Railway (DMLR)
Member of Peterborough and District Association
http://peterborough.16mm.org.uk/
Ditton Meadow Light Railway (DMLR)
Member of Peterborough and District Association
http://peterborough.16mm.org.uk/
-
Old Man Aaron
- Trainee Driver
- Posts: 807
- Joined: Wed Oct 19, 2016 11:08 am
- Location: Sunshine Coast QLD, Australia
Re: Stuart's occasional loco thread - Boot Lane Works 'Lilibet'
I'll second the suggestion of the pin vice. I love mine.
Looking forward to seeing the new loco come together, always nice to see a new build.
Looking forward to seeing the new loco come together, always nice to see a new build.
Regards,
Aaron - Scum Class Works
Aaron - Scum Class Works
Re: Stuart's occasional loco thread - Boot Lane Works 'Lilibet'
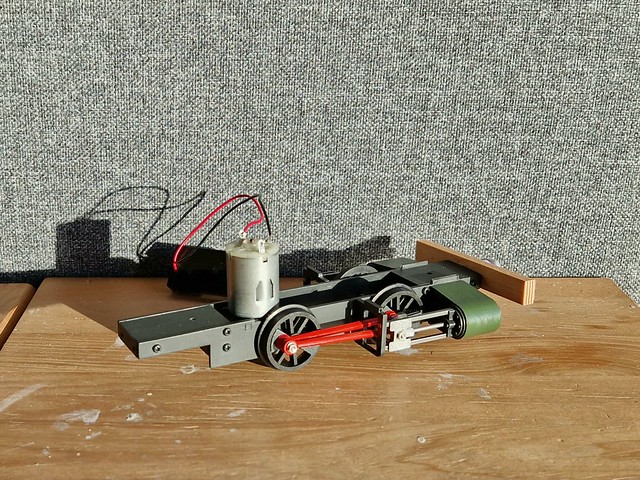
One completed and working chassis. A very well thought out design but very fiddly - how people make valve gear in 009 is beyond me! I changed the recommended build order so that I could paint as I went along and got in a right mess trying to put the crankpins afterwards. The holes in the printed inserts are too small and cause the crankpin screws to chew up when you try and screw them in. When I build the next one of these (Corris No.4) I will know that the holes need to be enlarged first!
I have also managed to solve the magnetic bufferbeam problem; I noticed that tools on the workbench stuck to the magnets much better than the nut and bolt holding the buffers on, and deduced that there must be a high chrome content in them or they are stainless. Swapping them for some ordinary zinc plated countersunk screws gives a much stronger joint.

Boot Lane Works Lilibet by Stuart, on Flickr
Boot Lane Works Lilibet by Stuart, on Flickr
I have also managed to solve the magnetic bufferbeam problem; I noticed that tools on the workbench stuck to the magnets much better than the nut and bolt holding the buffers on, and deduced that there must be a high chrome content in them or they are stainless. Swapping them for some ordinary zinc plated countersunk screws gives a much stronger joint.
Boot Lane Works Lilibet by Stuart, on Flickr
Boot Lane Works Lilibet by Stuart, on Flickr
Re: Stuart's occasional loco thread - Boot Lane Works 'Lilibet'
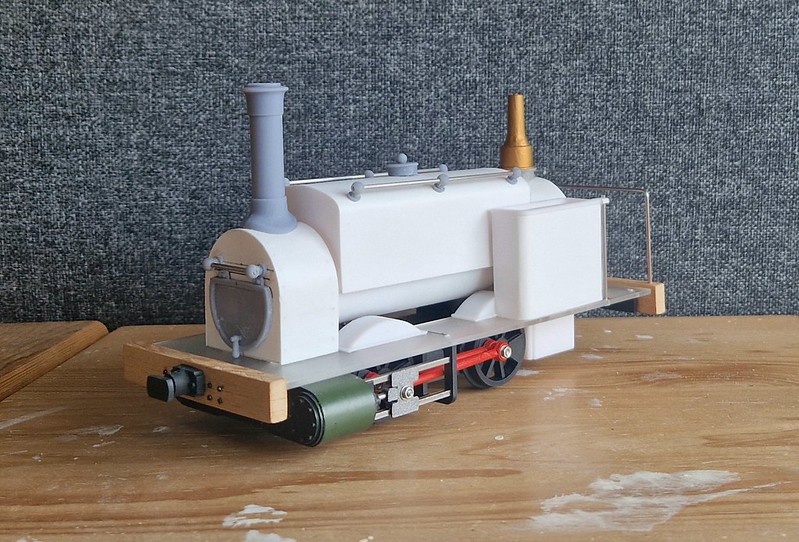
Time and mojo have been lacking recently but I have been working on the body as and when. I've had an unexpected weekend at home so I have been able to complete the main construction, and the loco is now ready for painting:
Boot Lane Works 'Lilibet' by Stuart, on Flickr

Boot Lane Works 'Lilibet' by Stuart, on Flickr
Boot Lane Works 'Lilibet' by Stuart, on Flickr
Boot Lane Works 'Lilibet' by Stuart, on Flickr
Re: Stuart's occasional loco thread - Boot Lane Works 'Lilibet'
Thats looking good, Don't forget to show us the result of painting her.
Philip
Re: Stuart's occasional loco thread - Boot Lane Works 'Lilibet'
Thansk Phil. It will be plain green as per the cylinders, although it is very tempting to paint it black and put CAMBRIAN on the tank sides!
Who is online
Users browsing this forum: No registered users and 4 guests