Something for myself - A Gwalior Light Railway 4-6-0

Discussion of Live Steam locomotives should be located here
workwright
Cleaner
Cleaner
Posts: 33
Joined: Sun Apr 05, 2015 1:30 pm
Contact:

Something for myself - A Gwalior Light Railway 4-6-0

Post by workwright » Sun Jan 01, 2017 8:28 pm

I have had a month or so in the workshop to pursue my own interests. Returning north, recently, we stopped to visit an old friend. He very sensibly has decided to thin out his large collection of 16mm scale steam engines.
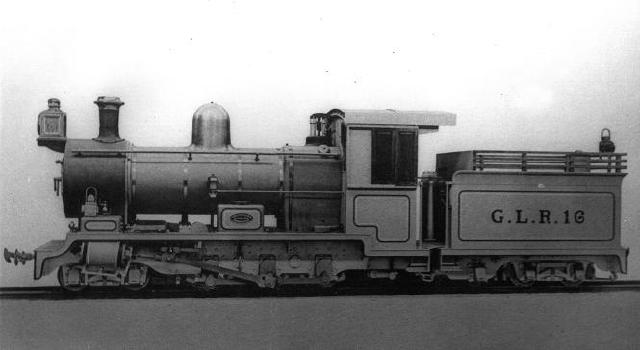
There is one in particular that he has owned for many years that had long taken my fancy. This 4-6-0 tender locomotive was constructed in 1909 by Kerr, Stuart in Stoke-on-Trent for the Gwalior Light Railway - no 16. Maharaja Madhav Roa II decided that the development of his province was hindered by the lack of good transport. Being an Anglophile he had followed with interest the development of the rail system in India and so naturally he chose British engineers and the Kerr, Stuart Co in particular to supply him with a system. At its peak, the system had well over 300 km track. To make construction cheap and speedy, it followed the trend of the 1890s for such railways to be built to narrow gauge. The gauge chosen was 2' but the length of the railway demanded large tender locomotives. The construction, therefore of the line plus all the rolling stock must have been an interesting challenge for the Kerr, Stuart designers. Their solution, in GLR no 16, is a very elegant and purposeful-looking engine.
[/img]
Image
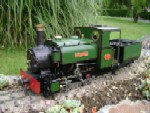
The model of the locomotive was built by Cyril Clarke and Peter Brookbank, in the late 1980s. They always built two locomotives at a time, (one each) and sometimes three. They were unusual models for the time, being good scale models with quite a high level of detail. Some years ago, Mr Clarke decided to give up his garden railway and sell his models off. My friend purchased no 16.
The model is largely as built. Both my friend and I suspect that at some point it had full working valve gear and an axle-driven water pump. Some day I might replace these but it works well, has a very large gas tank under the cab floor and the boiler is refillable using an Enots coupling. The tender is used to house R/C with one server on the locomotive operating the regulator. The large sandbox houses a very effective mechanical lubricator.
Image
Once the model was in the workshop, I decided to tidy it up a bit, repainting the cab roof which slides on and off and repairing some of the worst of the chips and scratches in the paintwork.
I decided next to build a train for it to pull and ordered kits for some Darjeeling 6-wheel passenger stock from IP Engineering. I have never built a laser-cut kit before. What a revelation! Everything fitted perfectly. With the aid of set-squares and heavy weights and a bottle of super-glue, they went together really well.
Image
I don't know whether these coaches actually existed on the DHR since there seems to be little if any photographic evidence, as IP admit in their excellent instructions. Certainly the DHR had Cleminson coaches for a very short time.
Image
Due to the designer's error, the prototype coaches spent most of the time derailed. Although the Cleminson system did steer the axles through a curve, because the centre axle could not move from side to side, and 's' shaped bend of sharp radius, all too common on the DHR, would cause one end of the coach to be turning the centre axle left while the axle at the far end of the coach would try to turn it right. The models do not suffer from this defect since the centre axle has the necessary side-to-side movement.
In my opinion, the only problem in building these laser cut kits is to achieve a high quality surface finish on the plywood from which they are cut.
[/img]
Image
I read what is available on the web about how to do this but in the end, went my own way. I gave the sheets of ply several coats of grey Halfords primer, rubbing down between coats with a proper sanding block. After three coats, and rubbing down with increasingly fine grit, the ply sheets looked quite good. The inside of the coach was going to be varnished wood. This has all been stained and Halfords clear lacquer was used to seal the grain and allow the wood surface to be brought to a high finish. The parts were then taken from the sheets and assembled. The detail overlay parts were left on the sheet until they had been completely finished. The last was to glaze the coaches.
Image
It is so much simpler with these kits since the glazing accurately fits into the window apertures and is retained with canopy glue, piped into the aperture using a syringe with a fine needle. The roofs, made from ply rather than the material supplied, were applied to the bodies using rapid epoxy and an IP-supplied roof-fitting jig. To finish the coaches, I made a simple bending jig and set up the lathe to produce (96!) small thick rounded edge washers. Using another jig, these were assembled on to the hand-rails to give reasonably detailed grab-rails and door pulls. (The doors in these coaches probably slid to save space in the small compartments.) I also fitted contiunuous foot-steps to the coaches since they seemed a bit odd without. Waste laser-cut from the windows provided a simple representation of the under-step supports.
[/img]
Image
Encouraged by the coaches, a van kit was built. On this, the engraved padlock and hasp were replaced by working metal details. (IP say that their 6-wheel stock works best if the end vehicle is pulling a four-wheel wagon.)
Back to the engine. Encouraged by the look of the train, I decided over Christmas to give the locomotive a voice! Accordingly, on day one, a whistle was produced which provided some interesting machining challenges, but, produced a nice clear very shrill note on compressed air. Then, after some thought, a lever-operated whistle valve was made. Finally, there had to be a dummy whistle that would release a plume of steam when the real below-the-footplate whistle squealed.
Image
The whole shebang had to be worked by a new micro-servo. It all looked so simple on paper! In fact it took five days and about 30 hours to make and fit. If anybody wants to follow suit, I have since discovered that for the very reasonable sum of £90, DJB Engineering produces all the bits ready to mount on your loco. (A nice chime-whistle on its own - without control valves and piping - 70mm long and 17mm in diameter with ME pipe fittings can be purchased from ebay for £21, delivered.) So, when this arrives, if it is any good, I'll fit that to another one of my engines.[/img]
Workwright

User avatar
LNR
Driver
Driver
Posts: 1542
Joined: Sat Feb 27, 2016 5:26 am
Location: Australia

Post by LNR » Sun Jan 01, 2017 10:41 pm

Very nice looking loco, I'm always tempted by "colonial" narrow gauge tender locos with outside frames. Beautiful work on the coaches too, in all a very attractive train.
Grant.

User avatar
Keith S
Driver
Driver
Posts: 1626
Joined: Thu Feb 24, 2011 11:44 pm
Location: Canada

Post by Keith S » Mon Jan 02, 2017 12:33 am

I'm confused about the part where you said "at one point it had full working valve-gear". What does it have now? How does it run without working valve-gear?

User avatar
GTB
Driver
Driver
Posts: 1559
Joined: Sat Mar 05, 2011 2:46 pm
Location: Australia

Post by GTB » Mon Jan 02, 2017 5:05 am

Keith S:121952 wrote:I'm confused about the part where you said "at one point it had full working valve-gear".
Full working valve gear in the hobby usually means that the valve gear works like the full size version and can be linked up. Presumably this model now has slip eccentrics, but there are mounting holes, etc. suggesting that it was once fitted with inside Stephensons gear.

Most modellers don't regard slip eccentric gear as fully working as it can't be reversed from the cab and the cut-off is fixed. Some of the more pedantic don't regard single eccentric gear like Accucraft and Roundhouse as full valve gear either, as they don't have variable-cut off.

Like Grant I have a soft spot for colonial loco design and this little loco would be a nice thing to own.

Regards,
Graeme

User avatar
Keith S
Driver
Driver
Posts: 1626
Joined: Thu Feb 24, 2011 11:44 pm
Location: Canada

Post by Keith S » Mon Jan 02, 2017 9:36 am

It is an attractive engine.

User avatar
TonyW
Driver
Driver
Posts: 1357
Joined: Fri May 16, 2008 9:25 am
Location: North Wales
Contact:

Post by TonyW » Mon Jan 02, 2017 10:27 am

It is always nice to see a six-coupled that does not drive on to the back axle ... lovely!
Tony Willmore
Rhos Helyg Locomotive Works: http://www.rhoshelyg.me.uk
Facebook: https://www.facebook.com/RhosHelygLocoWorks

invicta280
Trainee Driver
Trainee Driver
Posts: 664
Joined: Wed Sep 21, 2011 9:24 pm
Location: kent england

Post by invicta280 » Mon Jan 02, 2017 10:51 am

What a handsome machine. Nice coaches too. Like the varnished interiors.

User avatar
Killian Keane
Trainee Fireman
Trainee Fireman
Posts: 194
Joined: Wed Nov 16, 2016 9:17 pm

Post by Killian Keane » Tue Jan 03, 2017 1:10 pm

What elegant lines the loco has! Note the peculiar arrangement of axleboxes on the tender, a single axle and then the other two paired, it looks to be articulated somehow (?), is this replicated on the model?
Blokes with tea can build anything

workwright
Cleaner
Cleaner
Posts: 33
Joined: Sun Apr 05, 2015 1:30 pm
Contact:

Post by workwright » Tue Jan 03, 2017 10:20 pm

Hi, thank you all above for the interest shown in my post.  The guy who made the point about my use of the term "full working valve gear" Was correctly answered in the following post. I should have explained too that the model currently has slip eccentric valve gear which of cause cannot be notched up.  This prevents the steam being used economically  ie. by changing the length of time during the piston stroke that steam is admitted to the cylinder.  This is not a problem of any account in our small scale models. The one real disadvantage of slip eccentric gear is that there is no easy way to reverse slip eccentric gear without physically moving the loco one wheel rotation in the direction you want to go.  My friend who I obtained the loco from thinks it was fitted with Joy valve gear.  If I ever have the time I would fit Joy gear since it would leave more space to arrange the transfer of the valve drive to the outside valve chests, and given the efficiency of the  single flue cross tube boiler an axle driven water pump which was fitted in the past. (the eccentric is still there)
I will post a few more photos of the engine when I have fitted a cowcatcher to it.   I would love to find out more about Mr Clarke and Mr Brookbank. In the 1980s I did meet them at a garden meet. They had just finished a pair of Russels which were equally nice and  powerful slow runners.
Yes the tender is correctly articulated.  I suppose the tender is a 0-2-4! The loco itself is fully sprung and the bogies are equalised. Thanks for all your interest.  Regards.
Workwright

User avatar
Killian Keane
Trainee Fireman
Trainee Fireman
Posts: 194
Joined: Wed Nov 16, 2016 9:17 pm

Post by Killian Keane » Tue Jan 03, 2017 10:53 pm

Will be interesting to see her with full valve gear, one very rarely sees joy gear on an outside cylindered loco, almost exclusively on the lynton and barnstaple manning wardles (its my favourite valve gear! :lol:  8) ) would that not require a bearing or hole for the jack link partway along the connecting rods? Does that mean the con rods are not the originals?
Blokes with tea can build anything

workwright
Cleaner
Cleaner
Posts: 33
Joined: Sun Apr 05, 2015 1:30 pm
Contact:

Post by workwright » Fri Jan 06, 2017 5:47 pm

Hi, I said in my first post that I thought GLR No 16 would look better with a cowcatcher and I found evidence that within a few years of arriving at Gwalior the loco had one fitted.
Image[/img]
Being short of time I found that there are a couple of ready made cowcathers available.  The one similar to the photo is produced  by GRS for a L and B locomotive. It had the advantage of being a lost wax casting with a buffer beam.  The last cowcatcher I made was for the loco below.  It took a lot of time and proved difficult to make.
Image
The photo is of a Falcon loco that ran on the Beira Railway.  I made this model about 30 years ago. It has full Stephenson Valve gear and is coal or gas fired. It is also in the workshop.  In the next post I will write about the problem and the cure.
Image[/img]
The new cowcatcher  for the GLR loco is quite a reasonable match for the Falcon loco. The original beam is in front of the model. The only work was the depth of the cast buffer beam had to be reduced to give the bottom of the cowcatcher some clearance above the railhead.  I also thought that the air brake pipe looked a bit  too small so replaced it with a casting I had made myself when I built a batch of Ashover Baldwins.
Image[/img]
The close up  shows how nicely detailed the GRS casting is. I think it was very good value too.  The last photo below finishes with GLR No 16.  It shows the repainted cab interior and the newly fitted whistle valve and servo.

Image[/img]
I will have to spray the new servo cable black - there is always something else to do.
Last edited by workwright on Sat Jan 07, 2017 11:39 am, edited 1 time in total.
Workwright

User avatar
LNR
Driver
Driver
Posts: 1542
Joined: Sat Feb 27, 2016 5:26 am
Location: Australia

Post by LNR » Fri Jan 06, 2017 10:31 pm

I think cowcatchers emphasise the "Colonial" look of an engine and that it's narrow gauge. Wonderful pics. some very handsome engines there.
Grant.
PS does the throttle in the last pic. have a stop collar on it, and that gauge glass set-up looks interesting.

workwright
Cleaner
Cleaner
Posts: 33
Joined: Sun Apr 05, 2015 1:30 pm
Contact:

Post by workwright » Sat Jan 07, 2017 11:27 am

Hi, Thanks for your comment Grant. No, the two part boss is simply a sort  of simple clutch. The tab turns. In the slot , as shown, the RC servo is engaged. Out , the loco is manual.  So neat and elegant I would never have thought that one  up!
The GLR Loco gauge glass is in the same vein, simple to make and elegant plus it is one of the few glasses that works well on my engines. Clarke and Brookbank made not only an attractive model but one that functions reliably.
Repairing the glass on the Indian Red loco in the post was one of the reasons that was back on the workbench - that glass  is typical, works some of the time but not so well when the blower is on and you need it to work.
Workwright

workwright
Cleaner
Cleaner
Posts: 33
Joined: Sun Apr 05, 2015 1:30 pm
Contact:

Post by workwright » Sun Jan 29, 2017 5:37 pm

Hi, finally a bit of time to write about troubles with the Beira loco. The prototype was built by Falcon (later Brush) for the Beira Railway , a 2 foot gauge line that  went nearly 300 miles from the port of Beira in Mozambique to Umtali in Rhodesia. It only lasted a few years before being re-built in Cape Gauge (3 foot 6 inches) The stock had a long life in South Africa (one of the later 4-4-0s is running at Sandstone Estates today)
                                  Image
I built this loco at the start of the 1980s and it gave good service until the Lego pipes that joined the tender to the loco gave out. There are 3 flexible pipes. One is under pressure from the tender hand pump feed. The other pipes are from the crosshead feed and the pump's bypass return. The gas spply is 1/16" copper. So for the last 10 years different tubes have been used with little success until I tried  thick walled silicon tubing with the correct spring clamps that  guys use for fuel pipe in RC model aircraft etc.  This has proved to last at least a few runs.  However I now have a new problem and rather a worrying one. I cannot get water into the boiler when the boiler is at pressure. Also the water gauge had stopped working unless the loco was cold!
So first the water supply.  There is a vertical tender pump, cunningly disguised as the tender filler lid. The pump clacks were leaking. So that was stripped down and the balls replaced with nitrile ones. Whilst at the job the cab was stripped out and the SS ball in the feed clack on the boiler backhead was replaced with nitrile too.  At least I could now run the loco without the boiler emptying itself into the tender.  
At this point it became clear that the cross head pump was no longer pumping water. The idiot who built the loco (me) clearly had no thought about maintaining the cross head pump.  Access was appalling and the swearbox was splitting by the time the problem was reached.  Both the ball seats in the pump were covered with a white  deposit so they were cleaned and not wishing to have to have another go these balls too were replaced with nitrile.
                                     Image
The pump was tested  and it worked well.
Before the loco was rejoined to its tender the water gauge was tackled.  This design of gauge is rather too clever to work well in such a small scale but at least it is easy to service.  The fault was the lower pipe joining the gauge to the water column had furred up so a bit of fiddling with a piece of piano wire unblocked the pipe. I then painted the water cavity with Hammerite white paint for white goods. It has proved to be fit for purpose rock hard and not effected by boiling water. The gauge was put back together and I left the boiler full of vinegar to get rid of 40 years of sludge.

                                    Image
Was the work worth doing?  Yes, there is no point in having a pretty loco that cannot cut the mustard is there? The only problem now is to find the time to re-built the railway in the garden to give these locos some running rather than the occasional rolling road


[/img]
Last edited by workwright on Sun Jan 29, 2017 10:32 pm, edited 1 time in total.
Workwright

User avatar
Killian Keane
Trainee Fireman
Trainee Fireman
Posts: 194
Joined: Wed Nov 16, 2016 9:17 pm

Post by Killian Keane » Sun Jan 29, 2017 7:27 pm

:shock: that is just gorgeous!  :D well worth the fettling and tinkering to get such a joy working! Would be great to see these run under their own steam, I do beleive Tom Cooper of merlin models had planned a very attractive colonial 4-4-0 very like that one which evidently never reached production, lamentably. You can see it in the advert on the second page of this thread http://modelsteam.myfreeforum.org/ftopi ... 0-asc-.php
Blokes with tea can build anything

User avatar
LNR
Driver
Driver
Posts: 1542
Joined: Sat Feb 27, 2016 5:26 am
Location: Australia

Post by LNR » Sun Jan 29, 2017 10:50 pm

I do hope you find the time to re-build your garden railway, that wonderful loco truly deserves a railway to run on. I have always liked the Falcon 4-4-0's, and if I build a tender loco it would probably be one of those, although I had trouble with a four wheel truck with outside frames on my last loco.
Grant.

workwright
Cleaner
Cleaner
Posts: 33
Joined: Sun Apr 05, 2015 1:30 pm
Contact:

Post by workwright » Sun Jan 29, 2017 10:55 pm

Killian hi, There is a link between Merlin and my loco.  He published in an early "Merlin Messanger" a reasonable drawing of the loco I built.  In fact it was one of the reasons I got into 16mm. You know how it is, the look of an engine just gets to you - daft is'nt it? But a harmless passion I think.
When I built the loco I changed the chimney from the spark arrestor it really had to that of a sister loco built for a 2' 6" gauge line in India.  This 4-4-0 loco had the chimney with the two Roscoe luricators on the bracket.  
The loco in the advert is the first loco supplied to the Gwalior Light Railway  by Kerr Stuart.  It was the Maharajah of Sindh's personal loco.  It still exists outside the palace in Gwalior (google images- search - Gwalior Light Raiway)
You will see why I wanted the 4-6-0 above.  The tenders have the same strange articulation. I look forward to seeing them pull a decent train together. I wonder if it will be possible to find  some nice figures to populate the coach and van roofs!
LNR hi, the front bogie is fully equalised ie the beams work and there is spring controlled side swing(this got it round 6' 6" radius. A pal suggested moving the pivot point back from the bogie centre (5mm) and I did this on a double link so it looks in the right position. It can get round 5' 6" after the mod. The main problem was balancing the springs to get loco level and powerful.  I wish in retrospect I had built the coupled wheels compensated.  We learn by our efforts.
Workwright

User avatar
Killian Keane
Trainee Fireman
Trainee Fireman
Posts: 194
Joined: Wed Nov 16, 2016 9:17 pm

Post by Killian Keane » Sun Jan 29, 2017 11:33 pm

Interesting to hear the connection to merlin, it is a very pretty little loco, pity they never got into full scale production, wouldn't mind one myself! :love10: glad to hear the real one is still with us, hopefully there is some possibility of a restoration in future years
Blokes with tea can build anything

User avatar
LNR
Driver
Driver
Posts: 1542
Joined: Sat Feb 27, 2016 5:26 am
Location: Australia

Post by LNR » Sun Jan 29, 2017 11:35 pm

Would I be guessing that you are running on 32mm gauge, as I use 45mm gauge, I found clearance to be a problem between cylinders and axle boxes. I have 7ft 6" radius on my line, but points are sharper.
Grant.

workwright
Cleaner
Cleaner
Posts: 33
Joined: Sun Apr 05, 2015 1:30 pm
Contact:

Post by workwright » Mon Jan 30, 2017 10:56 am

Hi Grant, yes you are correct the Burnside railway was/is 32mm gauge
Image
The Beira 4-4-0 in better times when the line was in good condition. The mistake I made was to lay the track on parallel pressure treated wood battens. These were nailed to deep driven posts. The whole lot has rotten after 15 years so now the track is all over the place.
Workwright

Post Reply

Who is online

Users browsing this forum: No registered users and 4 guests