Building Ginnerbeck viaduct for the Rylston Light Final Part.
The last instalment opened with the reveal of whether the newly assembled viaduct would fall apart on its first lift. Spoiler: It didn’t.
This instalment opens with whether I survived after the debacle of the expanding foam in the dining room. Spoiler: I did

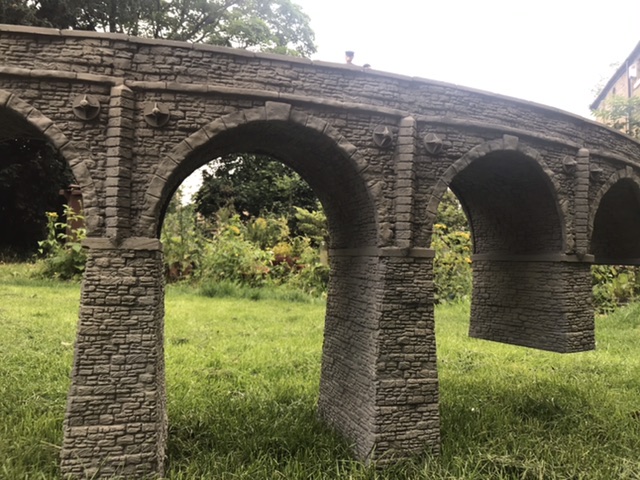
At this stage the major part of the build was complete. The final result of the expanding foam was disappointing in terms noise abatement but there was a separate benefit of doing it. The overall rigidity of the piers was improved and I would do this again.
The joins between the arch-side panels were adequately hidden by the triangular block strips, but that portion of the wall above track level was still visible as a plain butt joint with non-continuous stone courses. These needed to be blended in with forming stone courses across the joints using U-pol filler. The following (poor) photo shows the effect achieved.

- D804E591-5F0C-4B79-B75F-72EA00BA70F1.jpeg (114.87 KiB) Viewed 7872 times
I felt that the triangular strips were a little too visually prominent. I had an old Siligum mould for a tie-rod anchor-plate that I had made for the buttresses of Lygibeck viaduct some time ago. I cast 16 anchor plates figuring that they would shrink the impact of the triangular strips.

- 9780C140-FC4A-4710-A3FB-2F7484372CF1.jpeg (100.91 KiB) Viewed 7872 times
These were fitted to each side panel with dollops of U-pol. I filled any remaining gaps with U-pol.
Side note: over half a 3L tin of U-pol was used just in assembling and filling the viaduct.
Still another hour before the local forecast predicted rain, so into the garden for some undercoat. I’m always amazed how a unifying coat of one colour dramatically pulls a project together on a new level. It took 3 large rattle cans of plastic primer, and then a light spritz with the very little flat khaki I had in stock before the final photos for this opus.

- BBD00B2F-5905-4422-8ED2-3D15EA780177.jpeg (177.02 KiB) Viewed 7872 times

- A4BC38A5-0D4C-45D1-A72F-36CEDB542BBA.jpeg (173.27 KiB) Viewed 7872 times
- 4A9D317B-E330-4166-B4B9-08A630AEA1C8.jpeg (142.87 KiB) Viewed 7872 times

- F93762B6-F462-45D5-BFE0-72ADF9071B6D.jpeg (147.14 KiB) Viewed 7872 times

- 62F65081-0D14-4127-B2A7-C85128F9636F.jpeg (183.24 KiB) Viewed 7872 times

- 594E4FA5-C599-4939-8D15-342EEC6F57D2.jpeg (154.96 KiB) Viewed 7872 times

- 8F42475E-E70B-4627-8CA5-338941B3EAD4.jpeg (193.46 KiB) Viewed 7872 times
Now if you have followed this somewhat detailed account to the end then I thank you. Obviously I need to paint the viaduct properly and weather it, then there is the no small matter of building the miniscape into which it sits. I will post a final picture when it is weathered but there will be some delay before I can finish the paint job . . .
I have to de-goop the dining room first.
Hope you all enjoyed the ride. Andy
Andy S. at the Rylston Light Railway