CDR Railcar No. 10

What is your latest project?
User avatar
ge_rik
Administrator
Administrator
Posts: 6575
Joined: Sun Oct 25, 2009 10:20 pm
Location: Cheshire
Contact:

Re: CDR Railcar No. 10

Post by ge_rik » Tue Mar 31, 2020 7:19 pm

OK - A bit more progress today on this build...

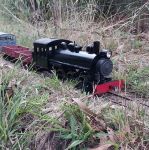
I had to modify the chassis to make it fit over the motor block. It was also a non obtrusive way for me to develop my brass soldering skills, which are still very rudimentary.
IMG_0155.JPG
IMG_0155.JPG (65.23 KiB) Viewed 5319 times
.
I took a while on the dry run of the cab body. I wanted to find a way of fitting three 18650 li-ion cells into it. Although there would be plenty of room in the passenger compartment, I felt the cab should be where the main electrics should be located. I could only fit two cells in the engine compartment but .....
IMG_0156.JPG
IMG_0156.JPG (72.4 KiB) Viewed 5319 times
.
..... after consulting plans and photos, I noticed there was an additional engine cover in the cab, which by happy coincidence was exactly the right size to accommodate the extra cell. A bit of hacking about was necessary but I can now squeeze three cells in.
IMG_0166.JPG
IMG_0166.JPG (87.62 KiB) Viewed 5319 times
.
I needed to make an engine cover which wasn't part of the original kit, but I have the satisfaction that it is prototypical.
IMG_0181.JPG
IMG_0181.JPG (80.14 KiB) Viewed 5319 times
.
It means I won't be able to model the railcar with the engine compartment open but I will need to construct another railcar to partner this one, so maybe that one will have an uncovered engine!.

It's beginning to take shape.
IMG_0178.JPG
IMG_0178.JPG (92.71 KiB) Viewed 5319 times
.
IMG_0179.JPG
IMG_0179.JPG (101.87 KiB) Viewed 5319 times
.
It's very much a steep learning curve for me. One thing I have discovered is that melted solder runs downhill ...... so propping the model up to get the next seam angled the right way makes life a lot easier. I've also learned that it would be a lot easier if I had another hand - and that wearing a glove on the left hand does make life easier when things get a bit hot!

Rik
------------------------
Peckforton Light Railway - Blog Facebook Youtube

User avatar
Peter Butler
Driver
Driver
Posts: 5244
Joined: Sun Sep 09, 2012 10:33 pm
Location: West Wales

Re: CDR Railcar No. 10

Post by Peter Butler » Tue Mar 31, 2020 7:40 pm

Great start Rik, well done. As you progress your skills will improve and you might go back to re-do something you are not quite sure about. One advantage of solder over adhesives is that it can easily be undone.
The best things in life are free.... so why am I doing this?

User avatar
LNR
Driver
Driver
Posts: 1542
Joined: Sat Feb 27, 2016 5:26 am
Location: Australia

Re: CDR Railcar No. 10

Post by LNR » Tue Mar 31, 2020 9:06 pm

Going well Rik, and another skill your learning due to garden railways.
Grant.

User avatar
Jimmyb
Fireman
Fireman
Posts: 492
Joined: Sat Nov 23, 2019 10:43 pm
Location: Weston-super-Mare

Re: CDR Railcar No. 10

Post by Jimmyb » Tue Mar 31, 2020 10:01 pm

Rik, I built a couple of 0 gauge models, and found using different temperature solders and a temperature controlled iron helps when adding parts to an assembly, i.e. the cooler solder and lower temperature does not melt the main assembly.

User avatar
Tropic Blunder
Trainee Fireman
Trainee Fireman
Posts: 189
Joined: Sun Dec 06, 2015 4:02 am
Location: Australia
Contact:

Re: CDR Railcar No. 10

Post by Tropic Blunder » Wed Apr 01, 2020 3:51 am

That came together quick! Looking Excellent Rick, there is something about the crispness of brass thats often impossible to obtain with other modelling materials.

You are of course right Graeme, I haven't got any contacts at Daylesford so I wont be making the trek up there just for that, ill put a 6L3 in it as I just found a few photos from last time we did work on the VA.

Seems the main difference between the L3 and LW is in the location of the fuel pump and the front timing case thats quite different. It also has a shaft running out of the front timing cover for the Dynamo which is mounted towards the back of the motor on the LH side.
Jake

Image

User avatar
ge_rik
Administrator
Administrator
Posts: 6575
Joined: Sun Oct 25, 2009 10:20 pm
Location: Cheshire
Contact:

Re: CDR Railcar No. 10

Post by ge_rik » Wed Apr 01, 2020 7:36 am

Jimmyb wrote: Tue Mar 31, 2020 10:01 pm Rik, I built a couple of 0 gauge models, and found using different temperature solders and a temperature controlled iron helps when adding parts to an assembly, i.e. the cooler solder and lower temperature does not melt the main assembly.
Thanks Jimmy
I've got a 100W iron but my temperature controlled iron is only 48W. Not sure if it will handle some of the bigger chunks of metal but maybe they will dissipate the heat quickly enough for it not to be a problem :?

Rik
------------------------
Peckforton Light Railway - Blog Facebook Youtube

User avatar
Jimmyb
Fireman
Fireman
Posts: 492
Joined: Sat Nov 23, 2019 10:43 pm
Location: Weston-super-Mare

Re: CDR Railcar No. 10

Post by Jimmyb » Wed Apr 01, 2020 8:05 am

Rik, I used a 80 watt for the large items, my temperature controlled iron is 50 watts, so similar, and for low melt solder worked okay.

User avatar
GTB
Driver
Driver
Posts: 1559
Joined: Sat Mar 05, 2011 2:46 pm
Location: Australia

Re: CDR Railcar No. 10

Post by GTB » Wed Apr 01, 2020 8:10 am

ge_rik wrote: Tue Mar 31, 2020 7:19 pm I've also learned that it would be a lot easier if I had another hand - and that wearing a glove on the left hand does make life easier when things get a bit hot!
You haven't been mucking around on this job...... :shock:

The learning curve may be steep, but it flattens quickly with practice. You seem to be getting the knack which will build your confidence.

Unfortunately the blind watchmaker didn't consider soldering when doing the initial design work. I've got some small toolmakers clamps and some miniature sash clamps. I sometimes use those and blocks of wood to hold parts in alignment so I can solder the joint. Mine are brass, so if I don't want them to act as a heatsink I use off-cuts of thin ply to insulate the clamp from the part.

Tinning parts first and using liquid flux helps with making neat joints. You don't need much solder in a joint as the stuff is weak, so large fillets don't make the joint any stronger. It's the solder in the joint that does the work.

I find gloves thick enough to act as insulation are clumsy and if I need to hold something close to where I'm soldering, I use a piece of ply or a block of wood between me and the metal. My soldering bench has a small pile of scorched wooden blocks and bits of ply for just that purpose.

I was taught basic glassblowing in my chemistry course, but have never developed the asbestos fingers of a professional glass blower. A TA in my lab had been a glassblower and could pick up hot glassware that I wouldn't touch with welding gloves.

Regards,
Graeme

User avatar
ge_rik
Administrator
Administrator
Posts: 6575
Joined: Sun Oct 25, 2009 10:20 pm
Location: Cheshire
Contact:

Re: CDR Railcar No. 10

Post by ge_rik » Wed Apr 01, 2020 5:07 pm

On more familiar territory today. Firstly, I tackled the interior detailing of the cab - using plasticard and a few other bits and pieces.
IMG_0188.JPG
IMG_0188.JPG (94.11 KiB) Viewed 4837 times
.
The driver needed minor surgery to give the impression he was actually in control.
IMG_0191.JPG
IMG_0191.JPG (94.85 KiB) Viewed 4837 times
.
The seat has been lowered since this photo was taken, but all the bits seem to fit OK and are based on a photo of the interior of the cab so I think they are in the right places.
IMG_0202.JPG
IMG_0202.JPG (70.96 KiB) Viewed 4837 times
.
The other job was soldering up and fitting the electrics (a bit blurry but you get the gist)
IMG_0200.JPG
IMG_0200.JPG (70.25 KiB) Viewed 4837 times
.
These are then covered by the fuel tank which is actually in the cab near the driver. Let's hope he doesn't like a smoke whilst on duty!
IMG_0203.JPG
IMG_0203.JPG (75.31 KiB) Viewed 4837 times
.
Hopefully, working on the roof tomorrow and then the cab will b mostly (structurally) finished.
:hello1:

Rik
------------------------
Peckforton Light Railway - Blog Facebook Youtube

User avatar
ge_rik
Administrator
Administrator
Posts: 6575
Joined: Sun Oct 25, 2009 10:20 pm
Location: Cheshire
Contact:

Re: CDR Railcar No. 10

Post by ge_rik » Sun Apr 05, 2020 3:15 pm

Latest update
The cab section is almost finished structurally. I've installed all the electrics including a soundcard and given her a test run (video to follow). As you can see, she has been through the paintshop for a coat of primer.
IMG_0218.JPG
IMG_0218.JPG (95.92 KiB) Viewed 4793 times
.
There is still plenty more to do. The roof and bonnet are only loose fits at the moment. The bonnet holds the batteries and the roof holds the electronics, which is still a bit of a bird's nest.
IMG_0222.JPG
IMG_0222.JPG (108.44 KiB) Viewed 4793 times
.
There's also a fair bit of filling and rubbing-down to be done before applying the final livery. The interior of the cab is more or less finished except for glazing and internal window frames and bars.
IMG_0217.JPG
IMG_0217.JPG (72.45 KiB) Viewed 4793 times
.
She's still a little bit stiff legged when she runs but I'm hoping a bit of tweaking will sort that out. The good news is that the electrics work as they are supposed to and my handiwork doesn't look too disreputable.

Rik
Attachments
IMG_0215.JPG
IMG_0215.JPG (116.3 KiB) Viewed 4793 times
------------------------
Peckforton Light Railway - Blog Facebook Youtube

User avatar
Peter Butler
Driver
Driver
Posts: 5244
Joined: Sun Sep 09, 2012 10:33 pm
Location: West Wales

Re: CDR Railcar No. 10

Post by Peter Butler » Sun Apr 05, 2020 6:02 pm

That's come together really well Rik, especially as you had no instructions. It will look right at home on your line too.
The best things in life are free.... so why am I doing this?

User avatar
ge_rik
Administrator
Administrator
Posts: 6575
Joined: Sun Oct 25, 2009 10:20 pm
Location: Cheshire
Contact:

Re: CDR Railcar No. 10

Post by ge_rik » Sun Apr 05, 2020 7:30 pm

Video of her first test run .....


Rik
------------------------
Peckforton Light Railway - Blog Facebook Youtube

User avatar
philipy
Moderator
Moderator
Posts: 5094
Joined: Sun Jan 30, 2011 3:00 pm
Location: South Northants

Re: CDR Railcar No. 10

Post by philipy » Sun Apr 05, 2020 7:50 pm

Be very nice once you've sorted that tight spot. Windy up your way today, obviously.
Philip

Puddlejumper
Cleaner
Cleaner
Posts: 31
Joined: Sun Feb 16, 2020 9:53 am

Re: CDR Railcar No. 10

Post by Puddlejumper » Sun Apr 05, 2020 8:23 pm

Looking (& sounding) good, good work :thumbleft: :thumbleft:
Doug

Hopelessly bodging stuff into some sort of semblance of a railway up in the frozen wasteland of County Durham.
16mm(ish) scale NG on 32mm track

User avatar
LNR
Driver
Driver
Posts: 1542
Joined: Sat Feb 27, 2016 5:26 am
Location: Australia

Re: CDR Railcar No. 10

Post by LNR » Mon Apr 06, 2020 1:13 am

Coming together well Rik. Looks kind of cute on its own.
Grant.

User avatar
ge_rik
Administrator
Administrator
Posts: 6575
Joined: Sun Oct 25, 2009 10:20 pm
Location: Cheshire
Contact:

Re: CDR Railcar No. 10

Post by ge_rik » Mon Apr 06, 2020 8:15 am

LNR wrote: Mon Apr 06, 2020 1:13 am Coming together well Rik. Looks kind of cute on its own.
Grant.
Thanks Grant.
I was thinking of making interchangeable bodies for it - the railcar passenger compartment as supplied and a railtruck body which looks like it will fit the same tractor unit.
7001103_orig.jpg
7001103_orig.jpg (285.79 KiB) Viewed 5327 times
.
Rik
------------------------
Peckforton Light Railway - Blog Facebook Youtube

User avatar
philipy
Moderator
Moderator
Posts: 5094
Joined: Sun Jan 30, 2011 3:00 pm
Location: South Northants

Re: CDR Railcar No. 10

Post by philipy » Mon Apr 06, 2020 8:32 am

Funnily enough, when I saw it running in your video yesterday I thought it looked more like a pickup than a railcar. This picture is exactly the sort of thing I was thinking of.
Philip

User avatar
Jimmyb
Fireman
Fireman
Posts: 492
Joined: Sat Nov 23, 2019 10:43 pm
Location: Weston-super-Mare

Re: CDR Railcar No. 10

Post by Jimmyb » Mon Apr 06, 2020 8:57 am

Rik, you truly are inspirational :thumbup:

User avatar
gregh
Trainee Driver
Trainee Driver
Posts: 570
Joined: Sun Apr 01, 2018 5:44 am
Location: Sydney, Australia
Contact:

Re: CDR Railcar No. 10

Post by gregh » Mon Apr 06, 2020 9:49 am

It's amazing how you fit everything in. It's nice looking model - quite unusual with the coupled wheels (to me anyway).
I can see the slight 'binding' as it moves. If you can't open out the conrod holes maybe the pins can be made a bit smaller?

The idle sound is beautiful. (but a little less good when running - sorry). Anyway I always say 'any sound is better than none.'

:thumbup: :thumbup:
Greg from downunder.
The Sandstone & Termite's website: https://members.optusnet.com.au/satr/satr.htm

User avatar
LNR
Driver
Driver
Posts: 1542
Joined: Sat Feb 27, 2016 5:26 am
Location: Australia

Re: CDR Railcar No. 10

Post by LNR » Mon Apr 06, 2020 9:54 am

ge_rik wrote: Mon Apr 06, 2020 8:15 am a railtruck body which looks like it will fit the same tractor unit.
Wow!! that looks the business. Perfect match.
Grant.

Post Reply

Who is online

Users browsing this forum: No registered users and 12 guests