Page 4 of 6
Re: Finishing the unfinished
Posted: Fri Jan 05, 2018 4:26 pm
by RylstonLight
One from the archives. This was the Lister in April 2002. Horrid livery and dodgy weathering, but there really wasn't the same returns when searching on the internet for Lister images. Funny how you don't think your modelling or photography skills improve until you see an old image. All the rolling stock is still exists in use in some form.

- 2002 Lister.png (479.32 KiB) Viewed 6471 times
Re: Finishing the unfinished
Posted: Fri Jan 05, 2018 4:40 pm
by Big Jim
I have had mixed experiences with them. It is worth looking at the tutorials that humbrol have published on YouTube on how they work.
Re: Finishing the unfinished
Posted: Fri Jan 05, 2018 4:47 pm
by RylstonLight
Thanks for the tip, I will
Re: Finishing the unfinished
Posted: Sat Jan 06, 2018 12:11 am
by LNR
I was hoping Tony would take the Lister out and get it a little grimed up.
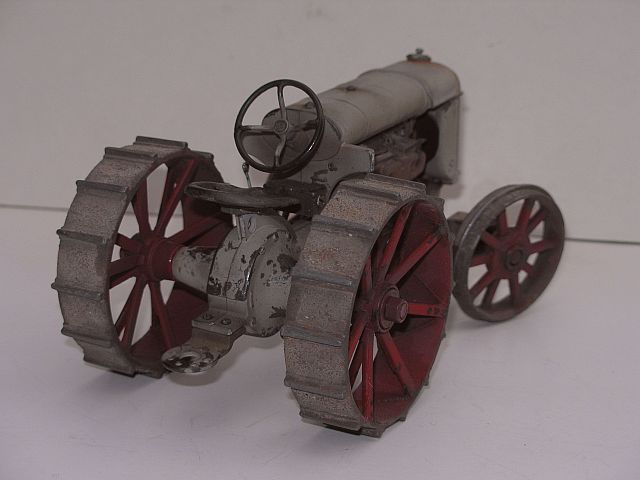
I too like polishing steel handrails, steps, running boards etc. to show constant wear, was wondering have you tried the paint and chip method using Maskol. Certainly not my idea (copied from Chuck Done on an American forum, worth looking up!) Strip the object to bare metal, apply the Maskol with a sharp tooth pick where chips and scuffing would appear, then spray or brush paint. When dry and hard, pick the Maskol off leaving a chip back to bare metal. I used it on the tractor in the pic. below.

- No Guards 3.JPG (45.12 KiB) Viewed 6461 times
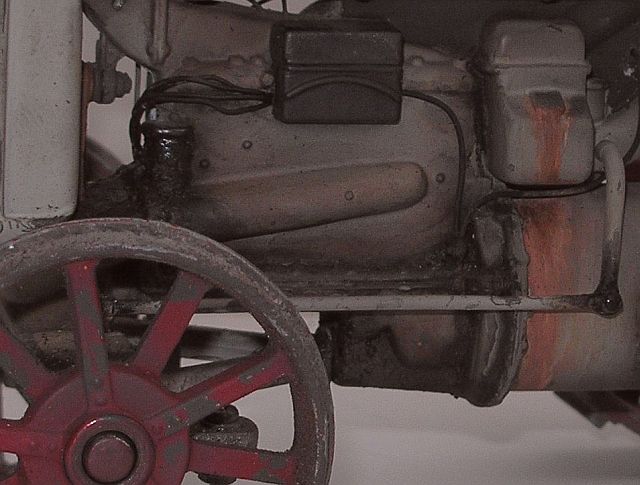
For oil and grease grime I add talcum powder to the brush, mixed with the paint and stippled to give depth. A very dark brown to almost black colour, followed by some gloss varnish to give a wet appearance as in the oil filler and steering rod ends.

- No Guards 1.jpg (65.3 KiB) Viewed 6461 times
Grant.
Re: Finishing the unfinished
Posted: Sat Jan 06, 2018 7:47 am
by FWLR
Wow Grant that is very very good. Looks just like the real thing....


Re: Finishing the unfinished
Posted: Sat Jan 06, 2018 9:41 am
by RylstonLight
That looks good, yes Its a technique I use for heavier weathering such as the ballast hoppers (first picture this thread). I have tried the technique with an partial undercoat of “real” rust but this can be hit and miss. When it works it is great. Also It is no great problem if you don’t notice all the Maskol blebs as they can look convincingly like bubbling paint.
Re: Finishing the unfinished
Posted: Tue Jan 30, 2018 5:54 pm
by RylstonLight
Well, there was a hiatus with another hospital admission, but there has been progress on some projects.
The railcar has been glazed and horns put on so that is pretty much finished:

- railcar completed.png (484.22 KiB) Viewed 6276 times
The snowploughs are fitted to the diesel, No 4. Below are the re-railing bars ready for re-fitting in Spring:

- Pog with snowplough.png (340.13 KiB) Viewed 6276 times
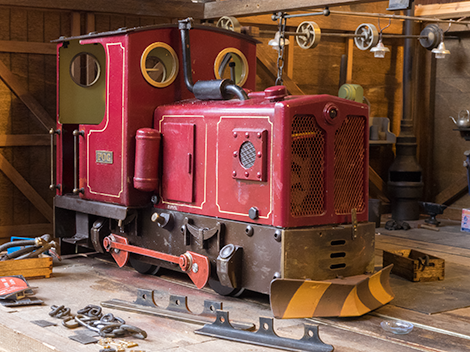
However the Lister is still under refurbishment with Dicky working late into the January evenings:

- Lister late night.png (494.67 KiB) Viewed 6276 times
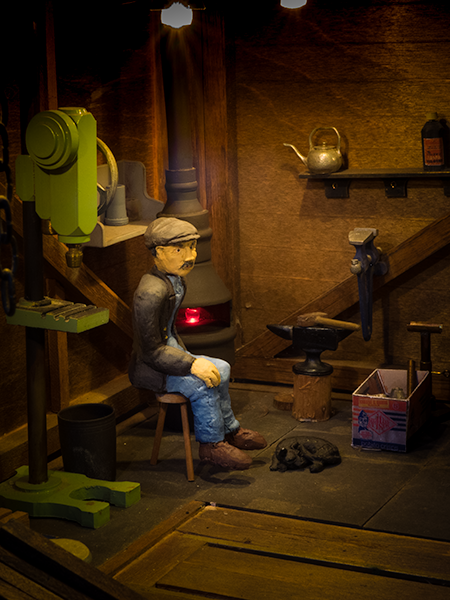
Whilst Dicky works at the cold-end of the workshop, Davey and cat snuggle by the forge to keep warm.

- Davy at fire.png (392 KiB) Viewed 6276 times
More in due course.
Re: Finishing the unfinished
Posted: Tue Jan 30, 2018 6:22 pm
by Peter Butler
Keep 'em comin', I can take as much of that as you can provide. Brilliant.
Love the railbus.
Re: Finishing the unfinished
Posted: Tue Jan 30, 2018 7:44 pm
by Soar Valley Light
Peter Butler wrote: ↑Tue Jan 30, 2018 6:22 pm
Keep 'em comin', I can take as much of that as you can provide. Brilliant.
Love the railbus.
Well said Peter, I couldn't agree more.
Andrew
Re: Finishing the unfinished
Posted: Tue Jan 30, 2018 9:03 pm
by bazzer42
I'm glad I don't have to pick a favourite, they're all genius modelling.
Re: Finishing the unfinished
Posted: Tue Jan 30, 2018 9:06 pm
by bazzer42
Genius modelling, couldn't pick a favourite from any of those pictures..
Re: Finishing the unfinished
Posted: Tue Jan 30, 2018 9:06 pm
by bazzer42
Genius modelling, couldn't pick a favourite from any of those pictures..
Re: Finishing the unfinished
Posted: Tue Jan 30, 2018 9:15 pm
by bazzer42
Too many years working for a council everything in triplicate, sorry internet playing up here.
Re: Finishing the unfinished
Posted: Tue Jan 30, 2018 9:41 pm
by invicta280
The Rylston Light Rlwy cries out to be the subject of an animated film. The attention to detail is superb.
Re: Finishing the unfinished
Posted: Wed Jan 31, 2018 7:54 am
by ge_rik
Inspirational!
Rik
Re: Finishing the unfinished
Posted: Thu Feb 01, 2018 4:16 am
by LNR
Your pics. have me scrutinizing the background in addition to the main subject, did you add the fan behind the radiator on the diesel? Love the overhead line shafting, HO wheels with the flange turned off perhaps. (be a bit of whip running anything off the centre pulleys

) Timber workshops always look very comfy with the lights on, glow of timber and all that. Excellent work and more please, as others have said.
Grant.
Re: Finishing the unfinished
Posted: Thu Feb 01, 2018 6:32 pm
by RylstonLight
The Lister may have stalled awaiting electrics, but the workshop lads have pressed ahead with No 6 Observation Coach (aka "The Lady of the Dales").
Bob worked into the gloom of the late afternoon finishing the lining, but of course Old Davey (who hangs around the workshop) knows a better way of doing it from when he was a lad. Still it does mean he vacated his favourite place by the fire for once.

- Bob lining with advice.png (301.15 KiB) Viewed 6021 times
The decals and lining are done, the brasswork been fitted. All that needs doing is the lighting and fabricating the roof. Thorough testing of the Cleminson Chassis will have to follow when the weather is warmer, as I have worries about the vertical movement of the middle axle (or relative lack of it).
Re: Finishing the unfinished
Posted: Thu Feb 01, 2018 6:55 pm
by RylstonLight
LNR wrote: ↑Thu Feb 01, 2018 4:16 am
Your pics. have me scrutinizing the background in addition to the main subject, did you add the fan behind the radiator on the diesel? Love the overhead line shafting, HO wheels with the flange turned off perhaps. (be a bit of whip running anything off the centre pulleys

) Timber workshops always look very comfy with the lights on, glow of timber and all that. Excellent work and more please, as others have said.
Grant.
The fan is a cheap internal computer fan and runs when in use. The overhead line uses turned down wheels from (I think) Ron Grant. Many years ago when he was trading he sometimes included a SINGLE extra wheel in an order (!). Even when you didn't order any wheelsets. I'm not sure if it was a form of advertising of what he did. Still what can you do with three wheels which is what I acquired over time? The overhead line shafting (along with the block-and-tackle) are photographic props and in fact if you look closely (well, maybe not as I try to control stray revealing angles) you might make out that they are engineering impossibilities. But they look good in setting the scene.
I have to retrieve some photographs of the actual garden railway as I am aware that this thread is getting a little thread-bare with only three-and-a-half square feet of workshop to photograph. Still the projects have been good occupational therapy and rehab.
Many thanks for everyone's kind comments.
Re: Finishing the unfinished
Posted: Thu Feb 01, 2018 11:06 pm
by LNR
It's the best three and a half feet of workshop I've seen in a while, and a perfect use for three wheels. Being compact has the advantage of complete control over background, and foreground, something that can be hard outside. Fences are the photographic bane of my life.
Grant.
Re: Finishing the unfinished
Posted: Thu Mar 01, 2018 8:34 am
by FWLR
Just love your work Andy, it does seem so real....

