My Winter Project - 2 Car Multiple Unit
Re: My Winter Project - 2 Car Multiple Unit
Nice workmanship, I think that blue is going to work well.


Re: My Winter Project - 2 Car Multiple Unit
..... and of course, the added pleasure of knowing that the stock running gently round the garden on that sunny evening is quite unique to your railway and all your own workJames from Devon wrote: ↑Sun Dec 10, 2017 10:33 pm ........, I had imagined that the most pleasure would come from sitting in the garden on a sunny evening watching the trains run around... I never thought that so much pleasure could come from making my own stock
Rik

Re: My Winter Project - 2 Car Multiple Unit
Looks great
Here is a picture of the Australian railcar set i designed myself
NSWGR CPH and CTH railmotor
Here is a picture of the Australian railcar set i designed myself
NSWGR CPH and CTH railmotor
- received_10212728860830403.jpeg (653.24 KiB) Viewed 6949 times
-
James from Devon
- Trainee Fireman

- Posts: 210
- Joined: Mon Feb 01, 2016 6:58 pm
- Location: Devon
Re: My Winter Project - 2 Car Multiple Unit
Thanks and I love your railcar....what gauge is it?
Garden railways don't run on steam or electric rather wine and Jedi master level patience
-
James from Devon
- Trainee Fireman
- Posts: 210
- Joined: Mon Feb 01, 2016 6:58 pm
- Location: Devon
Re: My Winter Project - 2 Car Multiple Unit
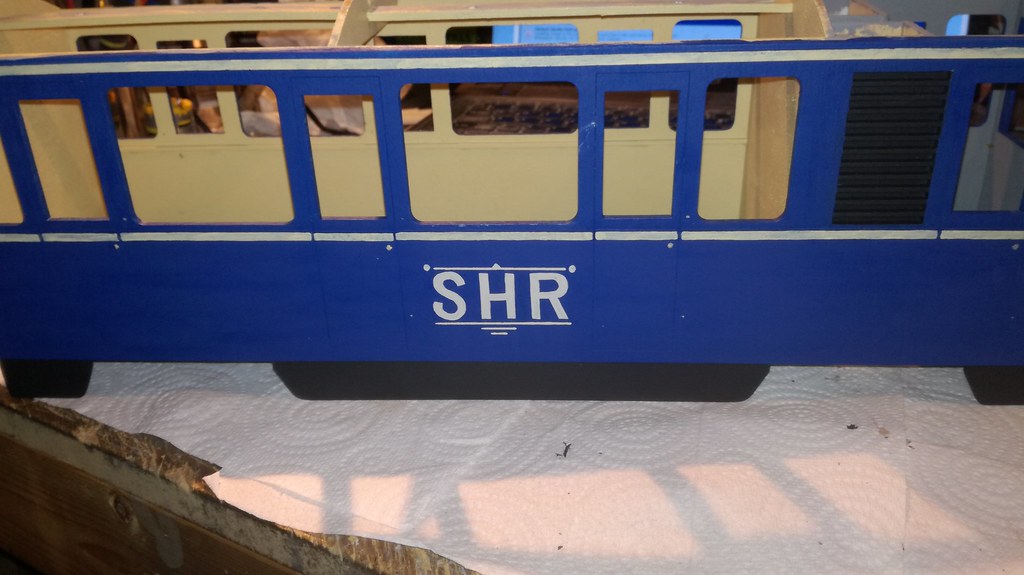
Cheers! it comes up a little bright in the camera flash. In case you want any, its Tamiya Flat Blue XF-8
Garden railways don't run on steam or electric rather wine and Jedi master level patience
-
James from Devon
- Trainee Fireman
- Posts: 210
- Joined: Mon Feb 01, 2016 6:58 pm
- Location: Devon
Re: My Winter Project - 2 Car Multiple Unit
Yeah! multiples are the devils work!
Garden railways don't run on steam or electric rather wine and Jedi master level patience
-
RylstonLight

- Trainee Fireman
- Posts: 209
- Joined: Fri Oct 26, 2012 3:10 pm
- Location: Pontefract West Yorkshire
Re: My Winter Project - 2 Car Multiple Unit
I like your solution for the springs to accomodate the moulding. Simple once you are clever enough to think of it!
Andy S. at the Rylston Light Railway
-
James from Devon
- Trainee Fireman
- Posts: 210
- Joined: Mon Feb 01, 2016 6:58 pm
- Location: Devon
Re: My Winter Project - 2 Car Multiple Unit
Cheers! I was less clever for the four or five methods I tried first which didn't work very well at all!RylstonLight wrote: ↑Sun Dec 17, 2017 5:22 pm I like your solution for the springs to accomodate the moulding. Simple once you are clever enough to think of it!
Garden railways don't run on steam or electric rather wine and Jedi master level patience
-
James from Devon
- Trainee Fireman
- Posts: 210
- Joined: Mon Feb 01, 2016 6:58 pm
- Location: Devon
Re: My Winter Project - 2 Car Multiple Unit
Hi, thanks for you comments and happy to talk through what I do. I must say I am not a moulding expert but have been dabbling for a couple of years. If you want expert advice, I would ask Ron at Swift Sixteen, he clearly has some Jedi-Level skill!
I use a condensation cure silicone for the mould. I make a master of the part I need and if both sides need to have specific dimensions then I make a 2 part mould but these bogie sides did not need details on the back so a single sided, or open mould would do.
I glue the master to a thick piece of plastic and make a lego box around it with around an inch all the way around the edge of the part. Mi and pour in the silicone (I use MB Fibreglass for mine) in a thin strand from one corner (this eliminates air bubbles and let the silicone flow around the part. Wait the full time the rubber needs to set and leave the mould somewhere flat and warm.
One the rubber is hard, remove the lego and carefully peel the mould away from the master.
I use Fast Cast resin for my parts. Mix is 1:! - my tip here is thoroughly mix it but quickly, you have about 2 mins before it starts to set.
Pour slowly into the mould and i use a cocktail stick to trace around the mould detail once the resin has been poured, this dislodges an air bubbles. also, tap the mould or hold a running drill against it, anything to vibrate the resin for about a minute - this further removes air bubbles.
Resin takes some practice but worth the effort. Like I say I am not an expert so the above may or may not be the "proper" method but it works for me!
There is a company in the USA called Smooth-On, they have a you tube channel with lots of great instructional videos. I use them regularly!
Hopes that's useful
Cheers
Jim
Garden railways don't run on steam or electric rather wine and Jedi master level patience
-
James from Devon
- Trainee Fireman
- Posts: 210
- Joined: Mon Feb 01, 2016 6:58 pm
- Location: Devon
Re: My Winter Project - 2 Car Multiple Unit
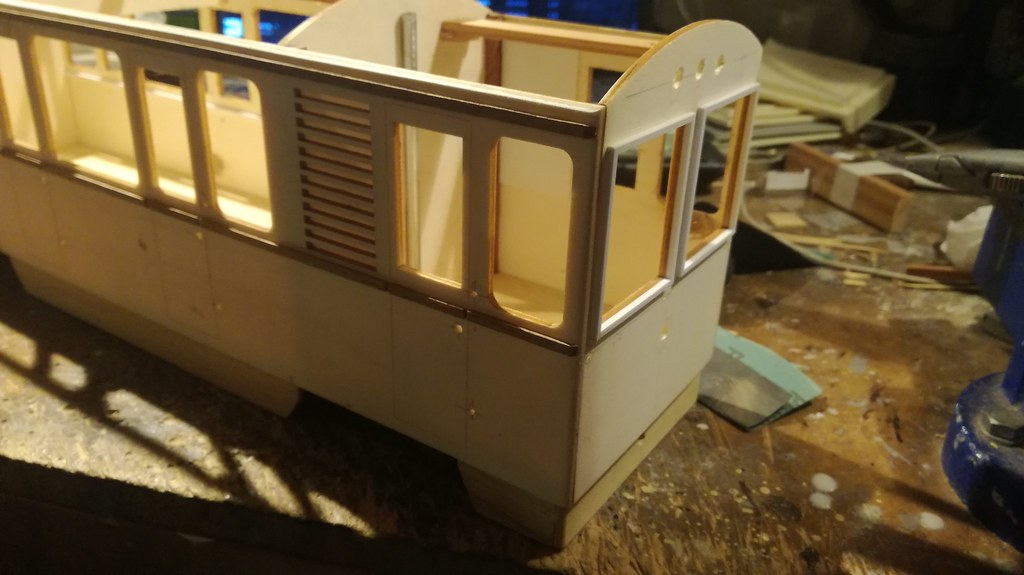
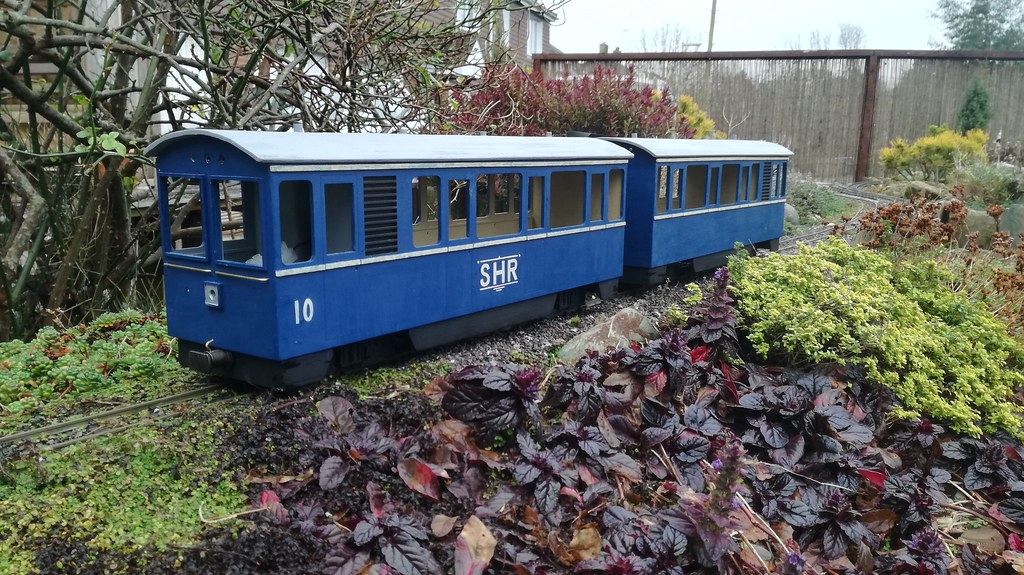
Ok, so here is my weekly update and I managed to have a quick test out on the track between showers to prove my bogie design an make sure i wasn't going to be hitting the tunnel sides...which thankfully, I didn't.
Nice to see it move under its own power but of course I have a load to do to finish this model off so it's back to the workshop.
Here is a short video of the test run. I need to add some weight under the back buffer beam to balance out the weight of the batteries but other than that, it ran quite well.
https://www.youtube.com/watch?v=Fue-Ne5 ... e=youtu.be
This week was mainly painting and wiring.
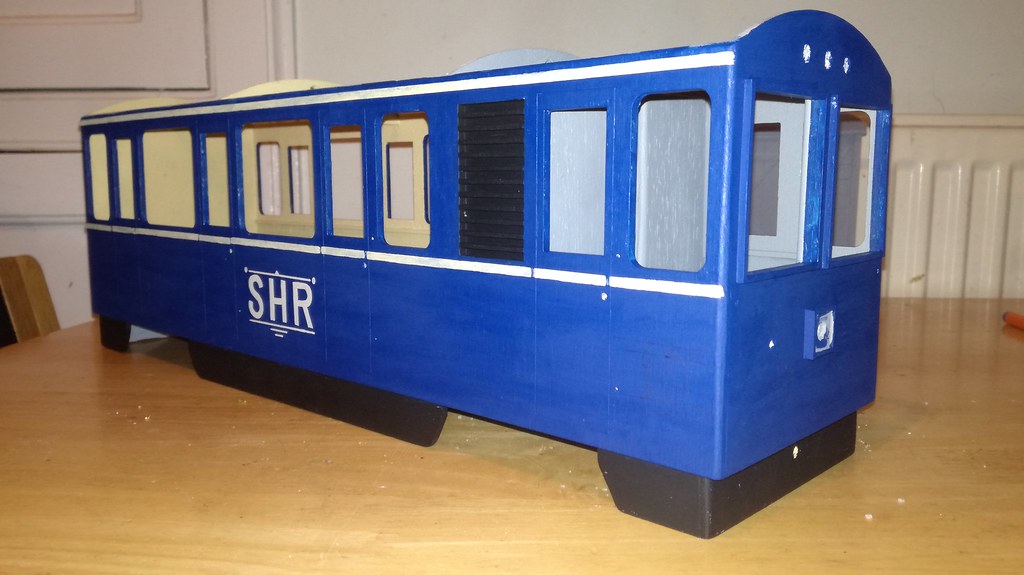
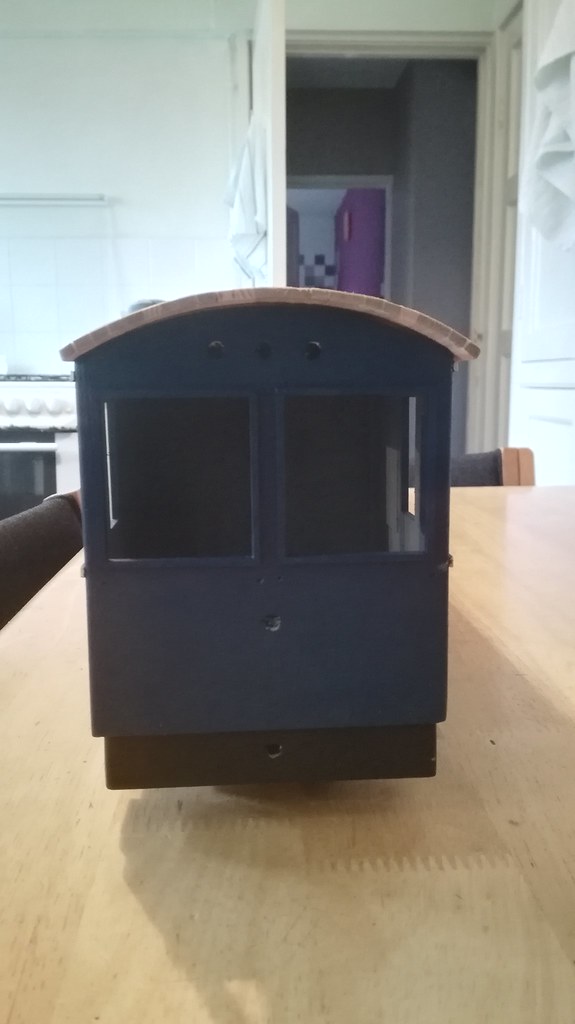
Paintwork - the blue is not as bright outside, the camera flash makes it a little bright!
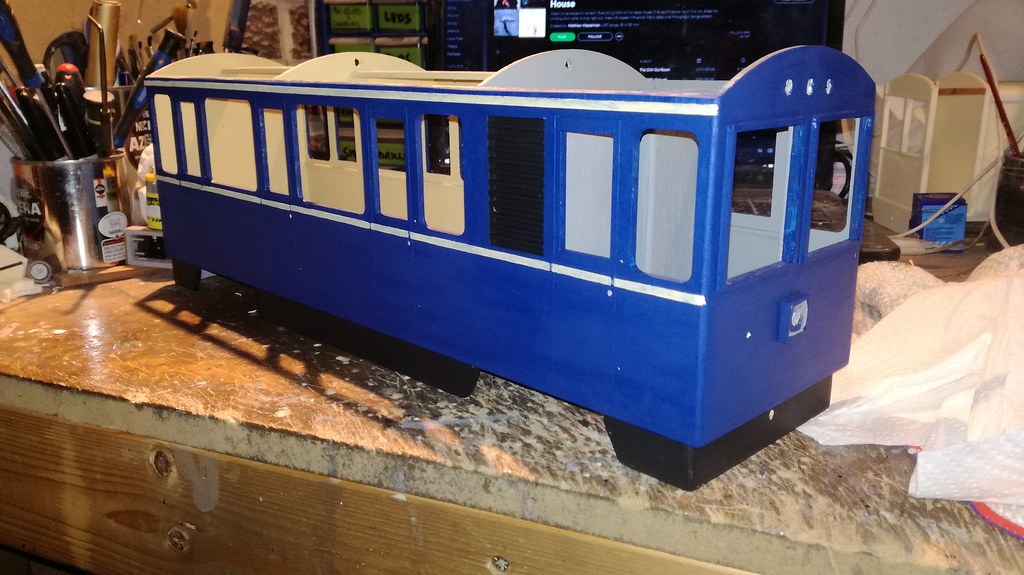
Signwriting...tedious, but fun!
Interior lighting with warm white LEDS:
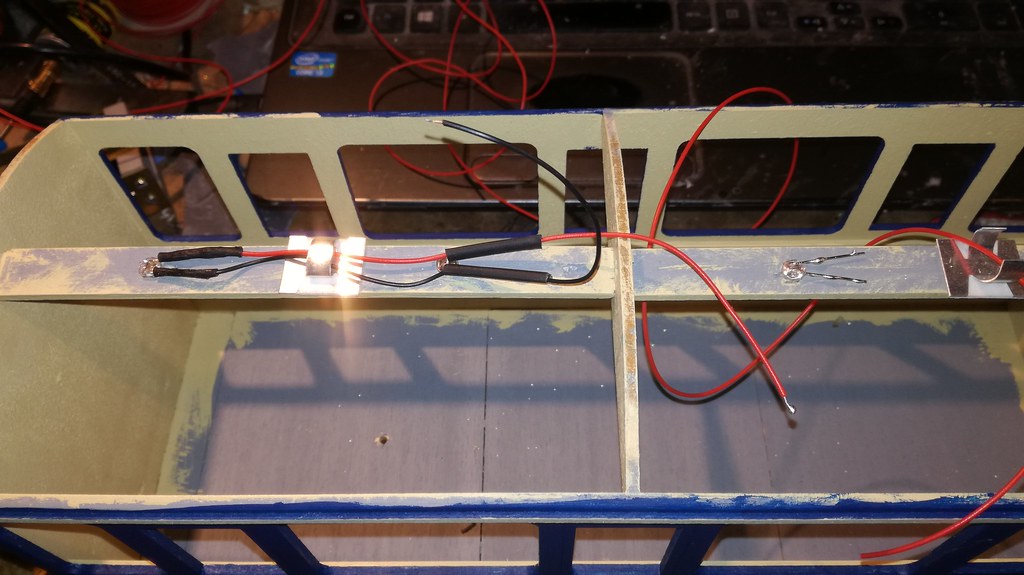
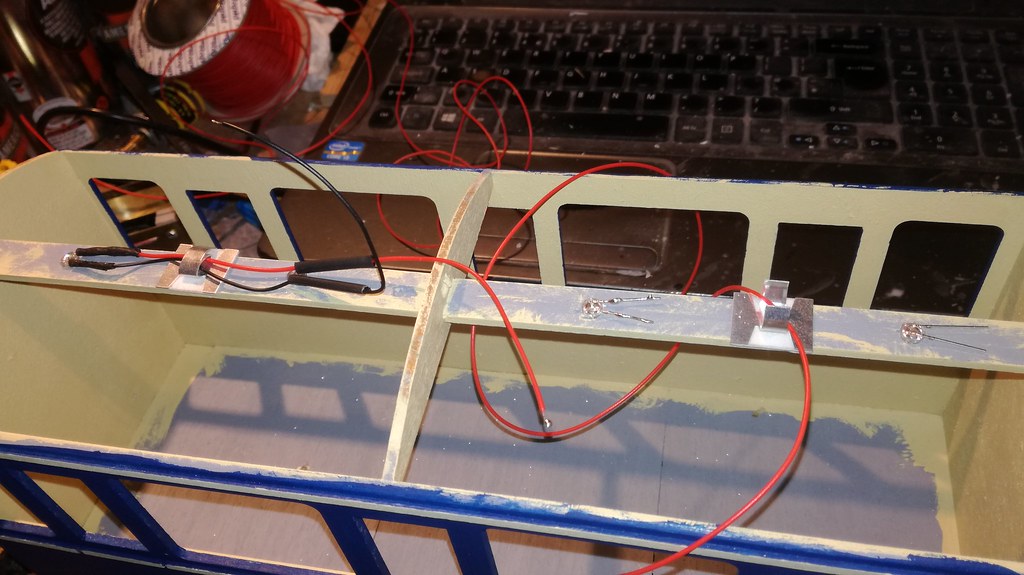
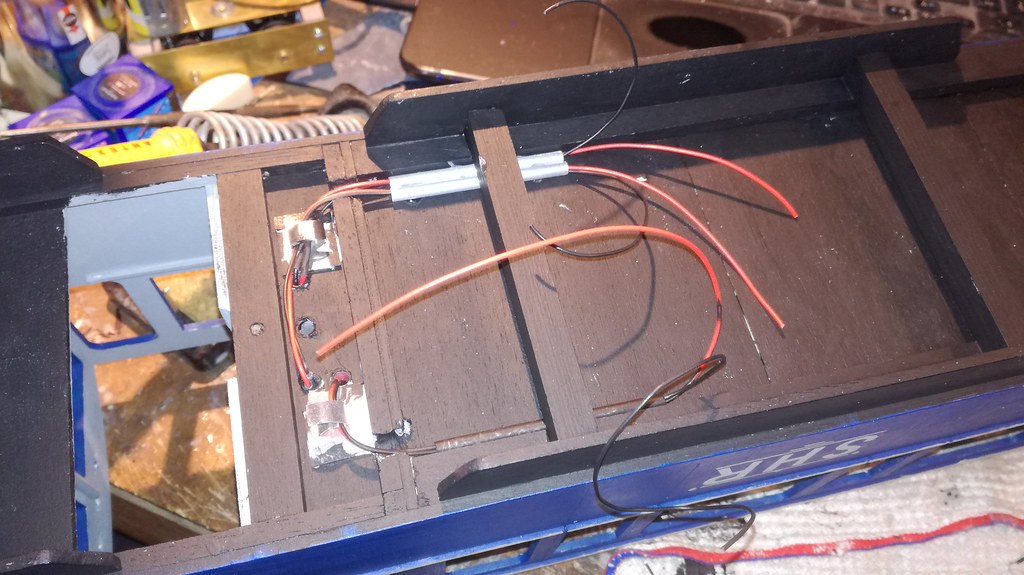
Wiring for motor and batteries ready for RC gear to be fitted:
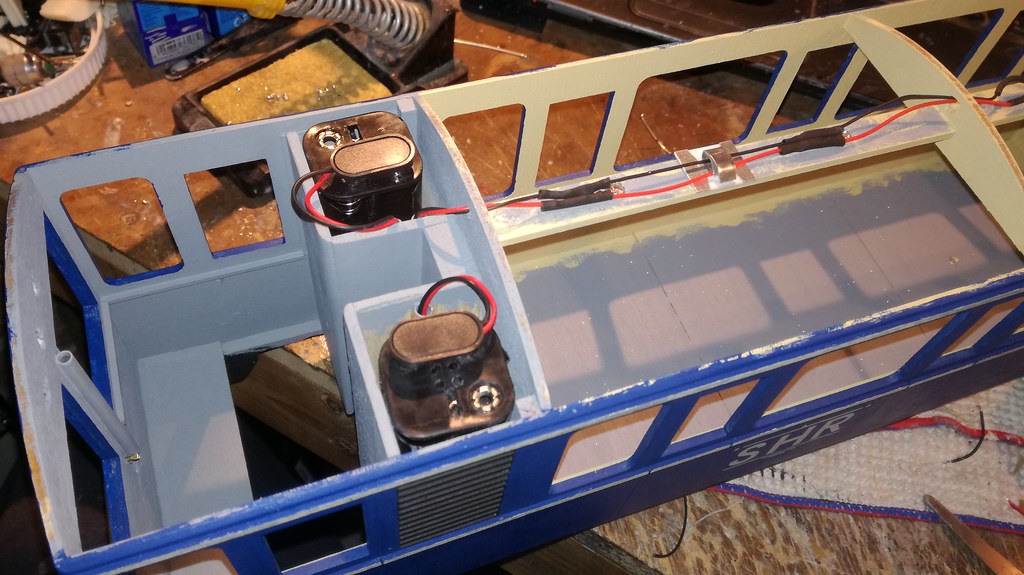
Battery packs:
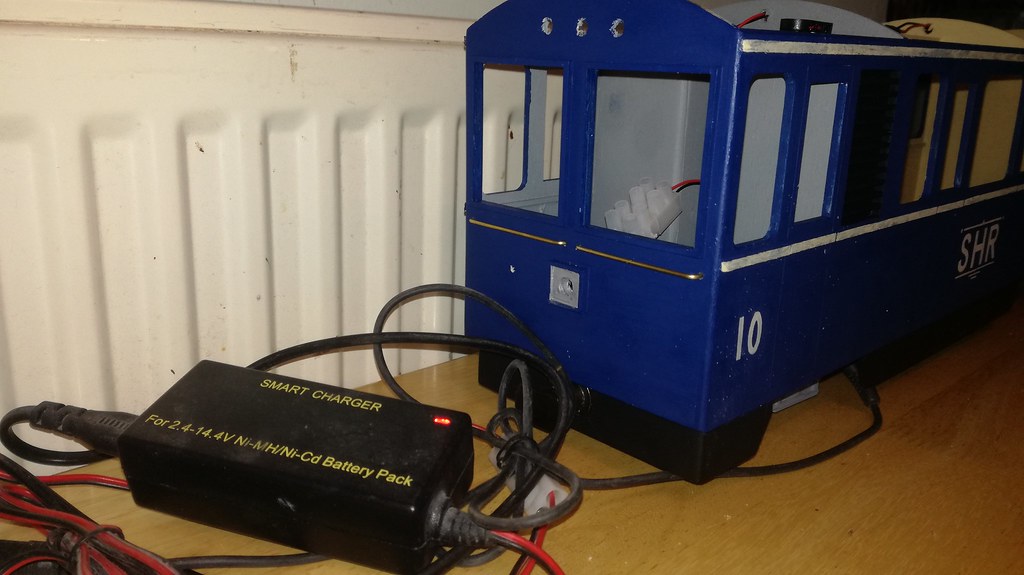
Being charged for the first time:
Outside on the track for the first time:
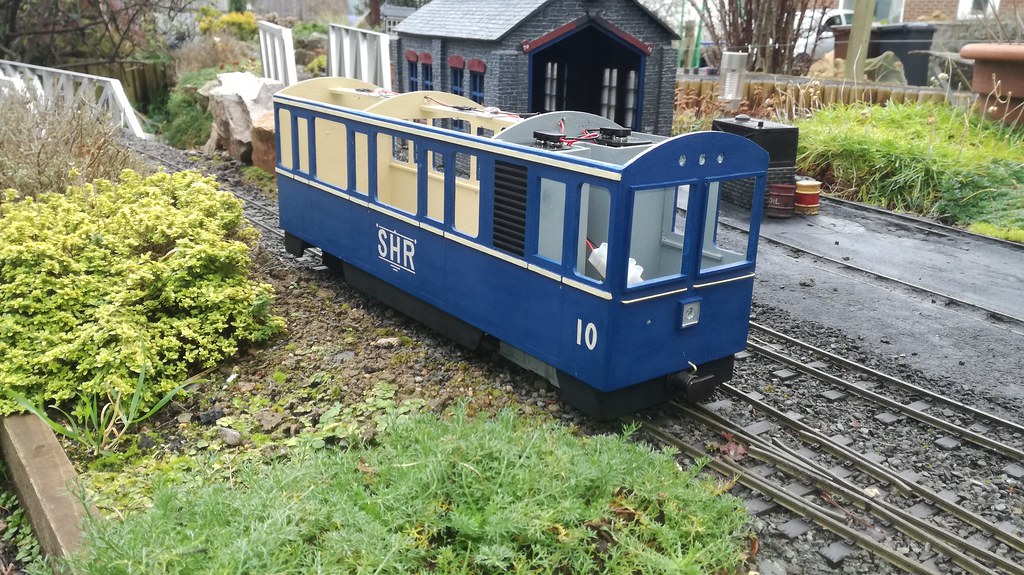
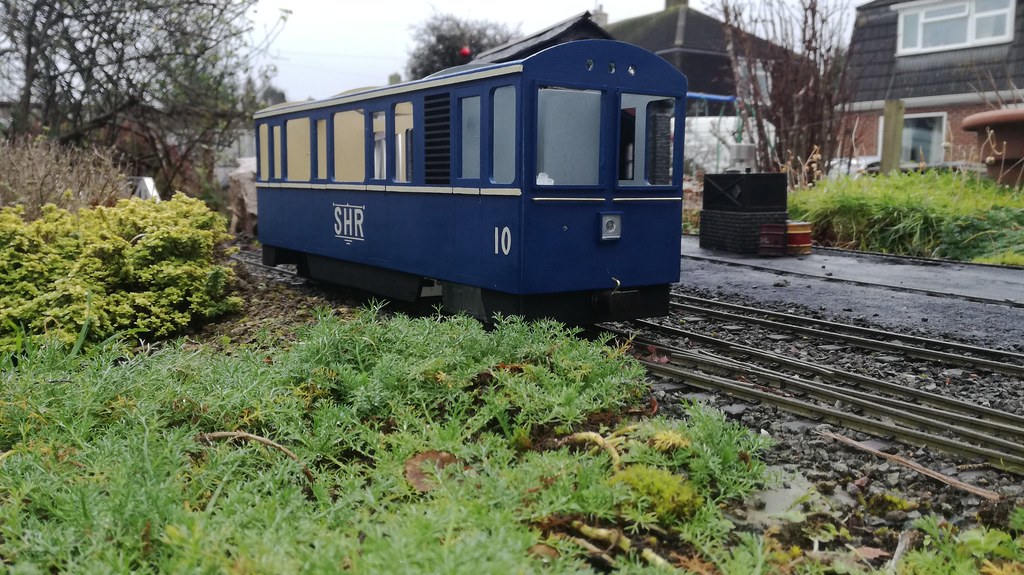
That's it for this week - next job is to finish the interior of this one and then crack on with the trailer car.
Thanks for all the support people, much appreciated.
I will likely post another update this week but just in case I don't...I wish you all a lovely, happy and train-filled Christmas
Nice to see it move under its own power but of course I have a load to do to finish this model off so it's back to the workshop.
Here is a short video of the test run. I need to add some weight under the back buffer beam to balance out the weight of the batteries but other than that, it ran quite well.
https://www.youtube.com/watch?v=Fue-Ne5 ... e=youtu.be
This week was mainly painting and wiring.
Paintwork - the blue is not as bright outside, the camera flash makes it a little bright!
Signwriting...tedious, but fun!
Interior lighting with warm white LEDS:
Wiring for motor and batteries ready for RC gear to be fitted:
Battery packs:
Being charged for the first time:
Outside on the track for the first time:
That's it for this week - next job is to finish the interior of this one and then crack on with the trailer car.
Thanks for all the support people, much appreciated.
I will likely post another update this week but just in case I don't...I wish you all a lovely, happy and train-filled Christmas
Garden railways don't run on steam or electric rather wine and Jedi master level patience
-
RylstonLight
- Trainee Fireman
- Posts: 209
- Joined: Fri Oct 26, 2012 3:10 pm
- Location: Pontefract West Yorkshire
Re: My Winter Project - 2 Car Multiple Unit
The livery is rather nice under natural light. I was wondering about what the battery compartments were for but now I know. Very elegent solution to hiding them. What is it about railcars/railbuses that are so appealing despite there not beeing a huge number of examples of prototypes?
Andy S. at the Rylston Light Railway
-
James from Devon
- Trainee Fireman
- Posts: 210
- Joined: Mon Feb 01, 2016 6:58 pm
- Location: Devon
Re: My Winter Project - 2 Car Multiple Unit
Yes, it's the endless problem of hiding dozens of batteries in our small locos! I'm waiting with hope for someone to invent a tiny battery with an enormous Ah capacity!RylstonLight wrote: ↑Sun Dec 17, 2017 5:57 pm The livery is rather nice under natural light. I was wondering about what the battery compartments were for but now I know. Very elegent solution to hiding them. What is it about railcars/railbuses that are so appealing despite there not beeing a huge number of examples of prototypes?
I think that if the bulk of narrow gauge lines had survived commercially into the 60s and 70s then they would almost certainly have employed multiple units. We are also used to seeing them on the mainline so maybe we all let our imaginations run away and we create quirky "might have been" models. Personally, I was thinking that my line would have built one for moving passengers if had existed for real!
Artistic licence! - I embrace it on my railway as much as possible!
Garden railways don't run on steam or electric rather wine and Jedi master level patience
-
steamer68
- Trainee Fireman
- Posts: 208
- Joined: Tue Nov 28, 2017 11:33 am
- Location: Bishop Auckland, UK
Re: My Winter Project - 2 Car Multiple Unit
Hi James I love the colour of your railcar it looks great on your line and you have done a great job in the battery compartment, I'm sure through time small and more powerful batteries will be available. 
Regards
Kevin
Kevin
Re: My Winter Project - 2 Car Multiple Unit
10mm scaleJames from Devon wrote: ↑Sun Dec 17, 2017 5:18 pmThanks and I love your railcar....what gauge is it?

Re: My Winter Project - 2 Car Multiple Unit
Great work as ever! Loving the bus - very 1970's BR - The neatness of your wiring puts mine to shame
Where did I put that uncoupler?
Re: My Winter Project - 2 Car Multiple Unit
Splendid.
I think you are right about the introduction of railcars on various ng lines. It never happened in the UK but it could have done.
I think you are right about the introduction of railcars on various ng lines. It never happened in the UK but it could have done.
If at first you don't succeed, use a bigger hammer!
-
James from Devon
- Trainee Fireman
- Posts: 210
- Joined: Mon Feb 01, 2016 6:58 pm
- Location: Devon
Re: My Winter Project - 2 Car Multiple Unit
Happy New Year Chaps!
I managed to fit in a couple of days in the workshop over the Xmas break so I have a little update.
Hope you like it. Loads more to finish but it is definitely getting there.
I have got the trailing car made up now, I haven't included lots of pictures of the construction as its essentially the same as the leading car!
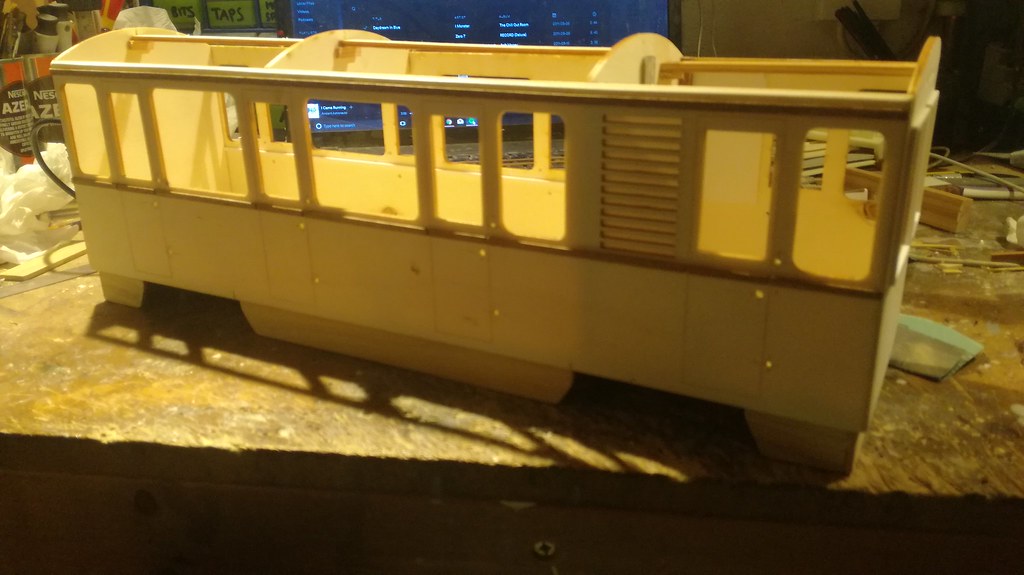
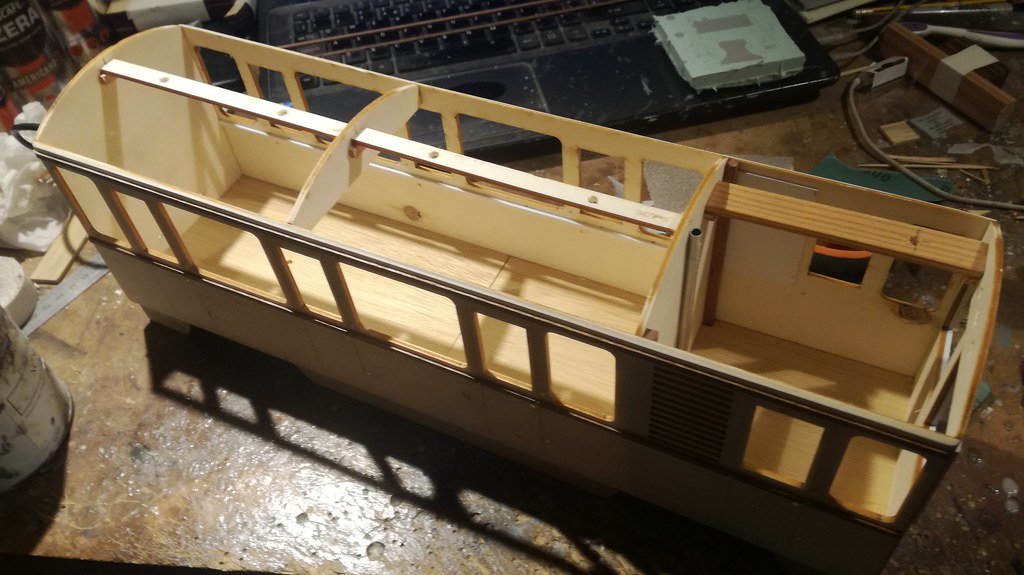
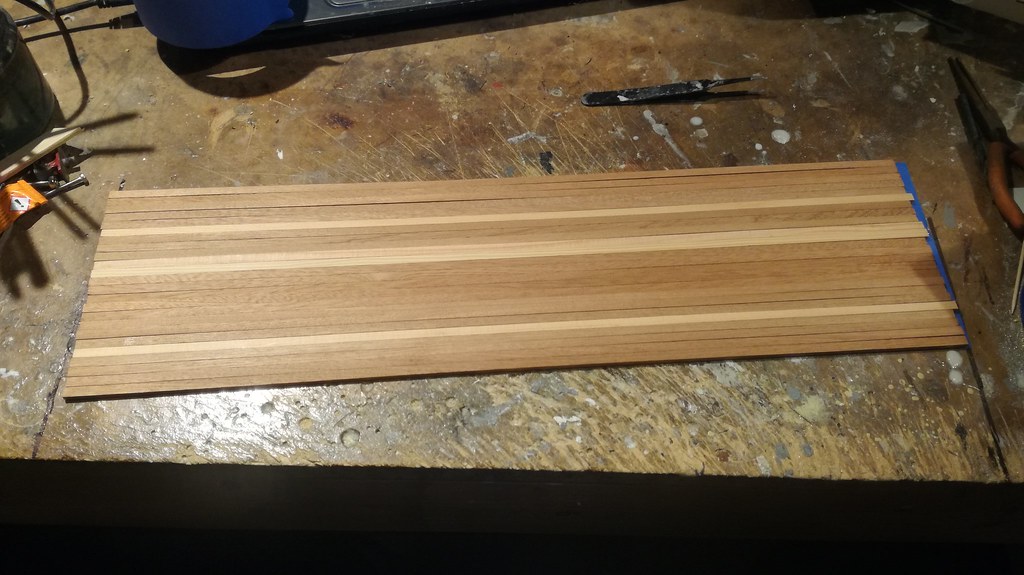
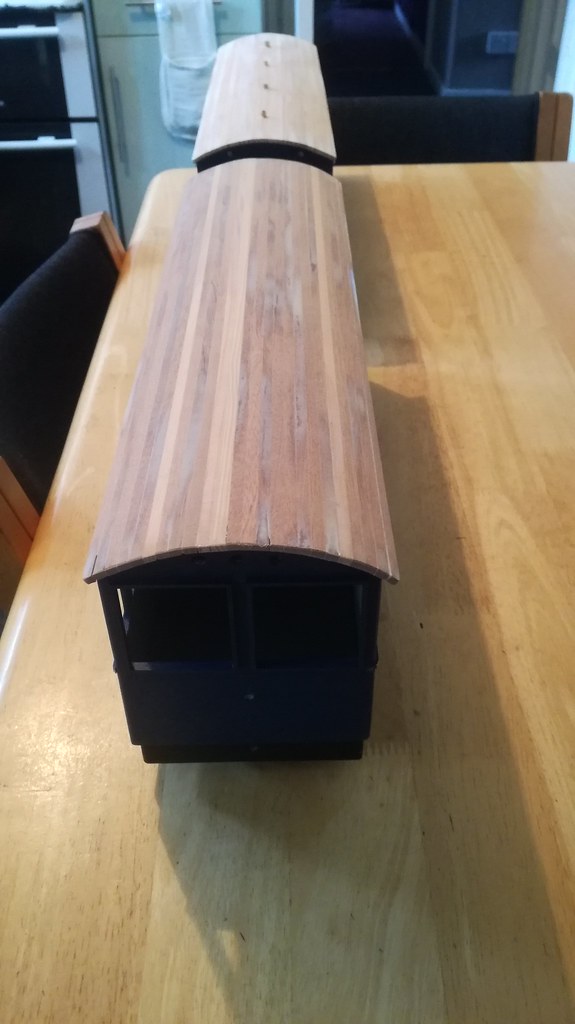
The roof sections have been bothering me for a while, I was kind of dreading them. I don't like plasticard really, it seems to distort in heat and this roof needed to be removable. I did consider making one from resin but the amount of silicone needed would have been really expensive for just 2. I tried out a new method and I am quite happy with the results. I like the roof to have a little texture as they would have in the real world:
Masking tape, sticky side up:
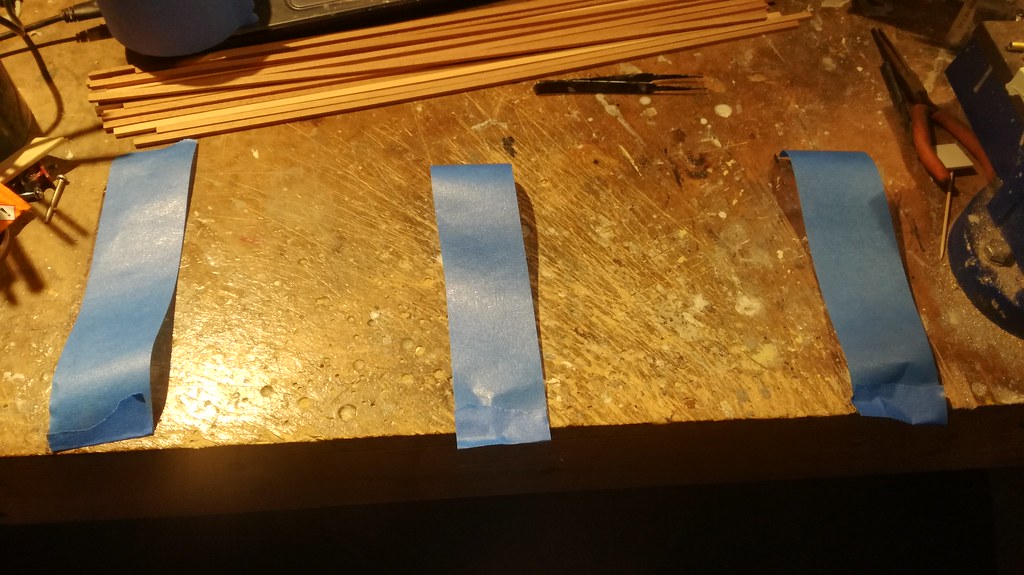
I then stuck 24 sections of Mahogany stripwood (3mm x 5mm) to the tape using black lines on my bench to keep it square:

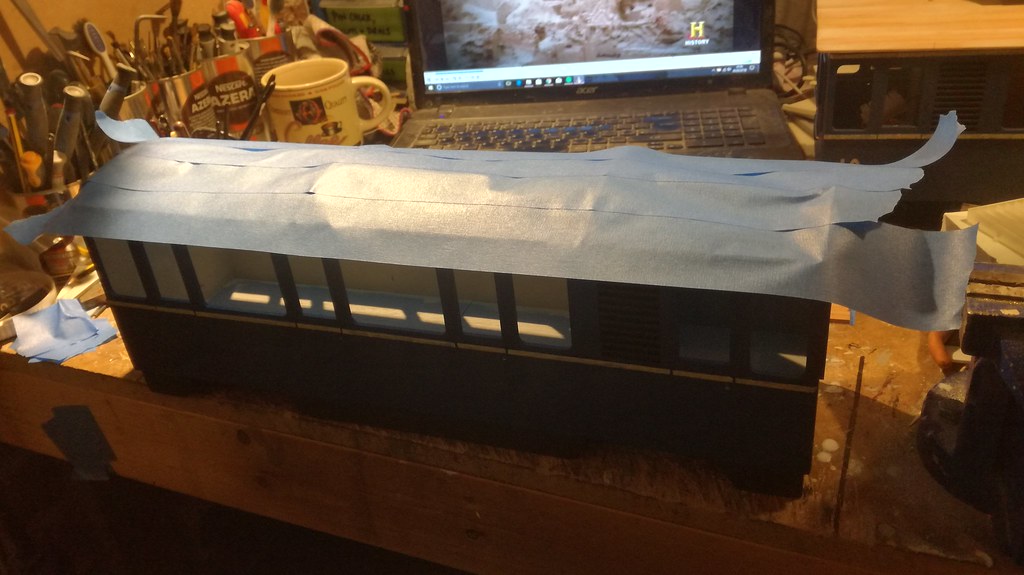
Next step is to cover the model with masking tape and drape the roof over the model, in the correct place:
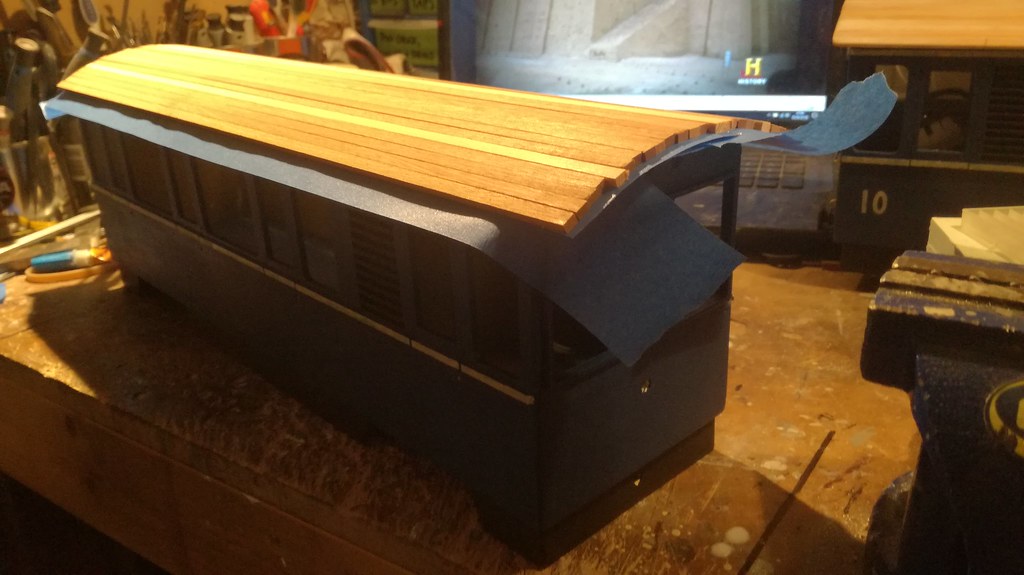
Then I coat the wood strips in casting resin which gets sucked into the gaps in the wood strips which then hardens, keeping the roof in its shape:
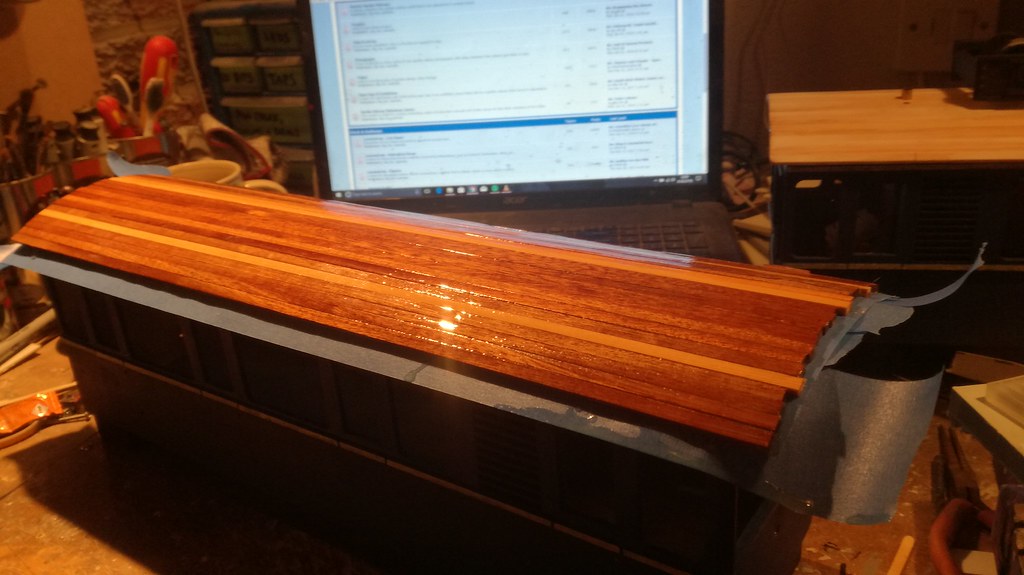
Once left overnight to cure, the roof can be removed and the making tape peeled off and then I use a palm sander to remove the excess resin and make the ends square which leaves a smooth roof in the exact radius to match the model:


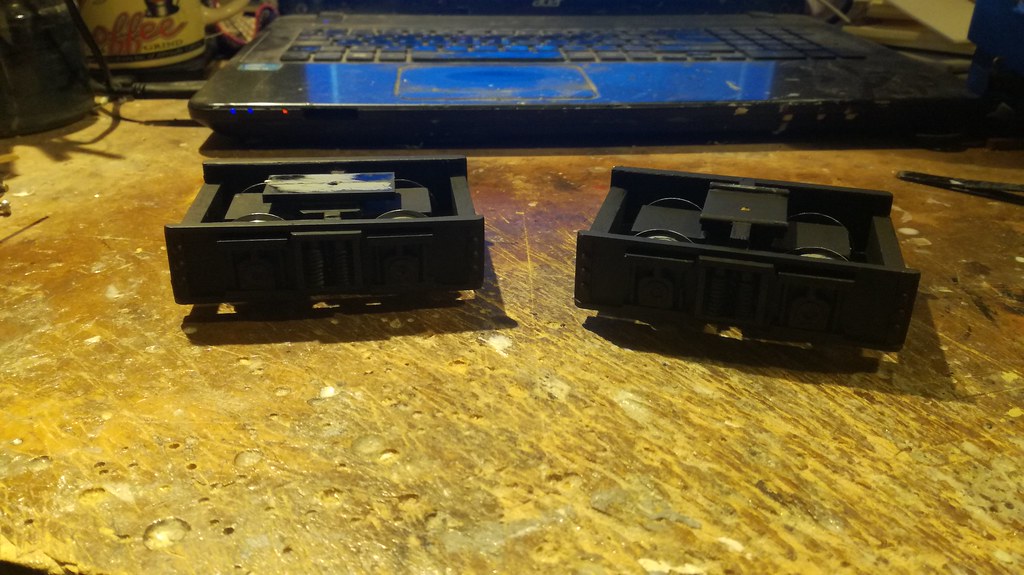
Another pair of bogies, one with lateral bolsters and one without:
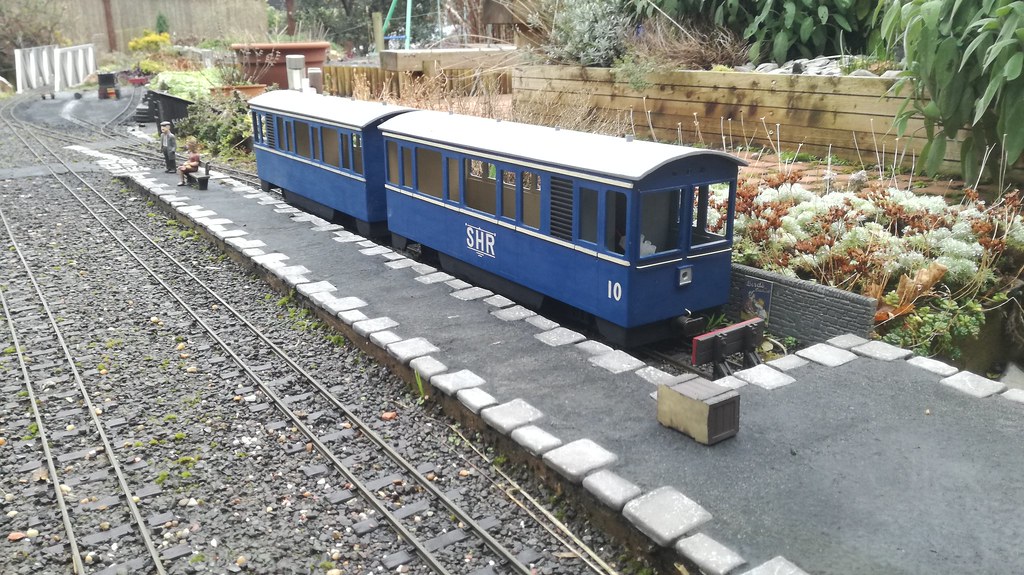
Then came the best part.... a run in the garden between showers, first time with both cars together. Really happy that all worked well:
Back to the bench for the rest of the paintwork, wiring, lighting, detail work and interiors!
Thanks for all the lovely comments so far, very much appreciated.
Cheers
Jim
I managed to fit in a couple of days in the workshop over the Xmas break so I have a little update.
Hope you like it. Loads more to finish but it is definitely getting there.
I have got the trailing car made up now, I haven't included lots of pictures of the construction as its essentially the same as the leading car!
The roof sections have been bothering me for a while, I was kind of dreading them. I don't like plasticard really, it seems to distort in heat and this roof needed to be removable. I did consider making one from resin but the amount of silicone needed would have been really expensive for just 2. I tried out a new method and I am quite happy with the results. I like the roof to have a little texture as they would have in the real world:
Masking tape, sticky side up:
I then stuck 24 sections of Mahogany stripwood (3mm x 5mm) to the tape using black lines on my bench to keep it square:
Next step is to cover the model with masking tape and drape the roof over the model, in the correct place:
Then I coat the wood strips in casting resin which gets sucked into the gaps in the wood strips which then hardens, keeping the roof in its shape:
Once left overnight to cure, the roof can be removed and the making tape peeled off and then I use a palm sander to remove the excess resin and make the ends square which leaves a smooth roof in the exact radius to match the model:
Another pair of bogies, one with lateral bolsters and one without:
Then came the best part.... a run in the garden between showers, first time with both cars together. Really happy that all worked well:
Back to the bench for the rest of the paintwork, wiring, lighting, detail work and interiors!
Thanks for all the lovely comments so far, very much appreciated.
Cheers
Jim
Garden railways don't run on steam or electric rather wine and Jedi master level patience
Re: My Winter Project - 2 Car Multiple Unit
Have some more lovely comments - That really does look nice, love the colour.
-
Soar Valley Light

- Driver

- Posts: 1451
- Joined: Sun Dec 08, 2013 5:18 pm
- Location: North West Leicestershire
Re: My Winter Project - 2 Car Multiple Unit
Hi Jim,
They look absolutely outstanding, the livery really sets them off. The view of them in the bay platform is really superb.
All the best,
Andrew
They look absolutely outstanding, the livery really sets them off. The view of them in the bay platform is really superb.
All the best,
Andrew
"Smith! Why do you only come to work four days a week?
"'cause I can't manage on three gaffer!"
"'cause I can't manage on three gaffer!"
-
IrishPeter
- Driver
- Posts: 1400
- Joined: Wed Feb 23, 2011 3:24 am
- Location: 'Boro, VA
Re: My Winter Project - 2 Car Multiple Unit
I rather like those. Another cracking job!
Cheers,
Peter in VA
Cheers,
Peter in VA
Traffic Pattern? What pattern? Spuds out; grain in, but cattle, sheep and passengers are a lot less predictable.
Who is online
Users browsing this forum: No registered users and 4 guests