
Steve,
Thanks for the advice, I don't have a lot of experience with these things. I did read as much as poss before going ahead, but personal experience is always valuable.
Yep, I have a balance charger and have spoken to a tech adviser at Hobbyking ( who suppled both battery and charger) so am aware of the storage and self-combustion issues.
Thanks again.
Styrene sheet moulding - Quintus build - FINISHED
-
-steves-

- Administrator

- Posts: 2444
- Joined: Thu Jul 28, 2011 1:50 pm
- Location: Cambridge & Peterborough
Excellent, then I am sure it will be great. The balance charger might show you the voltage status of each cell during charge, on most balance chargers with a display you simply "press one of the buttons" and it will change between overall charge status of the pack to individual cell voltage, very handy.philipy:116072 wrote:Steve,
Thanks for the advice, I don't have a lot of experience with these things. I did read as much as poss before going ahead, but personal experience is always valuable.
Yep, I have a balance charger and have spoken to a tech adviser at Hobbyking ( who suppled both battery and charger) so am aware of the storage and self-combustion issues.
Thanks again.
Personally over the years I have never had one go up, so they aren't all that bad and I have abused them, lots. It doesn't take abuse for them to pop, just bad luck I think, but if one is hissing, do not pick it up or try to move it, it will seriously burn.
I am pleased HobbyKing were helpful, they have always had good customer service for me too.
Sorry, I digress, cracking on with the build sir.
The buck stops here .......
Ditton Meadow Light Railway (DMLR)
Member of Peterborough and District Association
http://peterborough.16mm.org.uk/
Ditton Meadow Light Railway (DMLR)
Member of Peterborough and District Association
http://peterborough.16mm.org.uk/
It's been a long time coming but finally the body has been outshopped in works grey!
I still need to do some work to the GRS chassis - trimming down those massive cylinders and valve chests to something closer to the prototype and adding a second dummy slidebar, for certain.
Plus, ideally removing the balance weights from the cranks, has anyone any experience of doing that?

I still need to do some work to the GRS chassis - trimming down those massive cylinders and valve chests to something closer to the prototype and adding a second dummy slidebar, for certain.
Plus, ideally removing the balance weights from the cranks, has anyone any experience of doing that?
Philip


-
Peter Butler

- Driver

- Posts: 5245
- Joined: Sun Sep 09, 2012 10:33 pm
- Location: West Wales
I totally agree, that is an excellent model, well thought out and constructed. I do like to see them in works grey before the final coat when all of the component parts are given the same degree of importance, which is probably why the cylinders etc stand out more at this stage.
The best things in life are free.... so why am I doing this?
Thanks for the comments, guys.
Graham, I may well paint them as you suggest, to start with at least, but I'm inclined to take a Dremel slitting disc to them, longer term.
Grant, thanks.
Peter, you may be right that the colour difference make the cylinders stand out, but they are definitely oversized for this loco and the MW doesn't have the big square valve chests either. I'm thinking they need taking down to the same diameter as the end plate. Even then they will be a bit big but I can live with them at that size.
Philip

Rik,ge_rik:117601 wrote:Wow!! She sure is looking good, Philip.
Can I just ask where you source your pipework fittings? Did you scratchbuild them, bash them or buy them? They're the finishing touch which certainly brings the model to life.
Rik
A bit of all of those options, the expression "bodgeling" springs to mind!
Most of the basic pipework is brass or nickel silver wire/rod. The flat sections, i.e, reversing rod etc, are nickel silver. Most of it is stock, some dating back 20 odd years to my active 4mil days! A few bits were purchased from Eileens Emporium.
After that its a matter of adding bits and pieces of brass and styrene tube etc, so that things look about right, working from the drawings in SMT and the photo's.
As a f'rinstance, the lubricators in front of the smokebox:
These started with a small piece of white ABS tube for the body, then drill a small transverse hole right through and insert a length of ABS rod right through and glue it.
Cut a small ring of ABS tube and fit it onto a small flat head brass pin ( inherited from my dad in a box of junk!), give it a good soak of "Plasticweld" which rounds the edges.
Then cut the brass pin down to a suitable length and insert into the top end of the original tube.
Next get a piece of brass wire of a suitable diameter for the bottom feed tube and drill up from the bottom of the main body to cut through the cross piece.
Squirt a little drop of superglue into the body and insert the wire, once it has set, bend the wire to shape.
Then trim the cross piece to length both sides and glue on a very small piece of plasticard rod, to act as the handle of the valve.
Took about an hour to make two of them, including some bits that dropped on the floor and weren't worth searching for!
The handrail knobs are D-shaped brass wire ( e-bay) squeezed round the the handrail rod.
Rod, wire, tube and small washers can be transformed into all sorts of things with a bit of imagination!
Philip
I suspected as much - they are a credit to the work which went into them. I do enjoy hearing about the ingenuity of fellow modellers - especially when it comes to fine detailing.philipy:117611 wrote: Rik,
A bit of all of those options, the expression "bodgeling" springs to mind!
Most of the basic pipework is brass or nickel silver wire/rod. The flat sections, i.e, reversing rod etc, are nickel silver. Most of it is stock, some dating back 20 odd years to my active 4mil days! A few bits were purchased from Eileens Emporium.
After that its a matter of adding bits and pieces of brass and styrene tube etc, so that things look about right, working from the drawings in SMT and the photo's.
As a f'rinstance, the lubricators in front of the smokebox:
These started with a small piece of white ABS tube for the body, then drill a small transverse hole right through and insert a length of ABS rod right through and glue it.
Cut a small ring of ABS tube and fit it onto a small flat head brass pin ( inherited from my dad in a box of junk!), give it a good soak of "Plasticweld" which rounds the edges.
Then cut the brass pin down to a suitable length and insert into the top end of the original tube.
Next get a piece of brass wire of a suitable diameter for the bottom feed tube and drill up from the bottom of the main body to cut through the cross piece.
Squirt a little drop of superglue into the body and insert the wire, once it has set, bend the wire to shape.
Then trim the cross piece to length both sides and glue on a very small piece of plasticard rod, to act as the handle of the valve.
Took about an hour to make two of them, including some bits that dropped on the floor and weren't worth searching for!
The handrail knobs are D-shaped brass wire ( e-bay) squeezed round the the handrail rod.
Rod, wire, tube and small washers can be transformed into all sorts of things with a bit of imagination!
I'm afraid my fingers become thumbs when I try doing the fiddly bits - but I'm willing to have another go after reading your descriptions.
Rik
Knowing it can be done, and having a pointer as to how, is 90% of the battle. Thats exactly how your Deltang expertise helped me.ge_rik:117613 wrote:
I'm afraid my fingers become thumbs when I try doing the fiddly bits - but I'm willing to have another go after reading your descriptions.
Rik
Philip
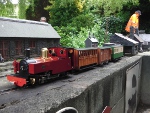
Octavius finally finished
The nameplates arrived from NarrowPlanet a few days ago and Octavius is now finally finished, apart from some necessary tweaking of the soundcard.


Philip
-
Peter Butler
- Driver
- Posts: 5245
- Joined: Sun Sep 09, 2012 10:33 pm
- Location: West Wales
Thanks chaps.Peter Butler:119059 wrote: Lots of nice detail and lining.... (where did that come from?)
!
Peter,
The lining was DIY waterslide. I used Draftsight ( which is a freebie Autocad lookalike and very good) to draw a simple outline of the cabside, ends and tank side. Then drew the lining and fiddled about with it until I got it looking about right - did several versions with the lining at different line thicknesses and configurations until I was happy. Then laser printed it onto white waterslide decal paper ( black central line and green outer line to edge the white. The difficult bit was then cutting round it all, but a ruler, pointed scalpel and care did the job. Most of it is straight lines, so only the curved corners are dicey.
Philip

A very nice build, and a lovely looking loco  painting our the cranks worked well, I had to zoom in to see if they were still there, very cool
Jon
Have fun steaming
Now put the kettle on....sit back and browse my webpage http://fwpl.webs.com/
Have fun steaming
Now put the kettle on....sit back and browse my webpage http://fwpl.webs.com/
Who is online
Users browsing this forum: No registered users and 15 guests