Page 1 of 1
Slate tile roofing
Posted: Sun Apr 20, 2014 11:40 pm
by Mrs F Controller
Been trying to make my own slate tiles from flooring tiles but cannot split them thin enough. Has anyone else tried doing it and how about using roofing tiles instead? Any finer?
Posted: Mon Apr 21, 2014 12:21 pm
by kandnwlr
That´s a challenge I haven´t gone for yet

You can buy reconstituted "stone" slates for roofing from 1:12 dolls house suppliers. They´re not that expensive, but require the patience of a saint to put them on one at a time ....

Posted: Mon Apr 21, 2014 3:57 pm
by bigtrainman2351
try roof slates have seen someone at a railway show splitting the he used a tile cutter to get the size then soaked them in water said they can only be cut wet. then cut the using a stanley knife blade in a xacto knife handle hope this may help
Posted: Mon Apr 21, 2014 7:14 pm
by ikcdab
This all sounds very difficult!
I have just completed a platelayers hut and used the old tried and tested method of strips of plasticard scored for individual slates. Then spray painted.
At the moment it looks fine.
Posted: Mon Apr 21, 2014 8:05 pm
by Dr. Bond of the DVLR
I have slit model slate tiles, as I understand it the slate needs to be of the finest grain possible to get it to a mm or thinner. The slate I had a go with was from a quarry in ffestiniog and had to be kept in a bucket of water to keep it wet. Apparently as soon as it dries out it doesn't come off in leaves, it crumbles a bit. I used a standard stanley knife blade mounted onto a handle that could be tapped with a hammer and it was a matter of halving each block again and again and again. It is easier if each block is just slightly bigger than the slate size you want so that they can be easily trimmed to size over a straight edge with a sturdy metal ruler.
Posted: Tue Apr 22, 2014 8:51 am
by bazzer42
I'm with Mr Dab and use black plasticard, 30mthou and just sand them to take the black edge away from the colour. Would love to use real slate but haven't got the time, or slate to make real ones.
Posted: Tue Apr 22, 2014 7:49 pm
by Mrs F Controller
Mr. Bond of the DVLR:99841 wrote:I have slit model slate tiles, as I understand it the slate needs to be of the finest grain possible to get it to a mm or thinner. The slate I had a go with was from a quarry in ffestiniog and had to be kept in a bucket of water to keep it wet. Apparently as soon as it dries out it doesn't come off in leaves, it crumbles a bit. I used a standard stanley knife blade mounted onto a handle that could be tapped with a hammer and it was a matter of halving each block again and again and again. It is easier if each block is just slightly bigger than the slate size you want so that they can be easily trimmed to size over a straight edge with a sturdy metal ruler.
Yes I agree with everything you've said Mr Bond! We were trying to split flooring tiles and Mr F C did wonder whether they were fine enough grain and being a geographer proceeded to inform me on how slate is formed! We are going to try roofing tiles instead. We followed the same process as you apart from keeping them in a bucket! Mr F C was dubious about the keeping them wet as he said ' slate is impervious that's why it's used for roofs!?' Also he has video of old slate mines and the process of dressing the slate and doesn't remember water being involved! But, if it works we will happily do it!
Off to Jewsons to buy a roofing tile....
Posted: Tue Apr 22, 2014 9:17 pm
by Dr. Bond of the DVLR
Keep us posted with how it turns out! For getting the all the same size the tool I used was a T shaped dowel, the bar along the top was used to run along the edge of a thin piece of slate, it had a nail in it which scribed a line parallel to the edge, it was turned over and used to scribe the other dimension as the other side had a nail in it at a different spacing away from the top of the T. In this way the long and short sides of the slate are determined, its then just a matter of chipping the slate away over a straight edge.
Posted: Thu Apr 24, 2014 12:32 am
by Mrs F Controller
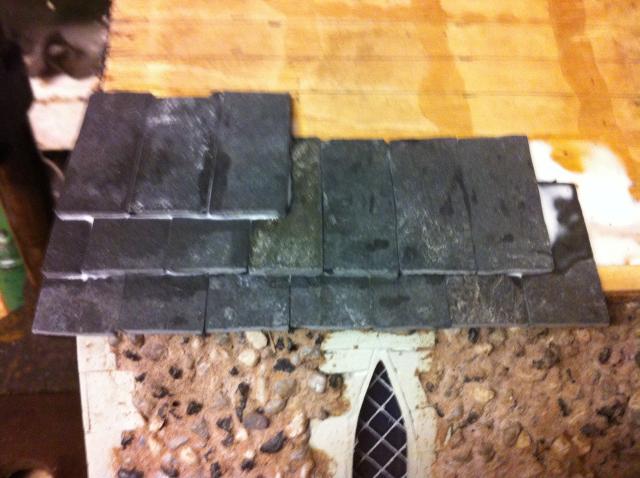
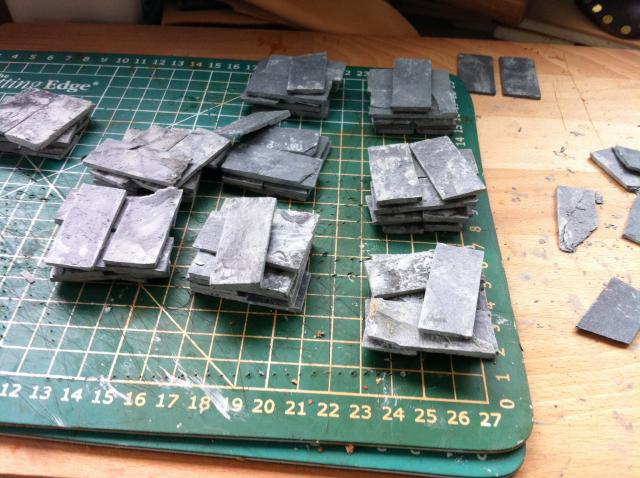
Right then, day off work so finished my tap class and went to a roofing reclaimation place and picked up 5 Welsh roofing slates! Mr F C had spent the night before pouring over geology maps deciding where the best slates come from! Apparently you can get Welsh, Spanish and Chinese! So we decided on Welsh and the man at the yard agreed. So Mr F C spent the afternoon cutting said tiles with our brand new tile cutter as the other blew itself up and started to split them. And here are a few to as the evidence!

Not bad eh! A little thick but using the ten foot rule and the relative small cost to buying ready made slates, worth a try! So I spent a few minutes trying out the effect on the church! What do you think?
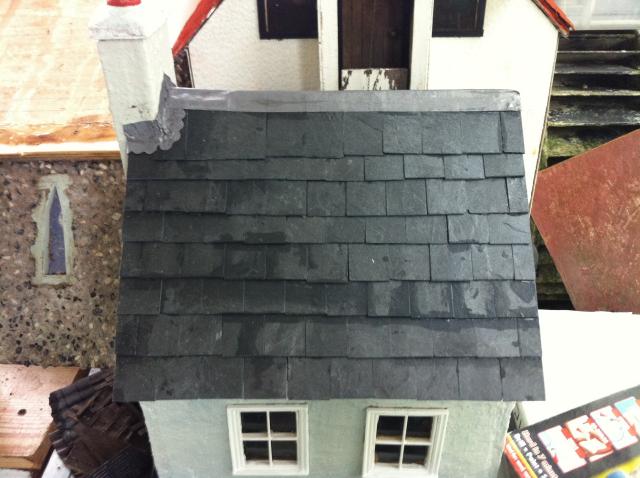
Just as a comparison this is the cottage roof I did the other day with Richard Stacey's roofing tiles. To cover the church in these would cost £50-60 so perhaps now you see why we are doing it this way!

Posted: Thu Apr 24, 2014 6:54 am
by philipy
I like the church, well done.
Can't see the other pictures though, just 'broken picture' icons and it says they "contain errors".
Posted: Thu Apr 24, 2014 8:00 am
by Mrs F Controller
Tried again don't know what happened there!
Posted: Thu Apr 24, 2014 12:58 pm
by philipy
Thanks, thats better!
Yours look just as good and in some ways better - more weathered. Is the thickness just down to lack of confidence in splitting them all again successfully, or is it a material limitation?
I'm seriously thinking I might have a go at it on a couple of buildings I'm planning.
Posted: Thu Apr 24, 2014 2:13 pm
by Mrs F Controller
Thank you! Yes I think it's limitations on the material although he does seem to have got better as it went along. Also getting the right tiles helped as the flooring tiles didn't split well at all. We went for Welsh slate as that seemed to look better in the yard. He did cut the tile up into the right size first as we felt that splitting the whole tile to such a thinness would make it too weak to cut to size? But willing to give it a go. The only reason I started this is not because it is more realistic but down to needing to have a durable roof material.
Posted: Thu Apr 24, 2014 4:25 pm
by Dr. Bond of the DVLR
Nothing beats real slate!
What are you sticking them on with?
Posted: Thu Apr 24, 2014 4:58 pm
by Mrs F Controller
Well, I would never have used it but Richard Stacey suggested it and it seems to work. They sell PVA but I actually went to B&Q for a large pot of exterior waterproof PVA and it's lovely gloopy stuff that seems to have stuck the first lot of purchased tiles a treat! Did considering tacking them on as they are put on but speed is of the essence open day in July! Will soon be here and got 3 more roofs to do!
Posted: Thu Apr 24, 2014 8:50 pm
by laalratty
That looks very good, I've got a single slate cut by Richard Copperwheat that he gave me at the WHHR years and years ago, he had waggons full of them running round.
Posted: Thu Apr 24, 2014 9:38 pm
by kandnwlr
Mrs F Controller:99960 wrote:Well, I would never have used it but Richard Stacey suggested it and it seems to work. They sell PVA but I actually went to B&Q for a large pot of exterior waterproof PVA and it's lovely gloopy stuff that seems to have stuck the first lot of purchased tiles a treat! Did considering tacking them on as they are put on but speed is of the essence open day in July! Will soon be here and got 3 more roofs to do!
Many thanks for the suggestion. Now then, just need to launch B&Q in France, and all is well. But my guess is that my local DIY has something similar. I´m about to try some dry stone walling, but need something to help beyond the laws of physics (aka "dry").
Posted: Thu Apr 24, 2014 11:02 pm
by Mrs F Controller
Like it! I expect you could find it in DIY shop even in France! We've used it a lot in the past especially making the church as I added it to the concrete mix to stick the stones to the walls! So I should think it will be perfect for adding to your dry stone walling!