Page 1 of 1
From flat wagon to bogie cable reel carrier
Posted: Thu Mar 20, 2014 7:14 pm
by andymctractor
I built two Jims flat wagon kits but wanted them as match trucks for a scratchbuilt mounted crane so I added an extra axle to each to make them look more the part. However, after completing a Pechot crane kit and two suitable match trucks for that, the flat wagons became part of an engineering train.
These flat wagons can be seen in the following photo at the far right end of the nearest track.

As part of a separate project I constructed a cable reel out of coffee stirrers but it was too large to be carried even on a bogie low wagon. The answer was to hang the reel on a framework between bogies. I utilised the flat wagons as bogies and the result is below. I'm quite pleased with it as it runs well both pushed an pulled across pointwork.

Another view of the set up can be seen in the following photo.
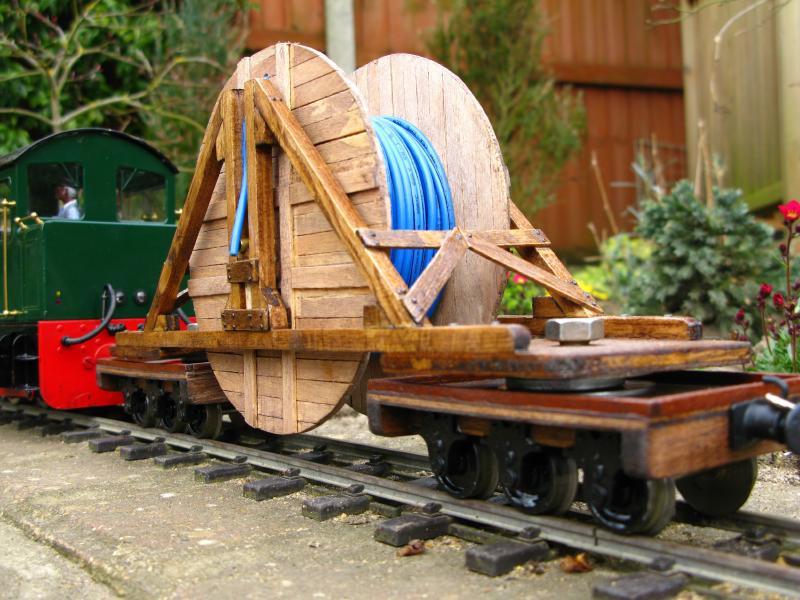
An engineering perspective was offered from the O gauge guys at the local model railway club and it was suggested on a 12"/ft version the weight of the reel would cause the gap at the very top of the frame to close as it bent the frame downwards towards the track. I will insert a block to prevent the gap closing.
Anyway, all is well with it and I might even buy the flat wagons again and scratch build the crane from the original project.
Posted: Thu Mar 20, 2014 7:27 pm
by TonyW
That's great!
Posted: Thu Mar 20, 2014 8:33 pm
by jim@NAL
now that's a bloody good looking cable reel well done .I do like that lots .what did u paint etc it with it looks very good
Posted: Thu Mar 20, 2014 8:55 pm
by Gremlin
nicely done, like it a lot. Do you have details of the crane kit
Posted: Thu Mar 20, 2014 9:47 pm
by Big Jim
Nice job. I'm impressed. Are the kits available online?
Posted: Thu Mar 20, 2014 11:11 pm
by andymctractor
The cable reel and the frame was 'painted' with Rustins Wood Dye Antique Pine which can be purchased in quite small cans, which lasts ages for this kind of work. It makes softwood like coffee stirrers look old and sun dried. The frame was treated with more coats and was then given a couple of coats of waterproof brush on satin varnish.
The frame was scratchbuilt and the design had more to do with what bits and bobs I had in my overflowing odds and sods box. Improvements could be made by being more careful not to allow adhesive to spread onto surfaces intended for the dye treatment.
The rivet/bolt details on the frame are 4mm Peco track pins that were pre drilled and glued into position.
The crane kit comes from
Wrightscale and comes with one bogie to mount it on. Its not the simplest kit to make but will benefit from much double checking before you glue things together. Also, some of the instructions didn't fully make sense until I'd completed the kit when it all became very clear.

My set up includes two extra bogies converted to match trucks with scribed plasticard decks and misc. add on parts. I didn't use the safety chains supplied but used ones from Brandbright.
The 6 wheel flat wagons (the bogies for the cable carrier) are the 4 wheel flat wagons from
Jims Models but I asked for extra white metal castings and wheelsets to convert them to 6 wheel wagons. I also added some stripwood round the edge of the deck of the wagons as they were originally intended to hold track maintenance tools.
Both Wrightscale and Jims Models advertise in SMT and will be at the Peterborough show.
Wrightscale has a website (
www.wrightscale.co.uk/accessories.html) but its not the most useful, I found phoning 013398 86494 the most useful route to order. You may need to phone a number of times to get an answer but be patient as he is very helpful once you get a reply.
Jims Models has a website (
www.jimsmodels.co.uk/Kits.htm)
Hope this helps
Posted: Thu Mar 20, 2014 11:49 pm
by MDLR
andymctractor:98073 wrote:Improvements could be made by being more careful not to allow adhesive to spread onto surfaces intended for the dye treatment.
I've taken to staining kit components before I start assembly, to avoid that very problem. I also stain the parts of my wooden platforms, because it's hard to dribble the stain between the slats of the top surface once it's assembled and somebody
ALWAYS spots the bits you've missed!
Posted: Fri Mar 21, 2014 3:38 pm
by andymctractor
MDLR:98075 wrote:I've taken to staining kit components before I start assembly, to avoid that very problem.
I must admit I never thought of that.
It does assume some forward thinking or compliance with some sort of plan though. I thought that a good sanding to tidy up the various wood components would double up as a surface cleaner but it didn't work out. In my defence the unit is purporting to be a rabbit job built in the nearby Navy dockyard by shipwrights rather than by railway engineers complying with strict criteria.

Posted: Fri Mar 21, 2014 4:22 pm
by MDLR
I got the "Been There, Done That" Tee shirt before I started doing it - it works well with Brandbright panelled coaches, too!