Discussion of Rolling Stock related topics should go here
-
taliesin001
Post
by taliesin001 » Sun Aug 25, 2013 7:28 pm
the latest project goes up a few scales. helping build a 5 inch gauge line at the nearby nene valley railway has made me think about having a go at building a scale piece of rolling stock to go on it. A bug box seemed like a good idea. Drawings were scaled up from 7mm ones and the parts were kindly cut out by WVLR. Yesterday I began construction, getting the base and sides together, and today the end were attached to create the body. The picture below shows current progress.

Uploaded with
ImageShack.us
-
laalratty
Post
by laalratty » Sun Aug 25, 2013 8:41 pm
Interesting idea Lewis, the body looks good. Is it going to be ride on?
-
METHSSNIFFER
Post
by METHSSNIFFER » Sun Aug 25, 2013 8:43 pm
Renamed a Bum Box though I would be reluctant to sit on a curly roof version
-
taliesin001
Post
by taliesin001 » Sun Aug 25, 2013 8:59 pm
It's not intended to be ride on, just as a large scale model. I think the width and sacrifice of detail to increase strength prohibit this.

-
WVLR
Post
by WVLR » Sun Aug 25, 2013 9:09 pm
It's looking great, so nice to see the parts come together.
-
taliesin001
Post
by taliesin001 » Mon Aug 26, 2013 7:24 pm
thanks for the picture mike.
Also wondering if anyone has any pictures of the interior?
-
Dr. Bond of the DVLR
- Retired Director

- Posts: 4533
- Joined: Tue Jun 09, 2009 9:43 pm
- Location: Suffolk
-
Contact:
Post
by Dr. Bond of the DVLR » Mon Aug 26, 2013 8:37 pm
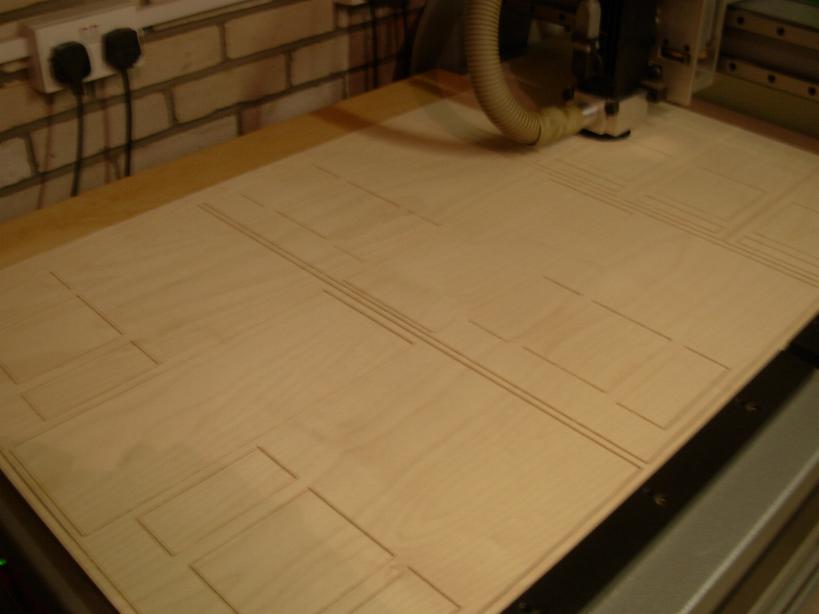
That machine is big enough for 5 inch gauge carriage parts WVLR? This opens up many possibilities
Looks great, it will have to go to JoL at some point

The railway which people forgot
(to build)
-
WVLR
Post
by WVLR » Mon Aug 26, 2013 10:45 pm
That machine is big enough for 5 inch gauge carriage parts
Yes, it can handle 700mm x 1220mm x 60mm to an accuracy of 0.025mm.
-
taliesin001
Post
by taliesin001 » Thu May 15, 2014 12:52 pm
-
MDLR
Post
by MDLR » Thu May 15, 2014 4:36 pm
Precision Paints LNER Tourist Stock Cream and Green.......................
-
laalratty
Post
by laalratty » Thu May 15, 2014 8:41 pm
That looks very nice indeed, would go well with the 5 inch gauge Moelwyn that now runs on the Joys of Life Railway (and its driving truck, a lovely model of one of the PW vans).
-
taliesin001
Post
by taliesin001 » Fri May 16, 2014 11:16 am
Thanks, I'll have to visit at some point over summer. The plan is to build the simplex to go with it eventually

-
Keith S
- Driver

- Posts: 1668
- Joined: Thu Feb 24, 2011 11:44 pm
- Location: Canada
Post
by Keith S » Fri May 16, 2014 3:37 pm
I approve of this. I think the 5 inch gauge trains would look better if a couple of the wagons didn't have a giant person perched on top of them.
-
laalratty
Post
by laalratty » Fri May 16, 2014 8:46 pm
Keith S:100699 wrote:I approve of this. I think the 5 inch gauge trains would look better if a couple of the wagons didn't have a giant person perched on top of them.
We have generally found this to be the case at the Joys of Life, however when we get lots of passengers it is a bit of a compromise, we do have some goods wagons which we run goods or mixed trains
-
taliesin001
Post
by taliesin001 » Thu Jun 26, 2014 11:35 pm
-
laalratty
Post
by laalratty » Fri Jun 27, 2014 8:46 pm
Superb as ever.
-
Andrew
- Moderator

- Posts: 3422
- Joined: Tue Jul 03, 2012 1:33 pm
- Location: Bristol, UK
-
Contact:
Post
by Andrew » Fri Jun 27, 2014 10:28 pm
laalratty:102119 wrote:Superb as ever.
It is, isn't it? Looking forward to photos of the finished thing...
Andrew.
-
taliesin001
Post
by taliesin001 » Wed Jul 16, 2014 11:14 pm
thanks very much, past couple of days have seen the project near completion, just a few bits of painting, add handles and crests still to do. pictured here with my 16mm example to show difference in size.
 free image host
-
WVLR
Post
by WVLR » Thu Jul 17, 2014 8:21 am
Wow, that is just superb - well done.
Who is online
Users browsing this forum: No registered users and 15 guests