As some of you will already know, I bought a pair of IP Engineering Mandie Railbuses some time ago, to be numbered 18A and 18B in the MDLR Stock List.
I've now started work on them, and will be writing up the work as it progresses. Today's post:
17th July
Started work today. Not a serious amount of physical work (apart from detaching the main parts of each body and sanding their edges – laser-cut edges seem to soak up a LOT of paint) but a lot of planning and decision making. As I’ve got a pair to play with, there will be some modifications from what Mr IP Engineering lays down in his instructions. Body sides are to be swapped between the kits, so there’s an entrance in each corner of each car, rather than both at one end. The entrance doors will have droplight windows with straps to open them.
As the rear entrances will become emergency doors between the halves of the twin set, we need some way for the passengers to get on and off! The motors will be installed at the opposite end to that suggested as there’s to be a half-width cab (at the left hand side as you face the end) with a Driver’s seat. The wiring runs will also be shorter.
The sides are to be double skinned with an inner skin of 0.8mm ply with the glazing in between the two skins – the ends won’t need it as the radiator end has the Driver’s desk which will hide the bottom edge of the glazing and you won’t be able to see the inner ends very well. The motors are going to need boxes making to fit over them – the top will provide extra seating. All seats will be covered in leatherette, and there’ll be a leatherette blind behind the Driver’s seat to stop light from the saloon from impeding his vision. The unit will be fully lit – directional lighting - headlamp and tail lamp at each end – and interior lights. I have a number of spare roof ribs from other kits which just happen to be the same radius as the roof of this kit, so they will be used to support the lighting bar down each car.
I’ve decided on the colour scheme – the interior will be stained with wood stain, whilst the exterior will be County Donegal – style red and cream, with the inner ends of the unit all red and the outer ends cream and Warning Panel Yellow – this is, after all, a modern piece of traction!
More to follow (and pictures) as I do it!
AGNES / PERDITA
-
Dr. Bond of the DVLR

- Retired Director

- Posts: 4533
- Joined: Tue Jun 09, 2009 9:43 pm
- Location: Suffolk
- Contact:

-
90733
- Driver

- Posts: 1955
- Joined: Wed Dec 16, 2009 6:17 pm
- Location: West Yorkshire
- Contact:
-
MDLR
18th July
Had a frustrating time trying to buy a SMALL sheet of acrylic glazing sheet – none of the local DIY sheds had got any – have to try Derby in the week! I got on with the painting of the body panels – grey primer, acrylic red and enamel cream and Warning Panel Yellow. The latter was a REAL disappointment – it’s very “thin” and even two coats aren’t going to be enough! (2 coats on the left, 1 on the right)

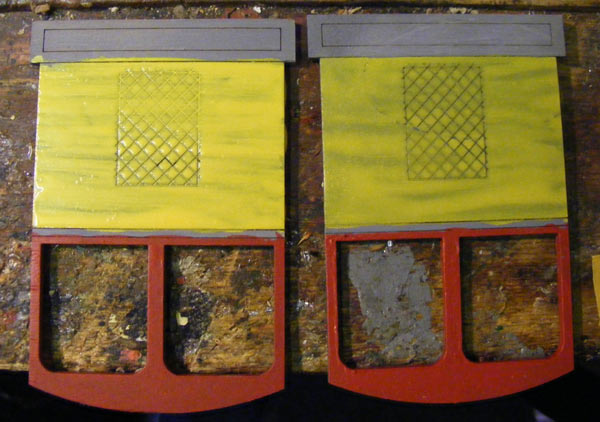
As you can see, the livery's got modified already! I decided there wouldn't be enough contrast between cream upper ends and the yellow warning panels, so the upper ends are now red!
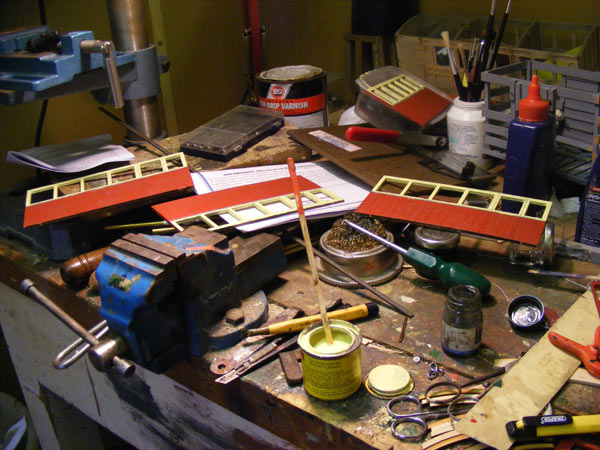
I think I’m going to “chicken out” over the black line which divides the body colours: though I could try and paint between the lasered lines, I think I’m going to buy a roll of lining tape!
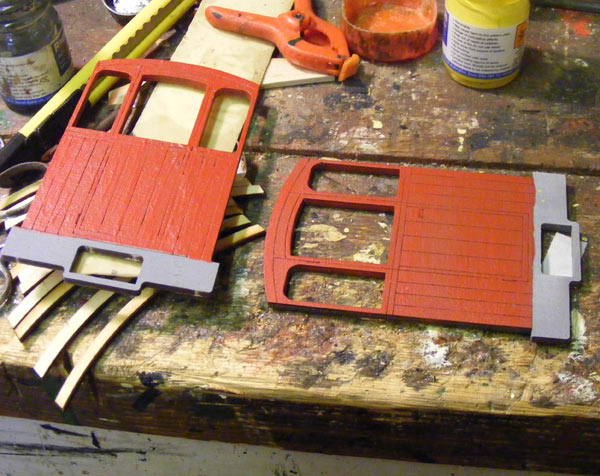
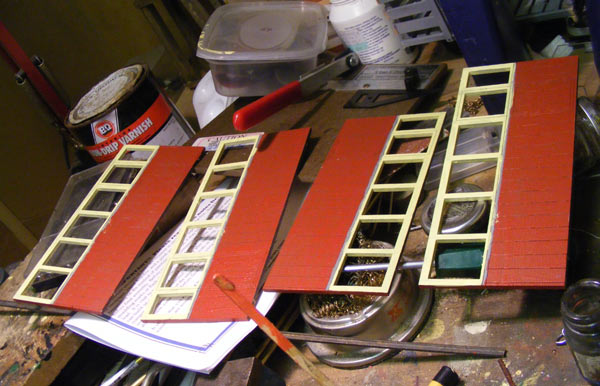
Had a frustrating time trying to buy a SMALL sheet of acrylic glazing sheet – none of the local DIY sheds had got any – have to try Derby in the week! I got on with the painting of the body panels – grey primer, acrylic red and enamel cream and Warning Panel Yellow. The latter was a REAL disappointment – it’s very “thin” and even two coats aren’t going to be enough! (2 coats on the left, 1 on the right)
As you can see, the livery's got modified already! I decided there wouldn't be enough contrast between cream upper ends and the yellow warning panels, so the upper ends are now red!
I think I’m going to “chicken out” over the black line which divides the body colours: though I could try and paint between the lasered lines, I think I’m going to buy a roll of lining tape!
Last edited by MDLR on Tue Nov 30, 2010 8:30 pm, edited 1 time in total.


-
Dr. Bond of the DVLR
- Retired Director
- Posts: 4533
- Joined: Tue Jun 09, 2009 9:43 pm
- Location: Suffolk
- Contact:
-
MDLR
19th July
A frustrating day’s shopping, this.
The MDLR’s Stores Dept was right out of glazing material and I needed to buy some. Investigations at my two local B&Q stores yesterday proved fruitless, so at lunch I went to the nearest store in Derby. “Where do you keep the acrylic glazing sheets?” I asked as I walked in. “At our other store in Derby” was the reply. It was too far to go in my lunch hour, so when I got home I rang the store. “We’re a Warehouse – we don’t sell single sheets. Would you like 20?” RETRTYGH*&&^%£!!!
I then looked up Wickes on the internet, found what I wanted and rang my local store. “We’ve got 14 in stock, sir”. RESULT!! A quick trip back into Derby (the store’s about 5 minutes from where I work but I wouldn’t use the works van in the day – oh, no!) resulted in the sheet being purchased and put away – I’ve enough glazing for YEARS!
Actual progress has been confined to more Warning Panel Yellow on the outer ends, plus spraying the two Cambrian Mouldings radiators with Plastic Primer, prior to prior to spraying with Plasticote Brass.
A frustrating day’s shopping, this.
The MDLR’s Stores Dept was right out of glazing material and I needed to buy some. Investigations at my two local B&Q stores yesterday proved fruitless, so at lunch I went to the nearest store in Derby. “Where do you keep the acrylic glazing sheets?” I asked as I walked in. “At our other store in Derby” was the reply. It was too far to go in my lunch hour, so when I got home I rang the store. “We’re a Warehouse – we don’t sell single sheets. Would you like 20?” RETRTYGH*&&^%£!!!
I then looked up Wickes on the internet, found what I wanted and rang my local store. “We’ve got 14 in stock, sir”. RESULT!! A quick trip back into Derby (the store’s about 5 minutes from where I work but I wouldn’t use the works van in the day – oh, no!) resulted in the sheet being purchased and put away – I’ve enough glazing for YEARS!
Actual progress has been confined to more Warning Panel Yellow on the outer ends, plus spraying the two Cambrian Mouldings radiators with Plastic Primer, prior to prior to spraying with Plasticote Brass.
Last edited by MDLR on Mon Jul 19, 2010 9:54 pm, edited 1 time in total.
-
MDLR
-
MDLR
-
MDLR
-
MDLR
21st July
It’s been a bit too hot to spend much time in the workshop of an evening (apart from yet more Warning Panel Yellow on the ends) but tonight I finally went into the workshop at around 2300, having cut what is laughingly referred to as the lawn at MDLR Towers. Yet another coat of Warning Panel Yellow went on, as did a coat of semi-gloss black on the radiator centre. I decided to grasp the nettle of the black band ‘twixt red and cream, got my finest paint brush out and had a go. It worked! I’ve got a little touching up of red to do, and the laser-cut windows need another coat of cream: I think the laser cutting “crisps” the plywood and makes it absorb paint much more readily, but fairly soon I can see varnish being applied!
It’s been a bit too hot to spend much time in the workshop of an evening (apart from yet more Warning Panel Yellow on the ends) but tonight I finally went into the workshop at around 2300, having cut what is laughingly referred to as the lawn at MDLR Towers. Yet another coat of Warning Panel Yellow went on, as did a coat of semi-gloss black on the radiator centre. I decided to grasp the nettle of the black band ‘twixt red and cream, got my finest paint brush out and had a go. It worked! I’ve got a little touching up of red to do, and the laser-cut windows need another coat of cream: I think the laser cutting “crisps” the plywood and makes it absorb paint much more readily, but fairly soon I can see varnish being applied!
-
MDLR
27th July
More Warning Panel Yellow……………. (though I think we’re about there), more red paint (the last coat) and more black on the radiators. The cream needs doing again but I wouldn’t do that whilst the red was wet. I did, however, start on sorting out the non-interior-lighting LEDs. I’ve got a pair of awesomely bright clear red LED’s which will make the tail lights – I’ve also got the black bezels that they go into (and lock as you push them home!) but I’ve only got one small white clear one for the headlights, so the one I’ve got, plus a battery pack, have now been stowed in a plastic bag, ready for a visit to my local electronics shop – Messrs Potts, on Babington Lane in Derby http://www.rfpotts.com/.
More Warning Panel Yellow……………. (though I think we’re about there), more red paint (the last coat) and more black on the radiators. The cream needs doing again but I wouldn’t do that whilst the red was wet. I did, however, start on sorting out the non-interior-lighting LEDs. I’ve got a pair of awesomely bright clear red LED’s which will make the tail lights – I’ve also got the black bezels that they go into (and lock as you push them home!) but I’ve only got one small white clear one for the headlights, so the one I’ve got, plus a battery pack, have now been stowed in a plastic bag, ready for a visit to my local electronics shop – Messrs Potts, on Babington Lane in Derby http://www.rfpotts.com/.
-
Narrow Minded
Ah memories!Messrs Potts, on Babington Lane in Derby

I used to pop in there years ago when I worked in Derby! Marvellous place - do the staff still know exactly where everything is, even though most of the stuff is stored in identical looking un-labelled cardboard boxes?
I'd totally forgotten about the place (amazed it's still open really), so a big "Thank You" for the reminder and the trip down memory lane
-
MDLR
Who is online
Users browsing this forum: No registered users and 17 guests