Page 1 of 1
Brandbright GS6 build
Posted: Fri Mar 13, 2026 7:58 am
by Allu
Started a new build, Brandbright 4-plank wagon with opening sides.The model is small enough for my purposes and the kit quality so far seems to be very good. I got the 32mm steel wheels and centre buffers from the same make.
Sharing some photos along the make.

- 1.jpg (71.04 KiB) Viewed 4513 times
The wooden parts are very finely cut, no need for a lot of filing. Also the whitemetal parts need minimal work.
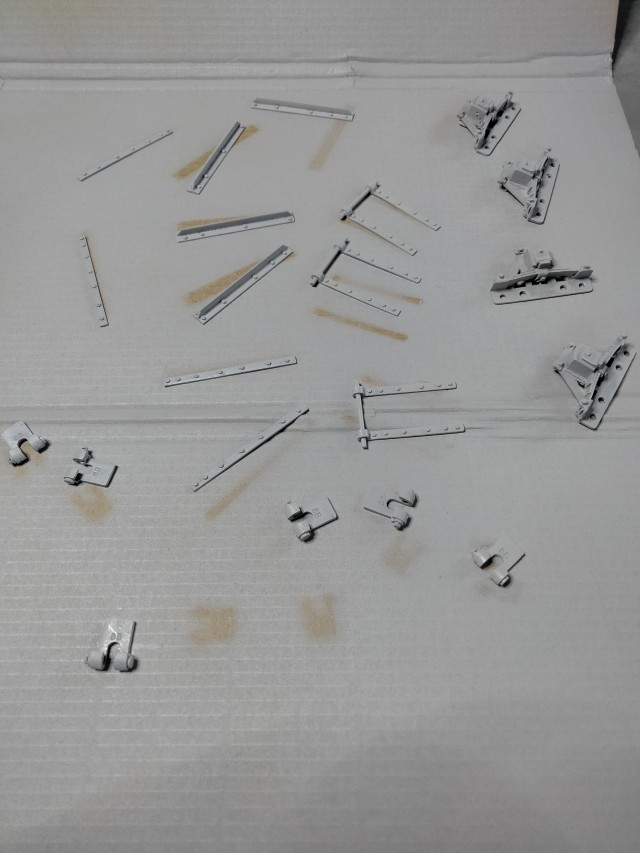
- 2.jpg (79.29 KiB) Viewed 4513 times
Whiteemtal parts getting primer paint (Tamiya Surface Primer)
Re: Brandbright GS6 build
Posted: Fri Mar 13, 2026 8:18 am
by Allu

- 3.jpg (57.07 KiB) Viewed 4509 times
Undercarriage and body getting shape.
Re: Brandbright GS6 build
Posted: Fri Mar 13, 2026 8:48 am
by ge_rik
Looking good, Allu.
Rik
Re: Brandbright GS6 build
Posted: Fri Mar 13, 2026 9:16 am
by Dr. Bond of the DVLR
I really like the GS6 on account of the working drop sides - good choice!
Rather than the brass wire catches supplied for locking the doors, I like to add these whitemetal parts from IP engineering:
https://www.ipenginnering.com/product-p ... on-catches
Re: Brandbright GS6 build
Posted: Fri Mar 13, 2026 10:14 am
by Allu
The IP wagon catches look very authentic indeed! I did not know about those, have to keep in mind for the future. For this build though I wont get them as with the Brexit, the postage, VAT and taxes are horrible getting stuff to Finland. Therefore I usually gather my shopping in 1 or 2 baskets every 2-3 months to consolidate the costs a bit.
Re: Brandbright GS6 build
Posted: Tue Apr 07, 2026 8:52 am
by Allu

- IMG_20260407_104825.jpg (83.62 KiB) Viewed 3846 times
First primer coat with Tamiya Fine Surface primer. I masked the insides of the wagon as they were rarely painted in real life.
Re: Brandbright GS6 build
Posted: Tue Apr 07, 2026 10:51 am
by Allu

- IMG_20260407_124851.jpg (101.81 KiB) Viewed 3832 times
Here gluing the end stanchions.
Re: Brandbright GS6 build
Posted: Wed Apr 08, 2026 9:00 am
by Allu

- IMG_20260408_105307.jpg (90.86 KiB) Viewed 3766 times
Basic painting done. The decal feathering should vanish after weathering and varnish layers applied.

- IMG_20260408_105316.jpg (92.59 KiB) Viewed 3766 times
The opening sides is a nice feature
Re: Brandbright GS6 build
Posted: Wed Apr 08, 2026 12:09 pm
by GTB
Allu wrote: ↑Wed Apr 08, 2026 9:00 am
Basic painting done. The decal feathering should vanish after weathering and varnish layers applied.
Unfortunately a coat of varnish won't fix that....... Been there, done that.....
The effect is called silvering and is caused by air trapped between the decal and the paint. Applying decals to matt or satin paints is the usual cause and the type of clear film used on modern decals seems to be more prone to the problem.
It can usually be fixed by applying decal setting fluid and piercing the bubbles with a sharp point so the decal set can penetrate the gap.
This website covers the basics and there are youtube videos on the subject. A very well known problem in military modelling circles, so there is a lot of info online on the subject of decal silvering and how to prevent and/or fix it.
https://www.hearnshobbies.com/blogs/edu ... 93EIzql7D9
Hobby shops that sell plastic kits should have decal setting fluids available. As always some are better than others.
Graeme
Re: Brandbright GS6 build
Posted: Wed Apr 08, 2026 1:14 pm
by Allu
GTB wrote: ↑Wed Apr 08, 2026 12:09 pm
Allu wrote: ↑Wed Apr 08, 2026 9:00 am
Basic painting done. The decal feathering should vanish after weathering and varnish layers applied.
Unfortunately a coat of varnish won't fix that....... Been there, done that.....
The effect is called silvering and is caused by air trapped between the decal and the paint. Applying decals to matt or satin paints is the usual cause and the type of clear film used on modern decals seems to be more prone to the problem.
It can usually be fixed by applying decal setting fluid and piercing the bubbles with a sharp point so the decal set can penetrate the gap.
This website covers the basics and there are youtube videos on the subject. A very well known problem in military modelling circles, so there is a lot of info online on the subject of decal silvering and how to prevent and/or fix it.
https://www.hearnshobbies.com/blogs/edu ... 93EIzql7D9
Hobby shops that sell plastic kits should have decal setting fluids available. As always some are better than others.
Graeme
Yes, wellknown issue this is. I made a mistake of not applying clear varnish underneath first...that reduces greatly the silvering. I already tried decal softing/setting fluid but it does not help in this kind of case of wood with grain + matt paint

Re: Brandbright GS6 build
Posted: Wed Apr 08, 2026 2:24 pm
by GTB
Allu wrote: ↑Wed Apr 08, 2026 1:14 pm
Yes, wellknown issue this is. I made a mistake of not applying clear varnish underneath first...that reduces greatly the silvering. I already tried decal softing/setting fluid but it does not help in this kind of case of wood with grain + matt paint
Still worth trying the pricking technique, as the decal set needs the holes to penetrate under the decal film. I've managed to get it to work on matt paint, but it's tedious.
You're not alone. Wouldn't be the first time I've had to remove a decal and refinish part of a model.
Graeme
Re: Brandbright GS6 build
Posted: Thu Apr 09, 2026 10:52 am
by Allu
Re: Brandbright GS6 build
Posted: Thu Apr 09, 2026 11:12 am
by ge_rik
Looks good. Hopefully, the first of many more to come .....

Rik
Re: Brandbright GS6 build
Posted: Thu Apr 09, 2026 11:20 am
by Peter Butler
That is a wonderful weathering finish and great overall effect. If you hadn't previously mentioned the decal silvering it probably would have gone unnoticed.
Next time would it be possible to trim off the excess before applying?
Re: Brandbright GS6 build
Posted: Thu Apr 09, 2026 12:45 pm
by LNR
I like the weathering too, is there a way to lock the drop down sides?
Grant.
Re: Brandbright GS6 build
Posted: Thu Apr 09, 2026 12:50 pm
by Allu
LNR wrote: ↑Thu Apr 09, 2026 12:45 pm
I like the weathering too, is there a way to lock the drop down sides?
Grant.
Yes, there is material (brass rod + nut) in the package to do wagon catches but they really are not prototypical so I am looking to either get some from IP or do my own. On the other hand they seem to stay upright quite well on their own, at least for the time being

Re: Brandbright GS6 build
Posted: Thu Apr 09, 2026 2:02 pm
by LNR
Don't know if this is any help or if it suits your prototype, this is what I have made on my bogie opens.

- NQ Build 7.JPG (701.79 KiB) Viewed 3558 times
Grant.